1. Introduction
This manual provides detailed instructions for the safe and proper assembly, operation, and maintenance of your VEVOR Hanging Tree Tent. Please read this manual thoroughly before use and retain it for future reference. This product is designed to provide a comfortable and versatile space for relaxation and play, suitable for both indoor and outdoor environments.
The VEVOR Hanging Tree Tent is constructed from durable 600D waterproof UV-resistant Oxford fabric, featuring multi-stitched top seams and thickened core ropes for enhanced durability and safety. It includes a high-strength steel frame with reinforced D-rings, supporting a maximum weight capacity of 330 lbs (150 kg).
2. Package Contents
Verify that all components are present and undamaged before beginning assembly. If any parts are missing or damaged, please contact VEVOR customer support.
- 1 x User Manual
- 1 x Inflatable Cushion
- 1 x Air Pump
- 1 x Adjustable Rope (4.92ft/1.5m thickened suspension rope)
- 3 x Top Tubes
- 4 x Bottom Tubes
- 4 x Foam Tubes
- 1 x LED Light String
- 1 x Mounting Plate
- 4 x Expansion Bolts
- 4 x Wood Screws
- 2 x Spring Hooks

Figure 2.1: All components included in the package.
3. Safety Information
WARNING: Failure to follow these safety instructions may result in serious injury or property damage.
- Maximum Weight Capacity: Do not exceed the maximum load-bearing capacity of 330 lbs (150 kg). Overloading can cause structural failure and injury.
- Secure Installation: Ensure the tent is securely mounted to a sturdy tree branch or a compatible stand designed for hanging swings. Use the provided mounting hardware correctly.
- Regular Inspection: Before each use, inspect all ropes, hooks, and structural components for wear, damage, or signs of fatigue. Do not use if any part is compromised.
- Supervision: Children should always be supervised by an adult while using the hanging tree tent.
- Clearance: Ensure adequate clearance around the tent to prevent collisions with obstacles or other individuals during swinging.
- Weather Conditions: Avoid using the tent during strong winds, heavy rain, or thunderstorms. Prolonged exposure to extreme weather may degrade materials.
- Flammable Materials: Keep the tent away from open flames, heaters, and other heat sources. The fabric is not fireproof.
- Sharp Objects: Do not bring sharp objects inside the tent that could puncture the inflatable cushion or tear the fabric.
- Proper Use: This product is intended for sitting and gentle swinging. Avoid excessive swinging, standing, or jumping inside the tent.
For additional safety, consider placing soft padding or a mat underneath the tent, especially if used by young children.
4. Setup Instructions
Follow these steps carefully for proper assembly and installation of your VEVOR Hanging Tree Tent.
4.1 Assembling the Frame
- Unpack all components and lay them out on a clean, flat surface.
- Connect the three top tubes to form the upper circular frame.
- Connect the four bottom tubes to form the lower circular frame.
- Slide the foam tubes onto the bottom tubes for cushioning and protection.
- Insert the assembled top and bottom frames into the designated sleeves within the tent fabric. Ensure they are fully seated.

Figure 4.1: Illustration of tent material and frame components.
4.2 Inflating the Cushion
- Locate the inflatable cushion and the air pump.
- Open the air valve on the cushion.
- Attach the air pump to the valve and inflate the cushion until it is firm but not overinflated.
- Close the air valve securely to prevent air leakage.
- Place the inflated cushion inside the tent on the bottom surface.

Figure 4.2: Inflatable cushion and bottom zipper detail.
4.3 Mounting the Tent
The tent can be mounted to a sturdy tree branch or a ceiling using the provided hardware.
4.3.1 Tree Mounting
- Select a strong, healthy tree branch that can safely support the tent's weight and occupants (up to 330 lbs / 150 kg). The branch should be at least 8 inches (20 cm) in diameter.
- Wrap the adjustable suspension rope securely around the chosen branch.
- Attach one of the spring hooks to the loop of the suspension rope.
- Attach the other spring hook to the top D-ring of the tent.
- Ensure the tent hangs level and at a safe height, allowing users to enter and exit comfortably without touching the ground. Adjust the rope length as needed.
4.3.2 Ceiling Mounting (Indoor/Outdoor)
- Identify a suitable mounting location on a sturdy ceiling beam or joist. Ensure the structure can support the tent's weight and occupants (up to 330 lbs / 150 kg). Consult a professional if unsure.
- Position the mounting plate against the ceiling at the desired location.
- Mark the drilling points through the holes on the mounting plate.
- Drill pilot holes using an appropriate drill bit for your ceiling material.
- For concrete ceilings, insert the expansion bolts into the drilled holes. For wood beams, use the wood screws.
- Securely fasten the mounting plate to the ceiling using the provided expansion bolts or wood screws. Ensure it is tightly fixed.
- Attach one of the spring hooks to the mounting plate.
- Attach the other spring hook to the top D-ring of the tent.
- Adjust the suspension rope to achieve the desired hanging height.

Figure 4.3: Detailed view of suspension rope, foam tubes, bottom hooks, and ceiling mount.
5. Operating Instructions
5.1 Using the Tent
- Entry and Exit: Carefully enter and exit the tent. Avoid sudden movements that could cause the tent to swing excessively.
- Comfort: The inflatable cushion provides a comfortable base. The tent's spacious interior (43x43x46 inches) can accommodate up to three children or one adult.
- Internal Storage: Utilize the 5 interior pockets for convenient storage of small items like books, toys, or personal belongings.

Figure 5.1: Spacious interior with storage pockets.
5.2 Adjusting the Top Cover and Side Curtains
The tent features an upgraded dual-layer top and side curtains for versatility.
- Open Configuration: For maximum airflow and outdoor viewing, the side curtains can be opened and secured.
- Closed Configuration: For privacy or protection from light rain/sun, the side curtains can be closed, and the dual-layer top provides additional coverage. The tent is fully enclosed when all openings are secured.
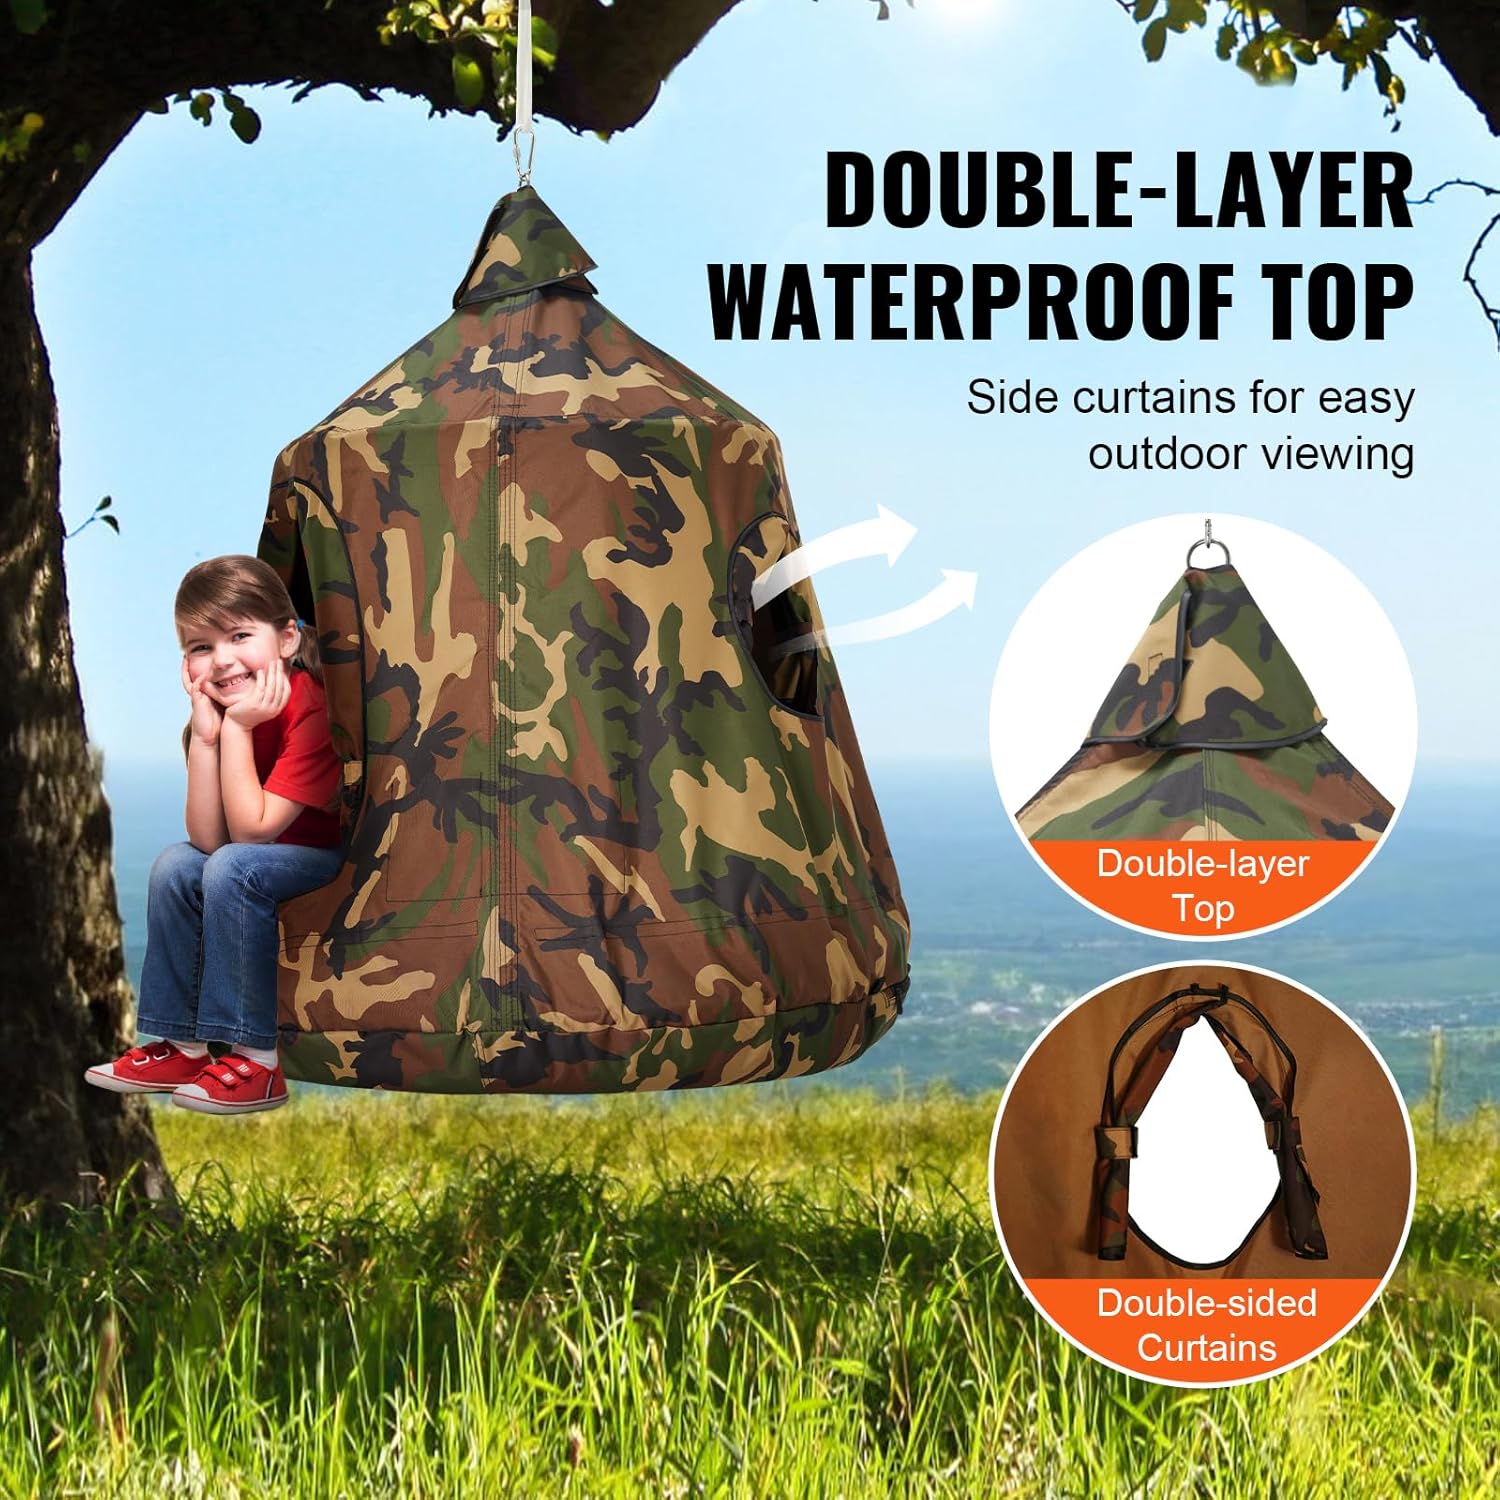
Figure 5.2: Dual-layer top and side curtain functionality.
5.3 Using the LED Light String
The included LED light string can be installed inside the tent to create a pleasant ambiance, especially during evening use.
- Unpack the LED light string.
- Carefully string the lights along the interior frame or ceiling of the tent.
- Ensure the battery pack (if applicable) is placed in a secure, dry location away from direct contact with users.
- Turn on the lights as desired.
Figure 5.3: LED light string for ambiance.
6. Maintenance
Regular maintenance will extend the lifespan of your VEVOR Hanging Tree Tent.
- Cleaning the Fabric:
- Wipe down the 600D Oxford fabric with a damp cloth and mild soap.
- Do not use harsh chemicals, bleach, or abrasive cleaners, as these can damage the fabric and its UV-resistant coating.
- Allow the tent to air dry completely before folding or storing.
- Cushion Care:
- The inflatable cushion can be wiped clean with a damp cloth.
- Ensure the cushion is completely dry before deflating and storing to prevent mold or mildew.
- Store the cushion away from sharp objects.
- Hardware Inspection:
- Periodically check all metal components, including the steel frames, spring hooks, mounting plate, bolts, and screws, for rust, corrosion, or signs of wear.
- Ensure all connections are tight and secure. Re-tighten screws or bolts if necessary.
- Rope Inspection:
- Inspect the suspension rope for fraying, cuts, or excessive wear. Replace the rope immediately if any damage is observed.
- Storage:
- When not in use for extended periods, especially during harsh weather, it is recommended to disassemble the tent and store it in a dry, cool place away from direct sunlight.
- Deflate the cushion before storage.
7. Troubleshooting
This section addresses common issues you might encounter with your VEVOR Hanging Tree Tent.
| Problem | Possible Cause | Solution |
|---|---|---|
| Tent is not stable or sways excessively. | Improper mounting, loose connections, or uneven hanging. | Ensure the mounting point (tree branch or ceiling) is sturdy and capable of supporting the weight. Check all hooks, ropes, and bolts for tightness. Adjust the suspension rope to ensure the tent hangs level. |
| Inflatable cushion deflates quickly. | Valve not properly sealed, or a puncture in the cushion. | Ensure the air valve is securely closed after inflation. Inspect the cushion for any punctures or leaks. If a small puncture is found, a repair kit (not included) may be used. For significant damage, replacement may be necessary. |
| Fabric appears worn or damaged. | Prolonged exposure to harsh weather, sharp objects, or excessive force. | Regularly inspect the fabric for tears or fraying. Avoid using sharp objects inside the tent. Store the tent indoors during extreme weather. Minor tears may be patched with suitable fabric repair kits. Significant damage may require replacement of the tent fabric. |
| LED lights are not working. | Dead batteries, loose connection, or damaged lights. | Check and replace batteries if necessary. Ensure all connections are secure. Inspect the light string for any visible damage. |
If you encounter issues not listed here or require further assistance, please contact VEVOR customer support.
8. Specifications
| Feature | Detail |
|---|---|
| Item Model Number | SW134-TZ-11 |
| Material | 600D Waterproof UV-Resistant Oxford Fabric |
| Weight Capacity | 150 kg / 330 lbs |
| Closed State | Fully Enclosed |
| Product Size (Diameter x Height) | ø110 x 117 cm / ø43.38 x 45.98 inches |
| Product Weight | 6.6 kg / 14.55 lbs |
| Suspension Rope Length | 4.92 ft / 1.5 m (Adjustable) |
9. Warranty and Support
VEVOR products come with a warranty. For detailed warranty information and to register your product, please visit the official VEVOR website or refer to the warranty card included with your purchase.
For technical support, troubleshooting assistance, or to inquire about replacement parts, please contact VEVOR customer service through their official channels. You can often find support contact information on the VEVOR website or on the product packaging.
VEVOR Official Website: www.vevor.com
Technical Support and E-Warranty Certificate: www.vevor.com/support