ASRock B760M-H2/M.2
ASRock B760M-H2/M.2 Motherboard User Manual
Comprehensive Guide for Installation, Operation, and Maintenance
1. Product Overview
The ASRock B760M-H2/M.2 is a Micro ATX motherboard designed for Intel 12th, 13th, and 14th Gen Core Processors, utilizing the LGA1700 socket. It features DDR5 memory support, multiple M.2 slots for high-speed storage, and comprehensive connectivity options including 2.5G LAN and HDMI outputs. This manual provides detailed instructions for setting up, operating, and maintaining your motherboard.
1.1 What's in the Box
Your ASRock B760M-H2/M.2 package typically includes the following items:
- ASRock B760M-H2/M.2 Motherboard
- Quick Installation Guide / User Manual
- Driver CD / USB Drive
- SATA Data Cables
- M.2 Screw Package
- I/O Shield
2. Setup and Installation
Before beginning installation, ensure you have a clean, static-free workspace. It is recommended to wear an anti-static wrist strap to prevent damage to components.
2.1 Pre-Installation Checklist
- Compatible CPU (Intel 12th, 13th, or 14th Gen LGA1700)
- DDR5 RAM modules
- Power Supply Unit (PSU)
- Storage devices (SATA SSD/HDD, M.2 NVMe SSD)
- Graphics Card (if not using integrated graphics)
- Computer Case
- Screwdriver and other necessary tools
2.2 Motherboard Layout
Familiarize yourself with the various components and connectors on the motherboard.
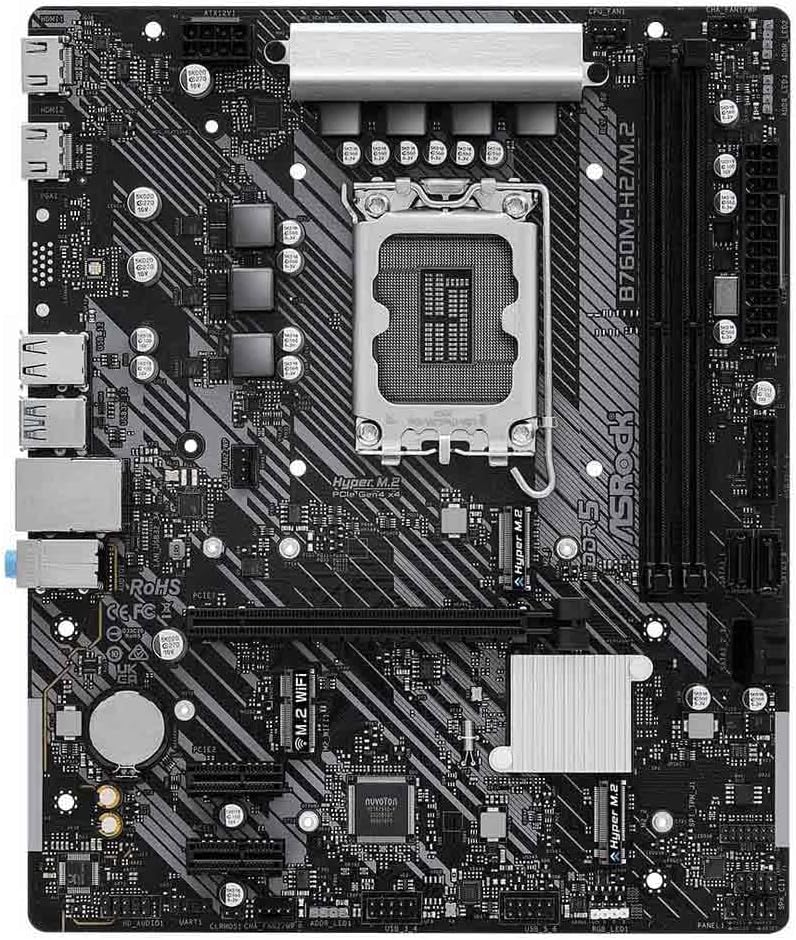
Figure 2.2.1: Top-down view of the ASRock B760M-H2/M.2 motherboard, highlighting the CPU socket, DDR5 DIMM slots, PCIe slots, and M.2 slots.

Figure 2.2.2: Rear I/O panel of the ASRock B760M-H2/M.2 motherboard, featuring HDMI ports, USB ports, LAN port, and audio jacks.
2.3 Component Installation
- CPU Installation:
Carefully open the CPU socket lever. Align the triangular mark on the CPU with the mark on the socket. Gently place the CPU into the socket without forcing it. Close the lever to secure the CPU. Install the CPU cooler according to its manufacturer's instructions.
- RAM Installation:
Open the clips on both ends of the DDR5 DIMM slots. Align the notch on the RAM module with the key in the slot. Press down firmly on both ends of the RAM module until the clips snap into place. For dual-channel operation, refer to the motherboard's silkscreen for recommended slot pairing (e.g., A2 and B2).
- M.2 SSD Installation:
Locate the M.2 slots. Remove the M.2 screw/standoff. Insert the M.2 SSD into the slot at a slight angle. Gently push down the SSD and secure it with the M.2 screw. Note: If installing a GPU, consider installing the M.2 SSD in the bottom slot as per user feedback to avoid clearance issues.
- Graphics Card (PCIe) Installation:
Open the latch on the PCIe 4.0 x16 slot. Align the graphics card with the slot and press down firmly until it is fully seated and the latch closes. Secure the card to the case with screws.
- Power Supply Connections:
Connect the 24-pin ATX power connector and the 8-pin (or 4+4-pin) CPU power connector from your PSU to the corresponding ports on the motherboard. Connect SATA power cables to your storage devices.
- Front Panel Connections:
Connect the case's front panel cables (Power SW, Reset SW, HDD LED, Power LED, USB, Audio) to the appropriate headers on the motherboard. Refer to the motherboard diagram or silkscreen for correct pin assignments.
3. Operating Instructions
3.1 First Boot and BIOS/UEFI Setup
After all components are installed and connected, power on your system. Press the DEL or F2 key repeatedly during startup to enter the BIOS/UEFI setup utility.
- Boot Order: Configure the boot order to prioritize your operating system installation media (USB drive or DVD).
- Date and Time: Set the correct system date and time.
- SATA Mode: Ensure SATA mode is set to AHCI or RAID depending on your storage configuration. For NVMe SSDs, this setting typically does not apply directly.
- XMP/EXPO Profile: Enable the XMP (Extreme Memory Profile) or EXPO profile for your DDR5 RAM to run at its advertised speeds.
- Save and Exit: Save your changes and exit the BIOS/UEFI. The system will restart.
3.2 Operating System Installation
Follow the on-screen prompts to install your preferred operating system (e.g., Windows, Linux). Ensure your installation media is bootable.
3.3 Driver Installation
After OS installation, install the necessary drivers for your motherboard components. These typically include:
- Chipset Drivers
- LAN Driver (for 2.5G Ethernet)
- Audio Driver
- Graphics Driver (if using integrated graphics or a dedicated GPU)
- USB Drivers
- M.2 NVMe Drivers (if applicable)
Drivers can be found on the included driver CD/USB or downloaded from the official ASRock website for your specific motherboard model.
4. Maintenance
Regular maintenance helps ensure the longevity and optimal performance of your motherboard and system.
- Dust Removal: Periodically clean dust from inside your computer case, especially from fans, heatsinks, and motherboard surfaces, using compressed air or a soft brush. Ensure the system is powered off and unplugged before cleaning.
- BIOS/UEFI Updates: Check the ASRock website for the latest BIOS/UEFI updates. Updates can improve compatibility, stability, and performance. Follow the update instructions carefully to avoid system damage.
- Driver Updates: Keep your drivers updated to ensure compatibility with new software and to benefit from performance improvements and bug fixes.
- Cable Management: Ensure cables are neatly routed to improve airflow and prevent obstruction of components.
5. Troubleshooting
This section provides solutions to common issues you might encounter.
5.1 Common Issues and Solutions
- No Power / System Does Not Turn On:
- Check if the PSU is properly connected to the motherboard (24-pin ATX and 8-pin CPU power).
- Ensure the power switch on the PSU is in the 'ON' position.
- Verify front panel power switch connection to the motherboard.
- Test the PSU with another system or a PSU tester.
- No Display / Black Screen:
- Ensure the monitor is connected to the correct display output (motherboard HDMI or dedicated graphics card).
- Reseat the graphics card and RAM modules.
- If using integrated graphics, ensure your CPU supports it.
- Try booting with only one RAM stick.
- Clear CMOS (refer to motherboard manual for jumper/button location).
- System Restarts Randomly / Blue Screens:
- Check CPU and GPU temperatures. Overheating can cause instability.
- Run memory diagnostic tools to check for faulty RAM.
- Ensure all drivers are correctly installed and updated.
- Verify PSU stability and wattage.
- Storage Device Not Detected:
- Check SATA data and power cable connections.
- Ensure M.2 SSD is properly seated and secured.
- Check BIOS/UEFI settings to ensure SATA ports are enabled and M.2 slots are configured correctly.
6. Specifications
Detailed technical specifications for the ASRock B760M-H2/M.2 motherboard.
| Feature | Specification |
|---|---|
| Brand | ASRock |
| Model Name | B760M-H2/M.2 |
| CPU Socket | LGA 1700 |
| Compatible Processors | Intel Core 12th, 13th, 14th Gen |
| Chipset Type | Intel B760 |
| RAM Memory Technology | DDR5 |
| Memory Speed | Up to 7200 MHz (OC) |
| Memory Slots | 2 x DDR5 DIMMs |
| Max Memory Capacity | 96 GB |
| Graphics Output | 2 x HDMI |
| PCIe Slots | 1 x PCIe 4.0 x16, 2 x PCIe 3.0 x1 |
| M.2 Slots | 2 x M.2 (storage), 1 x M.2 Key E (WiFi) |
| LAN | 2.5G LAN |
| Power Phase | 5+1+1 |
| Form Factor | Micro ATX |
| Dimensions (LxWxH) | 9.84 x 11.02 x 2.36 inches |
| Item Weight | 1.76 pounds |
7. Warranty and Support
7.1 Warranty Information
ASRock provides a limited warranty for its motherboards. The duration and terms of the warranty may vary by region and retailer. Please retain your proof of purchase for warranty claims. For detailed warranty information, please refer to the official ASRock website or the warranty card included with your product.
7.2 Technical Support
If you encounter issues that cannot be resolved using the troubleshooting steps in this manual, please contact ASRock technical support. Before contacting support, have your motherboard model number (B760M-H2/M.2) and serial number ready. You can find support resources, FAQs, and contact information on the official ASRock website:
Related Documents - B760M-H2/M.2
 |
ASRock B760M Pro RS & B760M Pro RS WiFi User Manual - Installation and Specifications Comprehensive user manual for ASRock B760M Pro RS and B760M Pro RS WiFi motherboards. Includes detailed specifications, installation guides, motherboard layout, I/O panel information, and setup details for PC builders. |
 |
ASRock B760M-H/M.2 User Manual - Installation and Specifications Comprehensive user manual for the ASRock B760M-H/M.2 motherboard. Learn about specifications, installation steps, I/O panel details, and system configuration for Intel 13th/12th Gen processors. Visit ASRock.com for support. |
 |
ASRock B760M PG Riptide 主機板使用手冊 ASRock B760M PG Riptide 主機板的詳細使用手冊,提供安裝指南、規格、主機板配置、I/O 面板說明,以及 M.2 SSD 和 WiFi/BT 模組的安裝說明。 |
 |
ASRock B760M-C/D4 Motherboard User Manual Comprehensive user manual for the ASRock B760M-C/D4 motherboard. Includes detailed specifications, installation guides for CPU, memory, M.2 SSDs, and connection details for system components. |
 |
ASRock B760M Pro RS User Manual: Installation and Specifications Comprehensive user manual for the ASRock B760M Pro RS motherboard, detailing installation, specifications, I/O panel, connectors, and troubleshooting for Intel 12th/13th Gen processors. |
 |
ASRock B760M-ITX Gen5 WiFi 用户手册 ASRock B760M-ITX Gen5 WiFi 主板的用户手册,提供安装、规格、布局和操作的详细指南,帮助用户充分利用其高性能特性,包括 Intel B760 芯片组、DDR5、PCIe 5.0、Wi-Fi 6E 和 Bluetooth 5.3。 |
Ask a question about this manual
Ask about setup, troubleshooting, compatibility, parts, safety, or missing instructions. Manuals+ will review the question and use this page’s manual context to help answer it.