
Douk Audio F5 Pure Class A
Douk Audio F5 Pure Class A HiFi Vacuum Tube Amplifier
User Manual - Model: F5 Pure Class A
1. Introduction
The Douk Audio F5 Pure Class A HiFi Vacuum Tube Amplifier is designed to deliver a warm, rich, and detailed audio experience for your home audio system. This manual provides essential information for setting up, operating, maintaining, and troubleshooting your amplifier to ensure optimal performance and longevity.
2. What's in the Box
Please check the contents of your package. If any items are missing or damaged, contact Douk Audio customer support.
- 1 * Tube Amplifier
- 1 * Power Cord

Figure 2.1: Contents of the Douk Audio F5 package, including the amplifier, power cord, and vacuum tubes.
3. Product Features and Components
Familiarize yourself with the various parts and features of your Douk Audio F5 amplifier.

Figure 3.1: Front view of the Douk Audio F5 amplifier, showcasing its elegant design and visible vacuum tubes.

Figure 3.2: Detailed view of the front panel controls, including the Power Switch Knob (left) and Volume Knob (right).

Figure 3.3: Rear panel connections, highlighting the dual RCA inputs (CD/AUX), input selector button, speaker outputs, and AC power input.
Detailed Component Views:
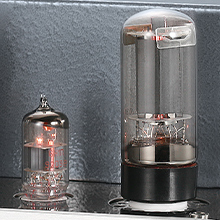
Vacuum Tubes
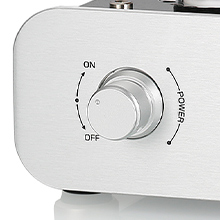
Power Switch Knob
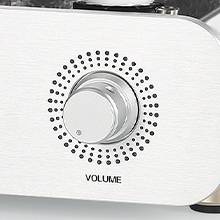
Volume Knob
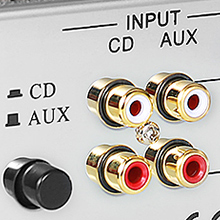
RCA Inputs
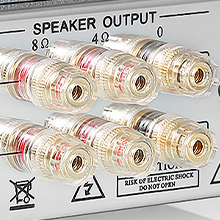
Speaker Outputs
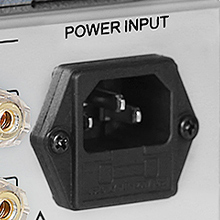
AC Power Input
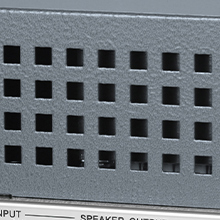
Ventilation Grille
4. Setup
- Placement: Place the amplifier on a stable, flat surface with adequate ventilation. Ensure there is enough space around the unit for heat dissipation, as Class A amplifiers generate heat.
- Connect Speakers: Connect your passive speakers to the appropriate speaker output terminals on the rear panel. Match the impedance of your speakers (4Ω or 8Ω) to the corresponding terminals. Use the 0Ω terminal for the negative connection. Ensure secure connections to prevent short circuits.
- Connect Audio Source: Connect your audio source (e.g., CD player, phone, TV) to either the "CD" or "AUX" RCA input jacks on the rear panel using appropriate RCA cables.
- Connect Power: Insert the provided power cord into the AC Power Input on the rear panel of the amplifier, then plug the other end into a suitable wall outlet (110V AC).

Figure 4.1: Example setup of the Douk Audio F5 amplifier connected to speakers in a home environment.
5. Operating Instructions
- Power On: Turn the Power Switch Knob on the front panel to the "ON" position. The vacuum tubes will begin to glow, indicating the amplifier is warming up. Allow at least 30 minutes for the tubes to warm up and stabilize for optimal sound quality.
- Select Input: Press the CD/AUX Input Select Button on the rear panel to choose between your connected audio sources.
- Adjust Volume: Slowly turn the Volume Knob clockwise to increase the sound level. Start with a low volume and gradually increase it to a comfortable listening level.
- Power Off: When finished listening, turn the Volume Knob counter-clockwise to the minimum setting, then turn the Power Switch Knob to the "OFF" position.
6. Maintenance
- Cleaning: Use a soft, dry cloth to clean the amplifier's chassis. Do not use liquid cleaners or abrasive materials.
- Tube Replacement: The vacuum tubes have a finite lifespan. If you notice a degradation in sound quality or if a tube fails, they can be replaced. Ensure the amplifier is powered off and unplugged, and the tubes have cooled down before attempting replacement. Refer to specialized guides for proper tube handling and replacement procedures.
- Ventilation: Ensure the ventilation grilles on the amplifier are not obstructed to prevent overheating. Regularly check for dust buildup and gently clean if necessary.
- Vibration Dampening: Some users have reported that the metal housing can resonate. If you experience unwanted ringing or chimes, consider placing a silicone pad or other dampening material under the amplifier to reduce vibrations.
7. Troubleshooting
| Problem | Possible Cause | Solution |
|---|---|---|
| No sound output |
|
|
| Distorted sound |
|
|
| Amplifier not turning on / Loud pop noise on startup |
|
|
8. Specifications
| Feature | Detail |
|---|---|
| Brand | Douk Audio |
| Model Number | F5 Pure Class A |
| Output Power | 6W + 6W |
| Vacuum Tubes | 6N1, 6L6 |
| Input Interface | Dual Stereo RCA (CD, AUX) |
| Output Interface | Speaker Outputs (8Ω, 4Ω, 0Ω) |
| Power Transformer | 150W |
| Ultra-Linear Output Transformer | 15W |
| Voltage | 110 Volts (AC) |
| Number of Channels | 2 |
| Mounting Type | Freestanding |
| Item Weight | 17.6 pounds (approx. 8 kg) |
| Package Dimensions | 12.8 x 12.6 x 10.91 inches |
| Compliance | FCC |
9. Warranty and Support
Douk Audio products are designed for reliability and performance. For warranty information, technical support, or service inquiries, please visit the official Douk Audio website or contact their customer service department.
Official Douk Audio Store: Douk Audio Store on Amazon
Ask a question about this manual
Ask about setup, troubleshooting, compatibility, parts, safety, or missing instructions. Manuals+ will review the question and use this page’s manual context to help answer it.