
ECD Germany IP-2150
ECD Germany 2.5T Hydraulic Car Jack (Model IP-2150) Instruction Manual
Brand: ECD Germany | Model: IP-2150
Introduction
This manual provides essential instructions for the safe and effective use, maintenance, and troubleshooting of your ECD Germany 2.5T Hydraulic Car Jack. Please read this manual thoroughly before operation to ensure proper handling and to prevent personal injury or damage to property.
Important Safety Instructions
WARNING: Failure to follow these instructions may result in serious injury or death. Always prioritize safety when operating lifting equipment.
- Read Entire Manual: Understand all instructions and warnings before using this jack.
- Rated Capacity: Do not exceed the jack's rated capacity of 2.5 tons (2500 kg).
- Stable Surface: Always use the jack on a hard, level, and stable surface. Avoid soft ground or inclines.
- Vehicle Stability: Ensure the vehicle is in park (P), the ignition is off, and the parking brake is engaged. Block wheels that are not being lifted.
- Proper Lift Points: Only lift the vehicle at manufacturer-recommended lift points. Use the provided rubber pads to protect the vehicle's chassis.
- Support Stands: After lifting, immediately support the vehicle with appropriate jack stands. Never work under a vehicle supported only by a hydraulic jack.
- Clear Area: Keep hands, feet, and other body parts clear of moving parts and the area under the vehicle.
- Lowering Slowly: Lower the vehicle slowly and carefully.
- Inspection: Inspect the jack for damage or leaks before each use. Do not use if damaged.
- Children and Bystanders: Keep children and unauthorized persons away from the work area.
Package Contents
Verify that all components are present and undamaged upon unpacking:
- 1 x ECD Germany 2.5T Hydraulic Car Jack
- 2 x Rubber Pads (for scratch and slip protection)
- 1 x SUV Adapter (for increased lift height)
- 1 x Pump Lever (operating handle)

Image: The hydraulic jack shown with its pump lever, two rubber pads, and an SUV adapter, as included in the package.
Specifications
| Model Number | IP-2150 |
| Capacity | 2500 kg (2.5 Tons) |
| Minimum Lift Height | 80 mm |
| Maximum Lift Height | 360 mm |
| Product Dimensions (L x W x H) | 53 x 17 x 13 cm |
| Product Weight | 10.8 kg |
| Material | Alloy Steel, Cast Iron |
| Style | Hydraulic |
| Wheels | 2 fixed, 2 x 360° swivel casters |

Image: Detailed dimensions of the hydraulic jack, illustrating its minimum and maximum lift heights, and overall length.
Setup and Preparation
- Unpack: Carefully remove the jack and all accessories from the packaging.
- Inspect: Check the jack for any signs of damage or oil leaks that may have occurred during shipping. Do not use if damaged.
- Assemble Handle: Insert the pump lever into the handle socket. Ensure it is securely seated.
- Bleed Air (First Use): Before first use, it is recommended to bleed any air from the hydraulic system.
- Turn the release valve counter-clockwise to fully open it.
- Pump the handle several times to expel any trapped air.
- Turn the release valve clockwise to close it.
- Attach Accessories: Place a rubber pad on the saddle of the jack. If lifting an SUV or a vehicle requiring extra height, attach the SUV adapter on top of the rubber pad.

Image: Illustration of attaching the rubber pad and SUV adapter to the jack's saddle for proper vehicle contact and protection.
Operating Instructions
Lifting a Vehicle:
- Prepare Vehicle: Park the vehicle on a firm, level surface. Engage the parking brake and place the transmission in "Park" (automatic) or a low gear (manual). Block the wheels that will remain on the ground.
- Position Jack: Locate the vehicle manufacturer's recommended lifting points. Position the jack directly under the designated lift point, ensuring the saddle with the rubber pad (and SUV adapter if needed) is centered and making full contact.
- Close Release Valve: Turn the pump lever clockwise until the release valve is fully closed. This prepares the jack for lifting.
- Lift Vehicle: Pump the handle up and down to raise the vehicle to the desired height. Lift only high enough to perform the necessary work.
- Secure with Jack Stands: Immediately place appropriately rated jack stands under the vehicle's designated support points. Lower the vehicle slowly until it rests securely on the jack stands. Never rely solely on the hydraulic jack for support.
- Remove Jack: Once the vehicle is safely supported by jack stands, you can remove the hydraulic jack.

Image: The hydraulic jack correctly placed under a vehicle's designated lifting point, demonstrating proper positioning before lifting.
Lowering a Vehicle:
- Raise Slightly: If the vehicle is on jack stands, pump the jack handle a few times to slightly raise the vehicle off the jack stands.
- Remove Jack Stands: Carefully remove the jack stands from under the vehicle.
- Lower Vehicle: Slowly turn the pump lever counter-clockwise to open the release valve. The vehicle will begin to lower. Control the lowering speed by adjusting how much you open the valve.
- Fully Lower: Once the vehicle is fully lowered and resting on the ground, remove the jack from underneath.
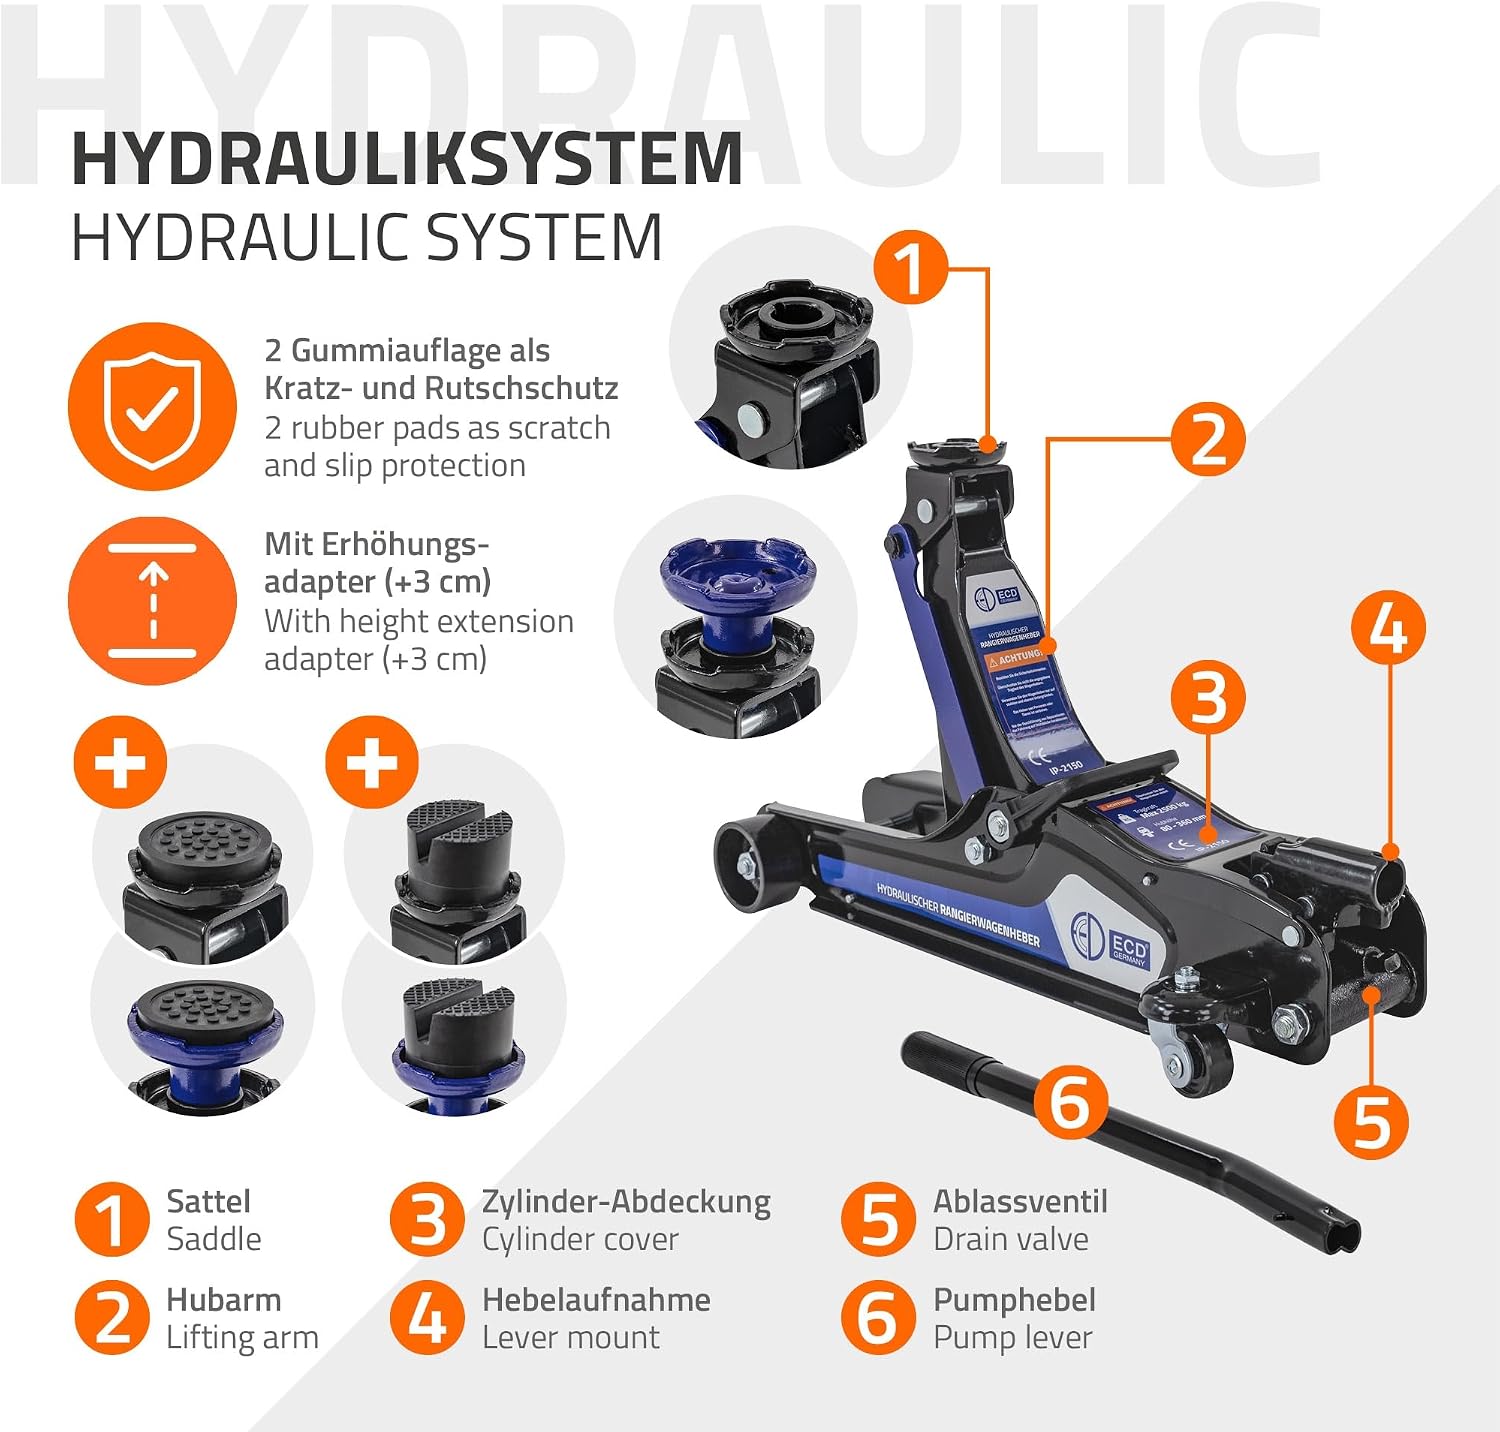
Image: A visual guide to the jack's lifting and lowering mechanism, including how to insert the lever and open the drain valve for controlled descent.
Maintenance
- Lubrication: Periodically lubricate all moving parts with light machine oil.
- Hydraulic Oil: Check the hydraulic oil level regularly. If low, refill with high-quality hydraulic jack oil. Do not use brake fluid or other fluids.
- Cleaning: Keep the jack clean and free of dirt, grease, and debris.
- Storage: Store the jack in a dry, clean place with the ram fully retracted to prevent corrosion and seal damage.
- Inspection: Regularly inspect for wear, damage, or leaks. Any damaged parts must be replaced by qualified personnel.
Troubleshooting
| Problem | Possible Cause | Solution |
|---|---|---|
| Jack will not lift or lifts slowly. |
|
|
| Jack lowers under load. |
|
|
| Jack does not lower. |
|
|
Warranty Information
The manufacturer provides a warranty for this product. Please refer to the warranty card included with your purchase or visit the official ECD Germany website for detailed warranty terms and conditions. Keep your proof of purchase for warranty claims.
The product specifications indicate that a manufacturer's warranty is provided.
Customer Support
For technical assistance, spare parts, or warranty inquiries, please contact ECD Germany customer service. You can find contact information on the official ECD Germany website or through your retailer.
Online Resources: Visit the ECD Germany Store on Amazon
Ask a question about this manual
Ask about setup, troubleshooting, compatibility, parts, safety, or missing instructions. Manuals+ will review the question and use this page’s manual context to help answer it.