1. Important Safety Instructions
Please read all instructions carefully before using your efkerggjgtgtgjhpwelp Smart Multifunctional Rice Cooker. Retain this manual for future reference.
- Do not touch hot surfaces. Use handles or knobs.
- To protect against electrical shock, do not immerse cord, plugs, or the main unit in water or other liquid.
- Close supervision is necessary when any appliance is used by or near children.
- Unplug from outlet when not in use and before cleaning. Allow to cool before putting on or taking off parts.
- Do not operate any appliance with a damaged cord or plug, or after the appliance malfunctions or has been damaged in any manner.
- Do not use outdoors.
- Do not let the cord hang over the edge of a table or counter, or touch hot surfaces.
- Do not place on or near a hot gas or electric burner, or in a heated oven.
- Extreme caution must be used when moving an appliance containing hot oil or other hot liquids.
- Always attach plug to appliance first, then plug cord into the wall outlet. To disconnect, turn any control to “off”, then remove plug from wall outlet.
- Do not use the appliance for other than intended use.
- This appliance operates on 220V~ rated voltage. Ensure your power supply matches this requirement.
2. Product Overview
2.1 Components
Your rice cooker package includes the following items:
- Multifunction Rice Cooker Unit (1)
- Non-Stick Inner Pot (1)
- Rice Spoon (1)
- Power Cord (1)
- Measuring Cup (1)
- Instruction Manual (1)
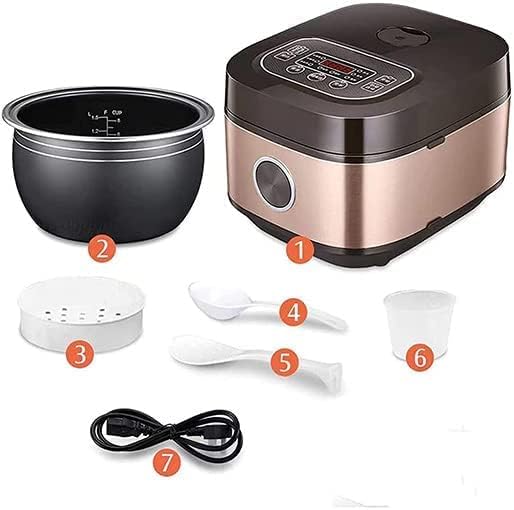
Image: This image displays the various components included with the rice cooker. From left to right, top to bottom: the removable non-stick inner pot, a steaming tray, the main rice cooker unit, a rice spoon, a serving spoon, a measuring cup, and the power cord.
2.2 Product Features
- Multifunctional Cooking: Capable of cooking rice, soup, stew, pastry, porridge, and steamed dishes.
- Quick Cook Function: For faster preparation of rice.
- Keep Warm Function: Automatically maintains food temperature after cooking.
- Intelligent Microcomputer Control: One-button touch operation for precise cooking.
- Non-Stick Inner Pot: Removable aluminum alloy coating for easy cleaning and durability.
- 24-Hour Timer: Allows for delayed cooking to suit your schedule.

Image: The rice cooker unit with text highlighting its 24-hour timer feature, indicating convenience for scheduled meals.

Image: A close-up view of the non-stick inner pot containing cooked rice, demonstrating the ease of serving due to the non-stick surface.

Image: A diagram illustrating the 360-degree heating technology within the inner pot, ensuring rice is cooked evenly and thoroughly.

Image: A detailed cross-section diagram showing the multi-layer construction of the inner pot, highlighting layers such as anti-scratch, alloy thermal conductive, threaded energy ring, hard wear layer, and far-infrared ceramic non-stick layer.
3. Setup
3.1 Unpacking
- Carefully remove all components from the packaging.
- Remove any protective films or stickers from the appliance.
- Check that all listed components are present and undamaged.
3.2 Initial Cleaning
- Wash the inner pot, rice spoon, and measuring cup with warm, soapy water. Rinse thoroughly and dry completely.
- Wipe the exterior of the rice cooker unit with a damp cloth. Do not immerse the main unit in water.
3.3 Placement
- Place the rice cooker on a stable, flat, heat-resistant surface.
- Ensure there is adequate ventilation around the appliance. Do not place it directly against a wall or under cabinets that may be damaged by steam.
- Keep the appliance away from water sources and direct heat.
4. Operating Instructions
4.1 Basic Rice Cooking
- Measure Rice: Use the provided measuring cup to measure the desired amount of rice. One cup of raw rice typically yields about 2-3 cups of cooked rice.
- Rinse Rice: Rinse the rice in a separate bowl until the water runs clear. This helps remove excess starch.
- Add to Inner Pot: Place the rinsed rice into the non-stick inner pot.
- Add Water: Add the appropriate amount of water. A common ratio is 1:1.25 (1 cup rice to 1.25 cups water), but this can vary based on rice type and personal preference. The inner pot has water level markings for guidance.
- Place Inner Pot: Carefully place the inner pot into the main rice cooker unit. Ensure it is seated correctly.
- Close Lid: Close the lid securely until it clicks into place.
- Connect Power: Plug the power cord into the rice cooker and then into a 220V~ wall outlet.
- Select Function: Press the desired cooking function button (e.g., "Rice" or "Standard Cook") on the control panel. The cooker will typically start automatically or require a confirmation press.
- Cooking Process: The indicator light will show that cooking is in progress. Once cooking is complete, the cooker will usually switch to "Keep Warm" mode automatically.
- Serve: Open the lid carefully to avoid steam. Use the provided rice spoon to fluff and serve the rice.

Image: A person serving freshly cooked rice from the open rice cooker into a bowl, demonstrating the product in use.
4.2 Using Other Functions (Soup, Stew, Porridge, Steamed Dishes)
Your multifunctional rice cooker offers various cooking modes. Refer to the control panel for specific function buttons.
- Prepare ingredients according to your recipe for soup, stew, or porridge.
- Place ingredients into the inner pot.
- Close the lid securely.
- Select the corresponding function button (e.g., "Soup," "Stew," "Porridge").
- For steamed dishes, add water to the inner pot (below the steaming tray), place ingredients on the steaming tray, and select the "Steam" function.
- The cooker will automatically adjust cooking time and temperature for the selected function.
4.3 24-Hour Timer Function
The timer function allows you to set a delayed start time for cooking.
- Prepare your ingredients (rice and water, or other food items) in the inner pot.
- Close the lid and plug in the cooker.
- Press the "Timer" or "Preset" button.
- Use the adjustment buttons (e.g., + / -) to set the desired delay time. The display will show the time until cooking begins.
- Select your desired cooking function (e.g., "Rice," "Porridge").
- The cooker will start cooking automatically after the set delay time has elapsed.
4.4 Keep Warm Function
After most cooking cycles, the rice cooker will automatically switch to "Keep Warm" mode to maintain the food's temperature. This function can also be manually activated or deactivated if available on your model.
5. Maintenance and Cleaning
Regular cleaning ensures optimal performance and extends the lifespan of your rice cooker.
5.1 Cleaning the Inner Pot
- Always unplug the rice cooker and allow it to cool completely before cleaning.
- Remove the inner pot.
- Wash the inner pot with warm, soapy water using a soft sponge or cloth. Do not use abrasive cleaners or metal scouring pads, as these can damage the non-stick coating.
- Rinse thoroughly and dry completely before storing or reusing.
5.2 Cleaning the Exterior
- Wipe the exterior of the main unit with a soft, damp cloth.
- Do not immerse the main unit in water or any other liquid.
- Ensure the power cord and plug are dry before plugging in the appliance.
5.3 Storage
Store the rice cooker in a dry, cool place when not in use. Ensure all parts are clean and dry before storage.
6. Troubleshooting
If you encounter any issues with your rice cooker, please refer to the following table before contacting customer support.
| Problem | Possible Cause | Solution |
|---|---|---|
| Rice is undercooked/hard | Not enough water; lid not properly closed; power interruption. | Ensure correct water-to-rice ratio; check lid seal; ensure stable power supply. |
| Rice is overcooked/mushy | Too much water; incorrect cooking function selected. | Reduce water slightly next time; select appropriate cooking function. |
| Cooker does not turn on | Not plugged in; power outlet issue; damaged cord. | Check power cord connection; test outlet with another appliance; contact support if cord is damaged. |
| Steam leaking from lid | Lid not properly closed; seal damaged or dirty. | Ensure lid is securely closed; clean or inspect the lid seal for damage. |
| Food sticks to inner pot | Non-stick coating damaged; insufficient oil (for some dishes). | Avoid using metal utensils; ensure proper cleaning; if coating is severely damaged, consider replacement. |
7. Specifications
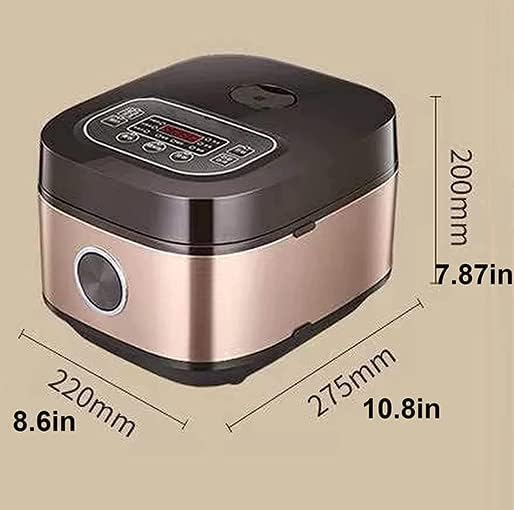
Image: This image shows the dimensions of the rice cooker: approximately 275mm (10.8in) in length, 220mm (8.6in) in width, and 200mm (7.87in) in height.
| Feature | Description |
|---|---|
| Product Name | Smart Rice Cooker |
| Brand | efkerggjgtgtgjhpwelp |
| Capacities Available | 3 Liters, 4 Liters, 5 Liters |
| Rated Power | 500W (for 3L/4L/5L models) |
| Rated Voltage | 220V~ |
| Net Weight | 2.1 kg |
| Inner Pot Material | Non-stick aluminum alloy |
| Special Features | Non-Stick, Removable Bowl, Multifunctional, Keep Warm, 24-Hour Timer |
| Product Dimensions (approx. 5L model) | 28.5 x 23.5 x 19.5 cm (Length x Width x Height) |
8. Warranty and Support
This product is covered by a manufacturer's warranty against defects in materials and workmanship. For specific warranty terms and conditions, please refer to the documentation provided at the time of purchase or contact your retailer.
For technical support, troubleshooting assistance, or to inquire about replacement parts, please contact the retailer or the manufacturer directly using the contact information provided with your purchase.