1. Introduction
Thank you for choosing the VEVOR 60ft Zipline Kit. This product is designed to provide a fun and engaging outdoor activity for children and adults, with a maximum weight capacity of 330 lbs. This manual provides essential information for the safe and proper installation, operation, and maintenance of your zipline kit. Please read all instructions carefully before assembly and use to ensure safety and optimal performance.
2. Safety Information
WARNING: Failure to follow these safety instructions may result in serious injury or death. Adult supervision is required at all times. This product is intended for recreational use only. Do not modify the zipline kit or its components.
- Weight Limit: The maximum weight capacity for this zipline kit is 330 lbs (150 kg). Do not exceed this limit.
- Age Recommendation: Manufacturer recommended age is 0-3 years, but due to the nature of the product, active supervision is required for all ages. Ensure users are capable of holding on and following instructions.
- Site Selection: Choose a clear, level area free of obstacles (trees, rocks, fences, water bodies) along the entire zipline path and at the start/end points. Ensure adequate run-out and braking space.
- Tree Protection: Always use the provided tree protectors to prevent damage to trees and the zipline cable.
- Pre-Use Inspection: Before each use, inspect all components for wear, damage, or loose connections. Do not use if any part is damaged.
- Safety Gear: Always use the included seat safety belt and rope safety harness. Ensure they are properly secured before each ride.
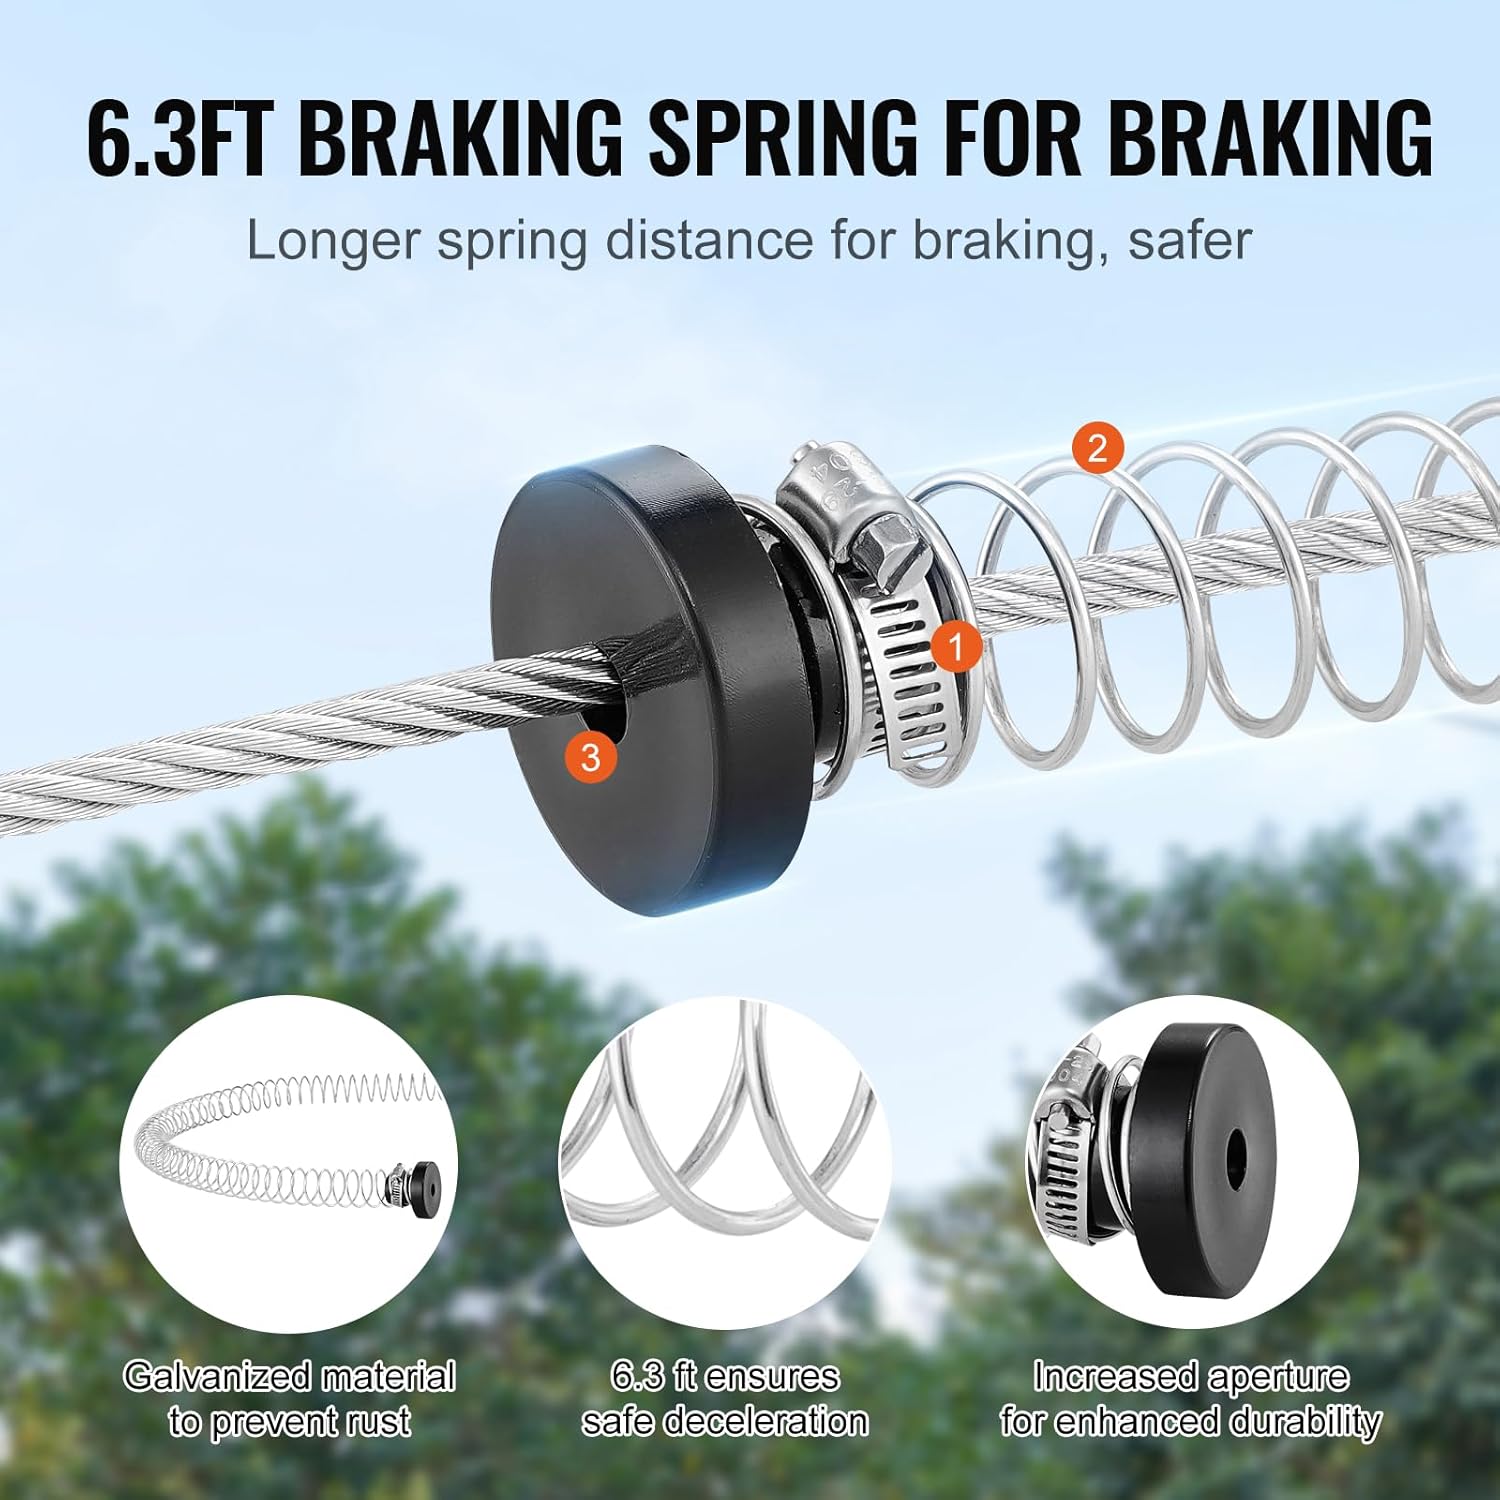
- Braking System: The 6.4 ft extended spring brake is designed for safe deceleration. Ensure it is correctly installed and functioning.
- Professional Equipment: This zipline kit features a thickened 0.25-inch steel wire rope and upgraded ball bearings for enhanced safety and durability. The product is CPC safety certified.

3. Components List
Your VEVOR 60ft Zipline Kit includes the following components:

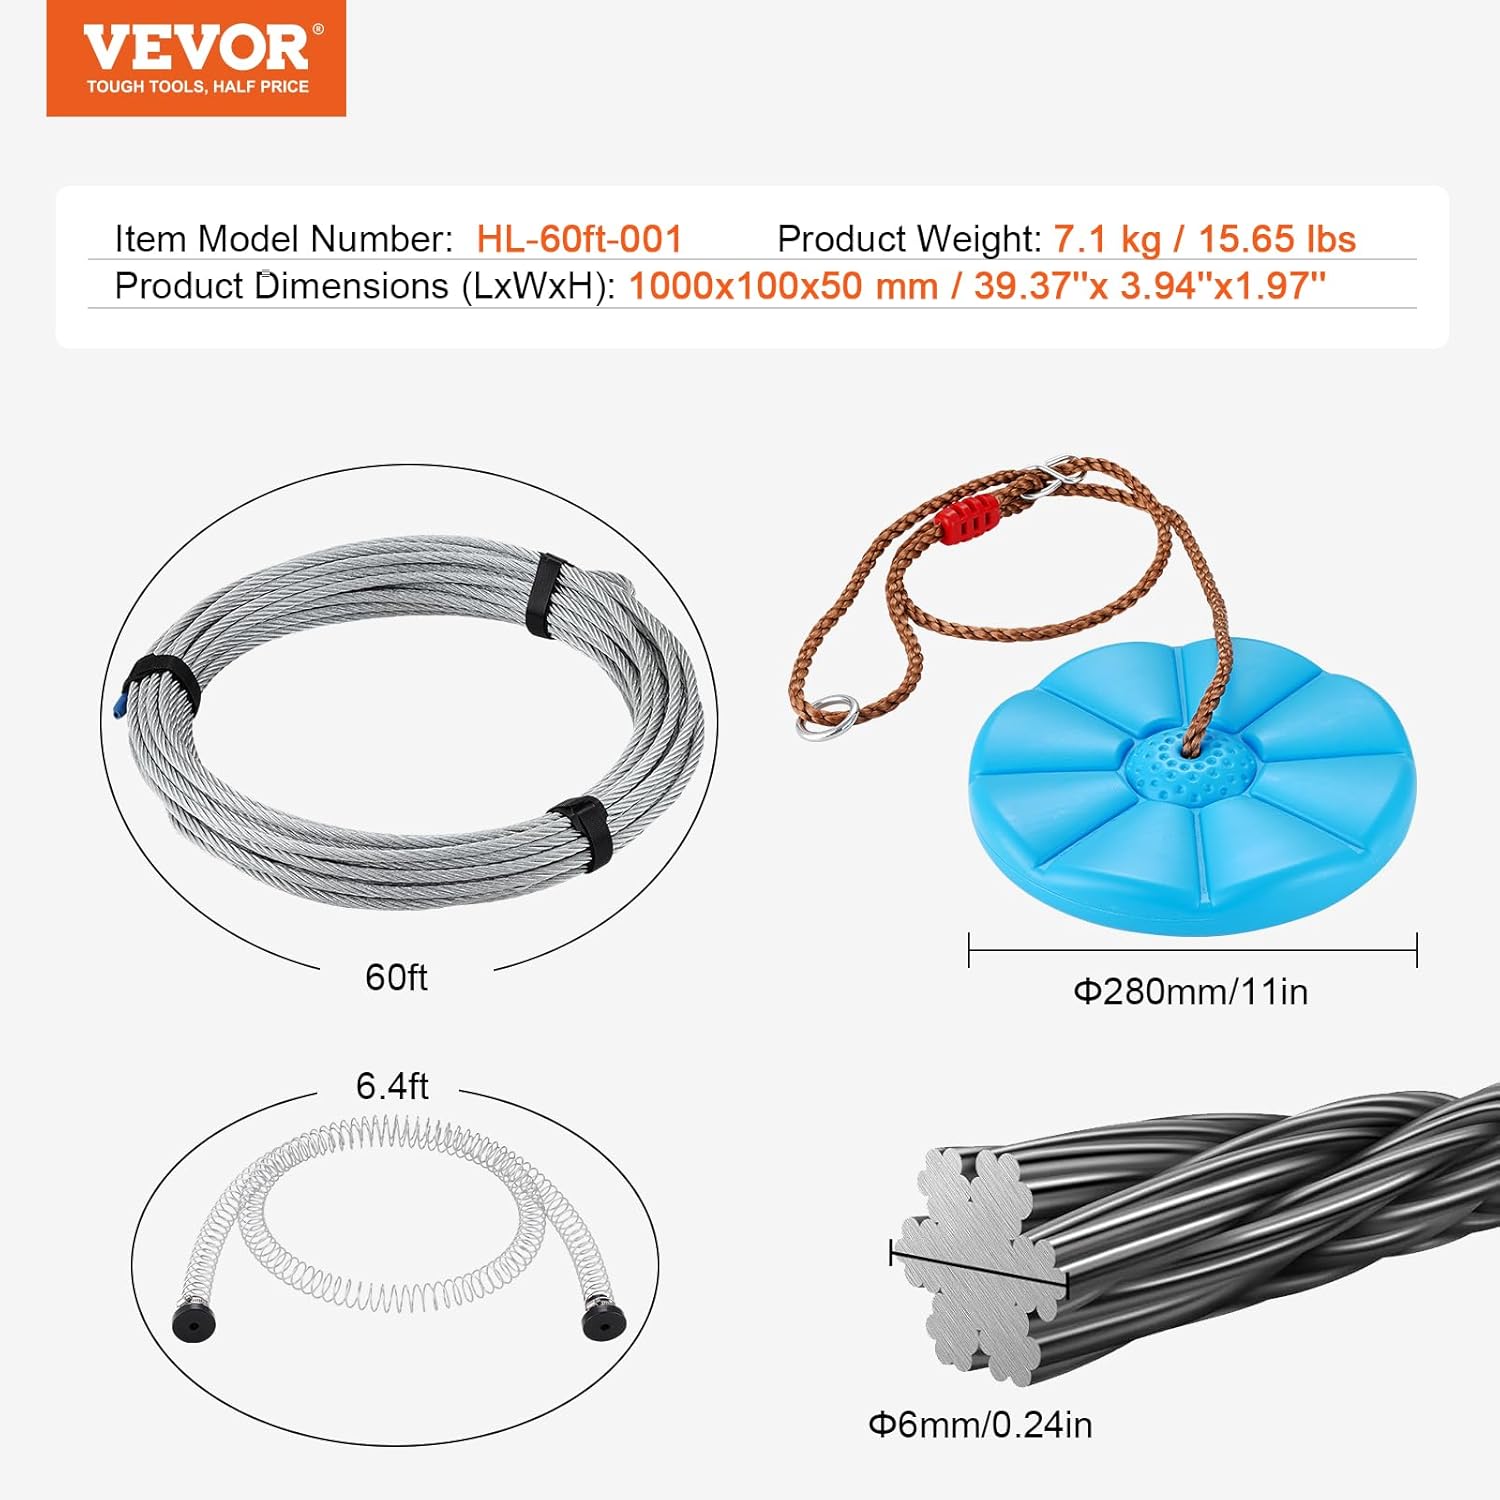
- 1 x Pulley (Trolley) with rubber anti-slip handles
- 1 x Main Cable (60 ft steel wire rope)
- 1 x Spring Brake (6.4 ft extended stainless steel)
- 1 x Cable Sling
- 1 x Swing Seat
- 1 x Seat Safety Belt
- 1 x Safety Strap (Rope Safety Harness)
- 2 x Carabiners
- 1 x Turnbuckle
- 3 x Clamps
- 2 x Tree Protectors
- 1 x Portable Bag
- 1 x Manual Wrench
- 1 x Set of Accessories (various small parts)
4. Setup and Installation
Proper installation is crucial for safety and performance. Follow these steps carefully:
- Site Measurement: Measure the distance between the two anchor trees. The recommended slope for the zipline is approximately 10%. For example, for a 60ft line, the elevation difference between the start and end points should be around 6 feet. Ensure the starting point is higher than the ending point.
- Tree Protection: Wrap the tree protectors around the anchor trees at the desired height.
- Main Cable Installation: Securely attach one end of the main cable to the higher anchor tree using the cable sling and clamps. Thread the cable to the lower anchor tree.
- Tensioning: Use the turnbuckle to tension the main cable. Ensure the cable is taut but not over-tensioned, maintaining the recommended slope.
- Spring Brake Installation: Install the 6.4 ft extended spring brake at the end of the zipline, near the lower anchor tree. This will act as a stopping mechanism. Ensure it is securely fastened to the cable.
- Trolley and Accessories Attachment: Attach the pulley (trolley) to the main cable. Connect the swing seat, seat safety belt, and safety strap to the pulley using the carabiners.
- Final Check: Double-check all connections, clamps, and tensioning points. Ensure all safety components are correctly installed and secured.
5. Operation
Once installed, the zipline is ready for use. Always ensure proper safety measures are in place.
- User Preparation: Ensure the user is wearing appropriate clothing and footwear. Long hair should be tied back.
- Safety Harness: Securely fasten the seat safety belt and rope safety harness around the user. Double-check all buckles and connections.
- Starting Position: Assist the user to the starting platform or elevated point. Ensure they grasp the trolley handles firmly.
- Launch: With adult supervision, allow the user to push off gently. Instruct them to keep their feet up and clear of the ground during the ride.
- Braking: The extended spring brake will gradually slow down the rider as they approach the end of the line. Do not attempt to stop manually by grabbing the cable.
- Dismount: Once the rider has come to a complete stop, assist them in safely dismounting the zipline.

6. Maintenance
Regular maintenance will prolong the life of your zipline kit and ensure continued safety.
- Routine Inspection: Periodically inspect the main cable, trolley, spring brake, and all connection points for signs of wear, fraying, rust, or damage.
- Clean Components: Clean the trolley and cable regularly to remove dirt and debris that could affect smooth operation. Use a damp cloth and mild soap if necessary.
- Lubrication: The pulley's ball bearings are designed for durability. If any squeaking or stiffness occurs, a light application of a silicone-based lubricant may be applied to the bearings.
- Rust Prevention: While components are designed to resist rust, prolonged exposure to moisture can cause issues. Consider disassembling and storing the zipline indoors during extended periods of non-use or during harsh weather conditions.
- Cable Tension: Check the cable tension periodically. Re-tension with the turnbuckle if the cable sags excessively.
- Replace Damaged Parts: If any component shows significant wear or damage, replace it immediately with genuine VEVOR replacement parts. Do not attempt to repair damaged components.
7. Troubleshooting
Here are some common issues and their solutions:
| Problem | Possible Cause | Solution |
|---|---|---|
| Zipline too slow/stops mid-way | Insufficient slope; cable not taut enough; debris on cable/pulley. | Increase starting height or decrease ending height to achieve proper slope; tighten cable with turnbuckle; clean cable and pulley. |
| Zipline too fast/hard stop | Excessive slope; spring brake not installed correctly or too far from end. | Adjust slope to be less steep; ensure spring brake is properly positioned and secured. |
| Trolley not moving smoothly | Dirt/debris in bearings; damaged bearings. | Clean pulley and bearings; apply silicone lubricant; replace trolley if bearings are damaged. |
| Cable fraying or showing wear | Improper installation; lack of tree protectors; age/heavy use. | Ensure tree protectors are always used; replace cable immediately if fraying is significant. |
8. Specifications
Detailed specifications for the VEVOR 60ft Zipline Kit:
- Model Number: HL-60ft-001
- Cable Length: 60 feet
- Cable Diameter: 0.25 inches (6mm)
- Maximum Load Capacity: 330 lbs (150 kg)
- Spring Brake Length: 6.4 feet
- Product Dimensions (LxWxH): 39.37 x 3.94 x 1.97 inches (1000x100x50 mm)
- Item Weight: 15.65 pounds (7.1 kg)
- Manufacturer: VEVOR
- Country of Origin: China
- Safety Certification: CPC Certified
9. Warranty and Support
For warranty information, technical support, or replacement parts, please contact VEVOR customer service. Refer to the contact details provided with your purchase or visit the official VEVOR website.
VEVOR Official Website: www.vevor.com


