
1. Introduction
Thank you for choosing the KEVTU K10 Motorcycle Bluetooth Headset. This device is designed to enhance your riding experience with advanced communication and entertainment features. Please read this manual carefully to ensure proper installation, operation, and maintenance of your headset.

Image 1.1: The KEVTU K10 Motorcycle Bluetooth Headset, shown with its main unit and three interchangeable cover plates (red, black, white). The main unit features a prominent KEVTU logo and a glowing blue K-shaped indicator.
2. Package Contents
Verify that all items listed below are included in your package:
- K10 Host Unit x 1
- Microphone x 2 (Soft microphone for full-face helmets, Hard microphone for 3/4 or 1/2 helmets)
- Cover Plate x 3 (Silver, Black, Red)
- Installation Base x 2 (Clamp base and Velcro base)
- Charging Cable x 1
- Small Tool x 1 (for installation)
- Velcro Stickers (several)
- Instruction Manual x 1
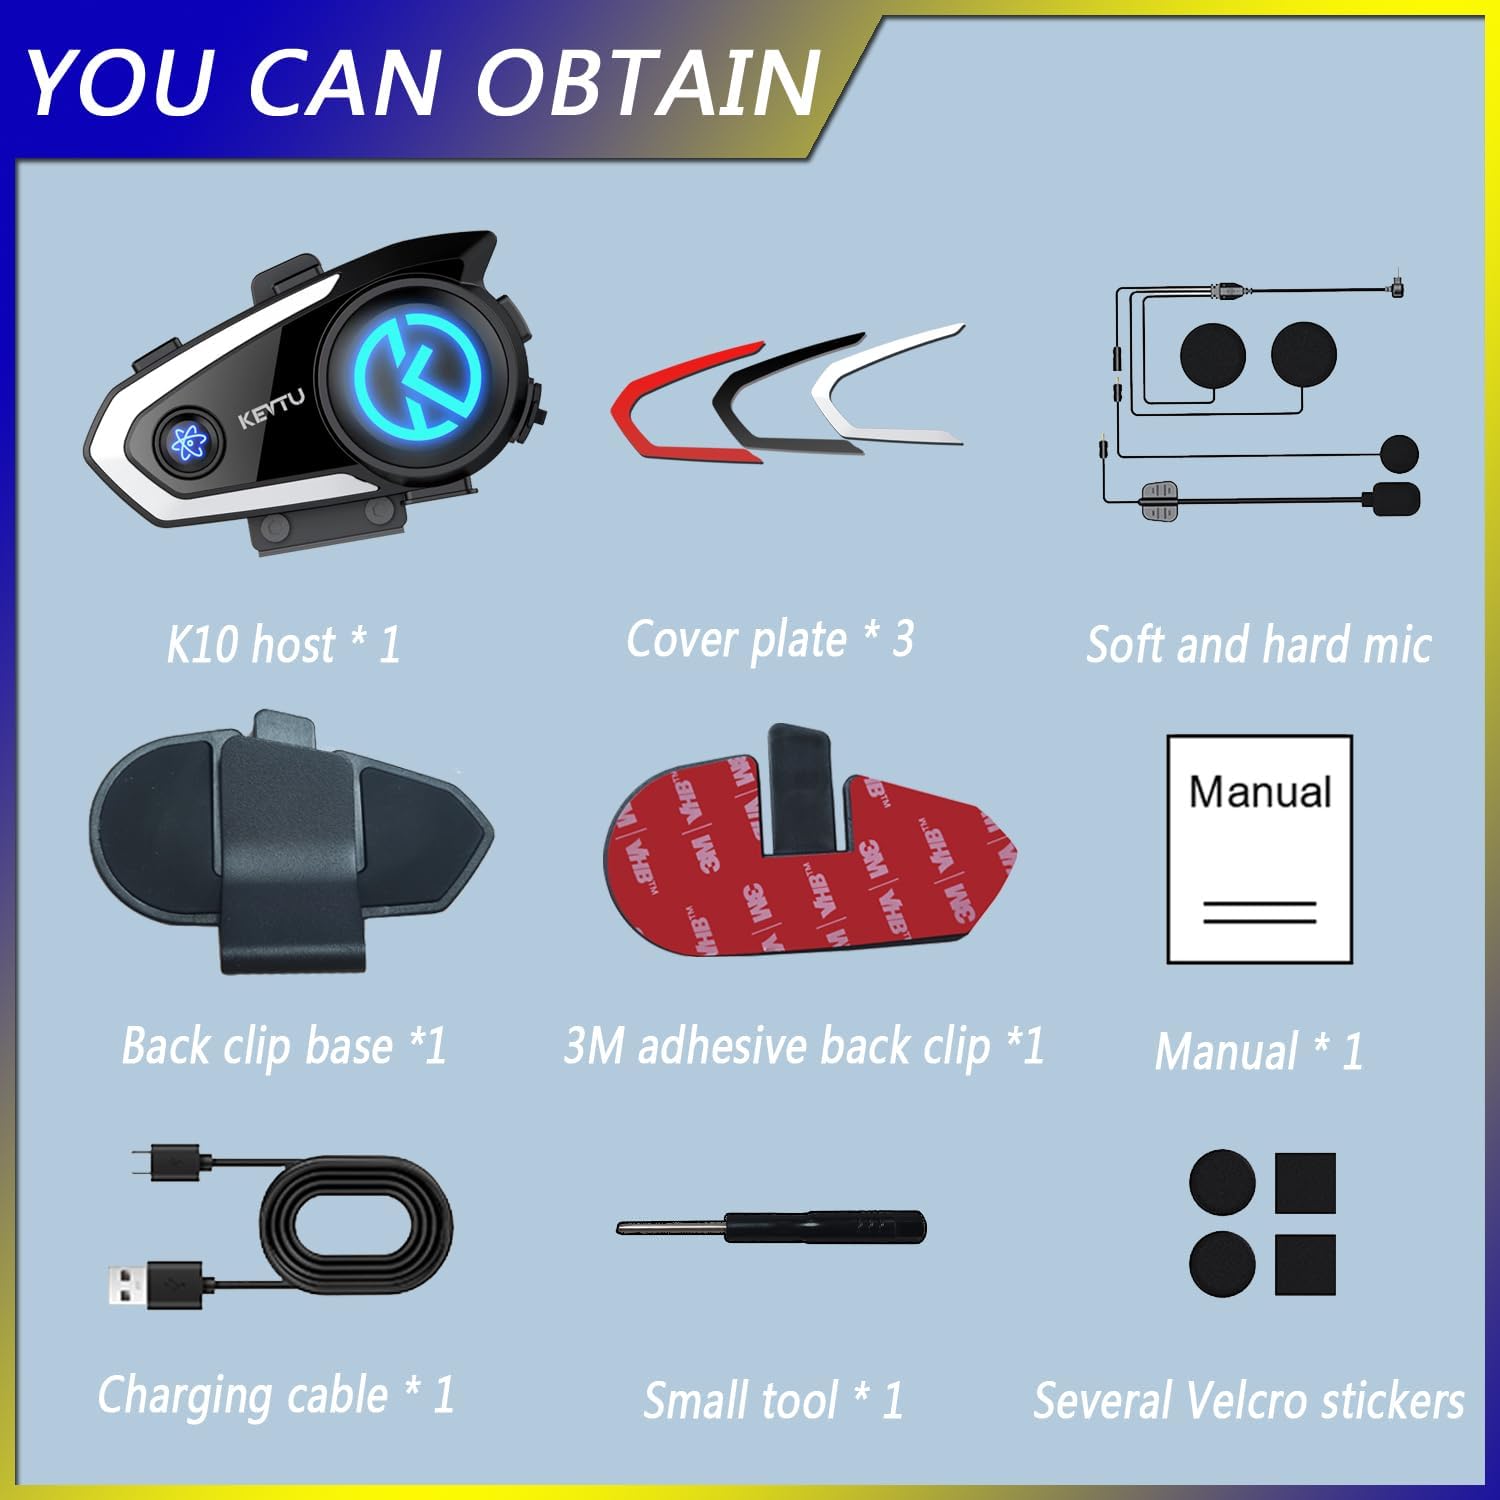
Image 2.1: A visual representation of all components included in the KEVTU K10 package. This includes the main K10 unit, three colored cover plates, soft and hard microphones, two types of mounting bases (clamp and adhesive), a charging cable, a small tool, Velcro stickers, and the instruction manual.
3. Product Overview and Controls
Familiarize yourself with the main unit and its control buttons.

Image 3.1: A diagram illustrating the KEVTU K10 headset from top and side views, highlighting its buttons and their corresponding functions. Key controls include: Voice Assistant (one-click wake-up), Volume+ (next song), Volume- (previous song), and a multi-function button for answering/hanging up calls, last code replay, play/pause music, and one-click turn on/off intercom.
Button Functions:
- Voice Assistant Button: One-click wake-up of your phone's voice assistant (e.g., Siri).
- Volume + / Next Song Button: Press to increase volume; long press for next song.
- Volume - / Previous Song Button: Press to decrease volume; long press for previous song.
- Multi-function Button:
- Short press: Answer/hang up calls, play/pause music.
- Double press: Last code replay.
- Long press: Turn on/off intercom.
4. Installation
The KEVTU K10 offers flexible installation options to suit various helmet types. You can choose between a clamp base or an adhesive Velcro base.
4.1 Choosing Your Microphone:
- Soft Microphone: Recommended for full-face helmets, as it can be discreetly placed inside the helmet lining.
- Hard Microphone (Boom Mic): Ideal for open-face, 3/4, or modular helmets where the microphone needs to extend closer to your mouth.
4.2 Mounting the Headset:
Both mounting methods ensure a secure fit. The headset base is designed to fit snugly against the helmet's curve.
- Select Mounting Base: Choose either the clamp base or the 3M adhesive Velcro base based on your helmet design and preference.
- Attach Base to Helmet:
- For Clamp Base: Securely attach the clamp to the edge of your helmet. Use the small tool provided to tighten if necessary.
- For Adhesive Base: Clean the desired area on your helmet's side. Peel off the protective film from the 3M adhesive and firmly press the base onto the helmet. Allow sufficient time for the adhesive to bond before use.
- Install Speakers and Microphone: Use the provided Velcro stickers to position the speakers inside the helmet's ear pockets and the chosen microphone near your mouth. Ensure wires are neatly tucked away.
- Attach K10 Host Unit: Slide the K10 host unit onto the installed base until it clicks securely into place.
- Personalize (Optional): Choose one of the three colored cover plates (silver, black, or red) and attach it to the K10 host unit to match your helmet or personal style.
5. Initial Setup
5.1 Charging the Device:
Before first use, fully charge your KEVTU K10 headset.
- Connect the provided charging cable to the charging port on the K10 unit and to a USB power source.
- A full charge typically takes approximately 2 hours.
- The 850mAh lithium battery provides up to 18 hours of battery life and up to 300 hours of standby time.

Image 5.1: An illustration detailing the KEVTU K10's battery specifications, showing an 18-hour battery life, 2-hour charging time, and an 850mAh battery capacity. A smartphone displaying music playback is shown in the background, emphasizing the device's entertainment capabilities.
5.2 Power On/Off:
- To Power On: Press and hold the multi-function button until the indicator light turns on and you hear a voice prompt.
- To Power Off: Press and hold the multi-function button until the indicator light turns off and you hear a voice prompt.
5.3 Bluetooth Pairing with Phone:
- Ensure the K10 is powered off.
- Press and hold the multi-function button for approximately 5-7 seconds until the indicator light flashes red and blue alternately, indicating pairing mode.
- On your smartphone, go to Bluetooth settings and search for new devices.
- Select "KEVTU K10" from the list of available devices to connect.
- Once connected, the indicator light will turn solid blue, and you will hear a confirmation tone.
6. Operating Instructions
6.1 Intercom Functions:
The KEVTU K10 supports various intercom modes for group communication.

Image 6.1: A graphic illustrating the KEVTU K10's intercom capabilities, including support for 8-person series intercom within 4000 meters, compatibility with third-party Bluetooth devices, and APP-based network group intercom with unlimited participants. The image shows multiple riders communicating on a road.
- 8-Person Serial Group Intercom: The K10 supports up to 8 riders in a serial group intercom within a 4000m range (500m between two riders).
- Third-Party Brand Intercom: The K10 can connect with other brands of Bluetooth earphones for intercom communication.
- APP-based Network Intercom: Utilize network intercom through messaging apps (e.g., WhatsApp) for unlimited participants, provided the other devices also support network intercom.
Intercom Pairing (for 8-person serial group):
To establish a multi-person intercom, devices need to be paired in sequence. For example, to pair devices A, B, C, D, E, F:

Image 6.2: A step-by-step diagram demonstrating how to set up group intercom pairing for multiple KEVTU K10 devices. It shows clearing previous pairing records, then sequentially pairing devices (A to B, B to C, etc.) by long-pressing the intercom button on one device and short-pressing on the other, and finally initiating the series intercom.
- Clear Pairing Records: On all devices (A, B, C, D, E, F), clear any previous pairing records according to the device's specific instructions.
- Sequential Pairing:
- Pair A with B: Long press intercom button on A for 3s, then short press intercom button on B once.
- Pair B with C: Long press intercom button on B for 3s, then short press intercom button on C once.
- Continue this sequence (C with D, D with E, E with F) until all desired devices are paired in series. Up to 8 hosts can be connected.
- Initiate Series Intercom: Once all devices are paired, press the intercom button on each device in reverse order of pairing (e.g., F, then E, then D, etc.) to connect the series.
6.2 Music Playback:
- After pairing with your phone, open your music player app.
- Use the multi-function button to play/pause music.
- Short press Volume+ for next song, Volume- for previous song.
- Adjust volume by long pressing Volume+ or Volume-.
6.3 Phone Calls:
- Answer Call: Short press the multi-function button when a call comes in.
- Hang Up Call: Short press the multi-function button during a call.
- Reject Call: Long press the multi-function button when a call comes in.
- Last Code Replay: Double press the multi-function button.
6.4 Voice Assistant:
Activate your smartphone's voice assistant (e.g., Siri, Google Assistant) with a single press.

Image 6.3: A rider on a motorcycle, with speech bubbles indicating voice commands like "Hey! Siri, open address book" and "Siri, how is the weather today?". The KEVTU K10 headset is shown with a finger activating the voice assistant button, and a smartphone screen displays a voice assistant interface.
- Press the dedicated Voice Assistant button to activate your phone's voice assistant.
- You can then issue commands such as making calls, playing specific music, or getting navigation directions.
7. Maintenance
Proper care will extend the life and performance of your KEVTU K10 headset.
7.1 Cleaning:
- Wipe the main unit with a soft, damp cloth. Avoid using harsh chemicals or abrasive cleaners.
- Ensure the charging port is free of dust and debris.
7.2 Storage:
- Store the headset in a cool, dry place away from direct sunlight and extreme temperatures.
- If storing for an extended period, charge the battery to about 50% to preserve its lifespan.
7.3 Battery Care:
- Avoid fully discharging the battery frequently.
- Use only the provided charging cable or a certified equivalent.
7.4 Waterproofing:
The KEVTU K10 is IP67 waterproof, meaning it is protected from dust and can withstand immersion in water up to 1 meter for 30 minutes. While it is designed for outdoor use in various weather conditions, avoid prolonged submersion or high-pressure water jets.

Image 7.1: The KEVTU K10 headset being splashed with water, demonstrating its IP67 waterproof rating. Multiple units with different colored cover plates are shown, emphasizing its adaptability to various humid environments and outdoor sports.
8. Troubleshooting
If you encounter issues with your KEVTU K10 headset, refer to the following common problems and solutions:
| Problem | Possible Cause | Solution |
|---|---|---|
| Device does not power on. | Low battery. | Charge the device for at least 2 hours. |
| Cannot pair with phone. | Device not in pairing mode; Bluetooth off on phone. | Ensure K10 is in pairing mode (flashing red/blue). Turn on phone's Bluetooth and search again. |
| No sound or low volume. | Volume too low; speakers improperly positioned; poor connection. | Increase volume on both K10 and phone. Adjust speaker position. Re-pair the device. |
| Intercom not connecting. | Incorrect pairing sequence; out of range. | Ensure devices are paired correctly in sequence. Check distance between riders. |
| Poor audio quality/noise. | Microphone placement; environmental noise. | Adjust microphone position. The K10 features CVC+DSP dual noise reduction for speeds up to 120km/h. |

Image 8.1: A graphic explaining the KEVTU K10's three noise reduction methods: DSP, CVC, and microphone windproof sponge. It illustrates how noise is reduced, ensuring clear communication even at speeds up to 120 km/h, and highlights the HIFI sound quality.
9. Specifications
Technical details of the KEVTU K10 Motorcycle Bluetooth Headset:
| Feature | Detail |
|---|---|
| Model Name | K10 |
| Connectivity Technology | Wireless (Bluetooth 5.0) |
| Intercom Support | Up to 8 riders, 4000m range (500m between 2 riders), APP-based network intercom, third-party device compatible |
| Noise Control | Adaptive Noise Cancellation (CVC+DSP dual noise reduction) |
| Voice Assistant | AI Voice Assistant (Siri, Google Assistant compatible) |
| Battery Life | Up to 18 Hours |
| Charging Time | 2 Hours |
| Battery Capacity | 850mAh Lithium Ion |
| Water Resistance Level | IP67 Waterproof |
| Material | Plastic |
| Item Weight | 8.3 ounces |
| Manufacturer | KEVTU |

Image 9.1: A detailed illustration of the Qualcomm 5.0 Bluetooth Chip, highlighting its features such as double speed transmission rate, 99% compatibility with Bluetooth devices, and zero sound stuck, indicating smooth and powerful performance for the KEVTU K10 headset.
10. Warranty and Support
10.1 Warranty Information:
For specific warranty details regarding your KEVTU K10 headset, please refer to the warranty card included in your product packaging or contact KEVTU customer service directly. Warranty terms typically cover manufacturing defects for a specified period from the date of purchase.
10.2 Customer Support:
If you have any questions, require technical assistance, or need to report an issue, please contact KEVTU customer support through the contact information provided on the official KEVTU website or in your product documentation. Please have your model number (K10) and purchase details ready when contacting support.