1. Introduction
This manual provides detailed instructions for the safe and effective use of your ERICAT Portable Food Nitrate Tester. This device is designed to measure nitrate content in various food items such as fruits, vegetables, meat, and fish, and also includes a radiation detection function. Please read this manual thoroughly before operating the device.
2. Product Overview
2.1 Package Contents
- 1 x Digital Food Nitrate Tester
- 1 x Data Cable (USB)
- 1 x User Manual
2.2 Device Components
Familiarize yourself with the main parts of your nitrate tester:

Image 2.2.1: Overview of the ERICAT Food Nitrate Tester components. The device features a touchscreen display, a power on/off button, a USB power cable port for charging, a removable protection cap, and a probe for insertion into food items.
- Touchscreen Display: For navigation and viewing results.
- Power On/Off Button: Located on the top side of the device.
- USB Power Cable Port: For charging the internal battery.
- Protection Cap: Covers the probe when not in use.
- Probe: The sensing element for nitrate detection.
3. Setup
3.1 Charging the Device
Before first use, fully charge the device. Connect the provided USB data cable to the USB power cable port on the device and plug the other end into a standard USB power adapter (not included) or a computer's USB port. The charging indicator on the screen will show the charging status.
3.2 Powering On/Off
- To Power On: Press and hold the Power On/Off button located on the top of the device until the screen illuminates.
- To Power Off: Press and hold the Power On/Off button until the device shuts down.
4. Operating Instructions
4.1 General Navigation
The device features a color touchscreen display. Navigate through menus by tapping the desired icons or options on the screen. Use the arrow icons (if present) to scroll or go back.
4.2 Nitrate Testing
This function allows you to measure the nitrate content in various food items.
- Remove Protection Cap: Carefully remove the green protection cap from the probe.
- Select Food Category: From the main menu, select the appropriate food category (e.g., Fruit, Vegetables, Meat, Fish).

Image 4.2.1: Main menu for food safety detection, displaying options for Fruit, Vegetables, and Meat. The device uses two probes for measurement.
- Insert Probe: Gently insert the probe into the food item. Ensure the probe is fully submerged in the flesh of the food, avoiding seeds or hard cores. For best results, insert the probe into multiple spots.
- Start Measurement: The device will automatically begin measurement, which typically takes 3 seconds.
- View Results: The nitrate content will be displayed on the screen in mg/kg, along with a color-coded indicator for safety.

Image 4.2.2: Interpretation of nitrate test results. A green display indicates low nitrate content (PASS), yellow indicates elevated nitrate content (CAUTION), and red indicates excessive nitrate content (DANGER).

Image 4.2.3: Example of the nitrate tester in use, showing a 'PASS' result for broccoli with a nitrate level of 85 mg/kg.
- Clean Probe: After each use, clean the probe as described in the Maintenance section.
4.3 Radiation Detection
The device is equipped with an upgraded Geiger-Müller tube to detect ionizing radiation in your immediate environment.
- Access Radiation Mode: From the main menu, select the 'Radiation' option.
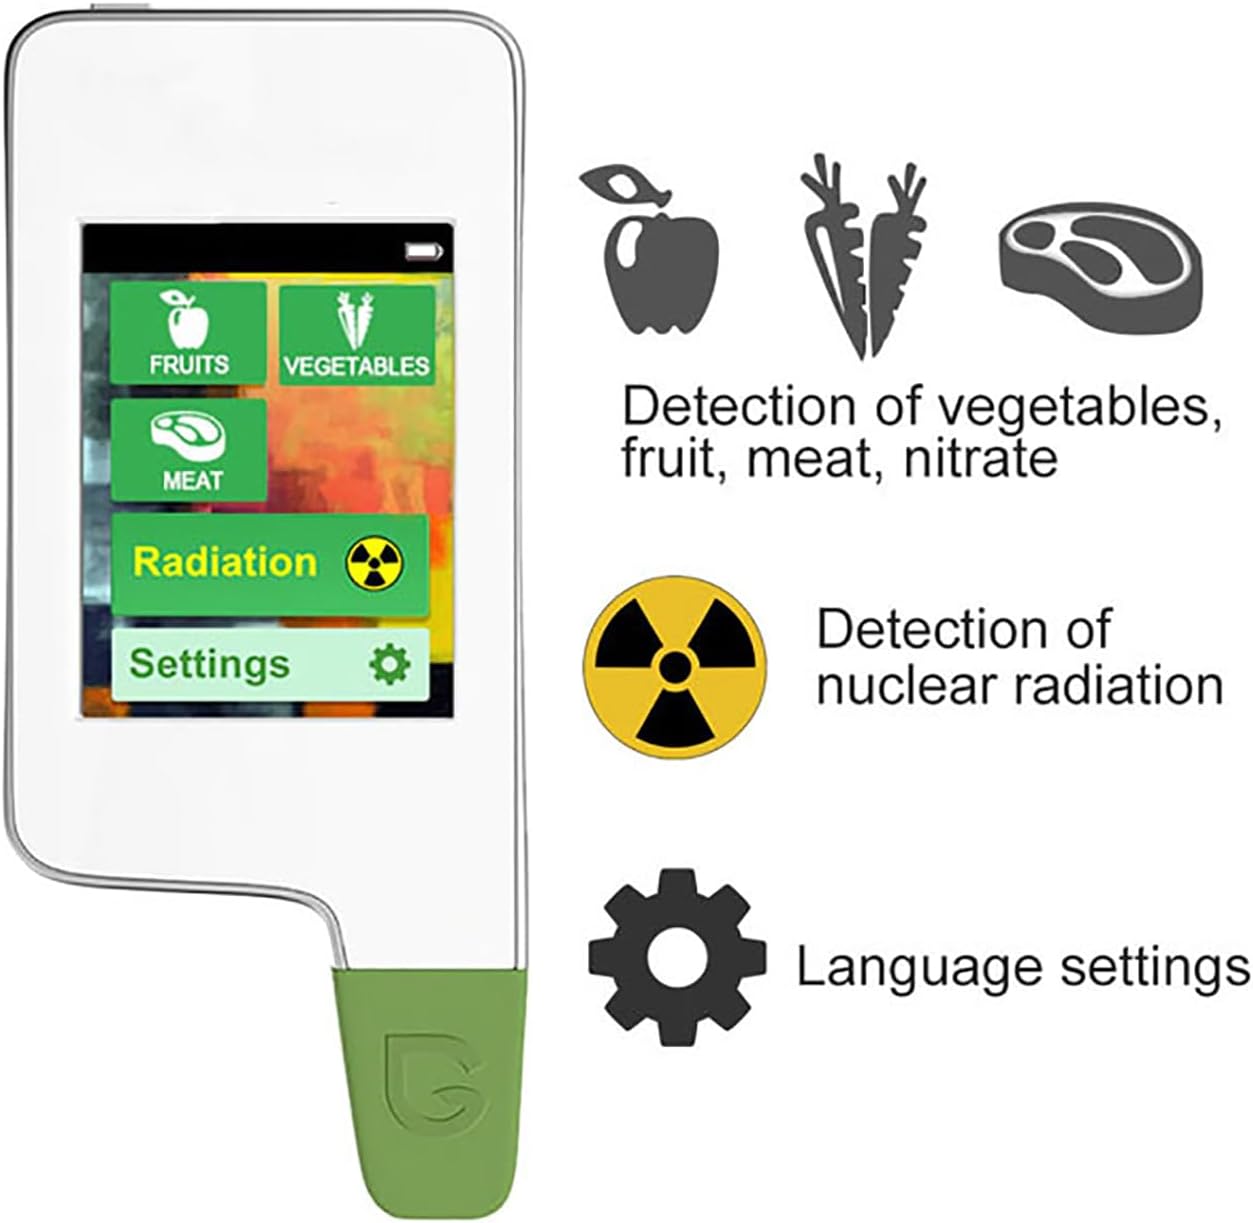
Image 4.3.1: Menu displaying options for nitrate detection in various foods and a dedicated option for radiation detection.
- Monitor Readings: The device will display real-time radiation levels.
- Interpret Alerts: The device will alert you to unsafe radiation exposure levels. Refer to local safety guidelines for interpreting specific radiation readings.
5. Maintenance
5.1 Cleaning the Probe
After each nitrate test, it is crucial to clean the probe to ensure accurate future readings and device longevity.
- Wipe the probe gently with a soft, damp cloth.
- Do not use abrasive cleaners or immerse the entire device in water.
- Ensure the probe is completely dry before replacing the protection cap.
5.2 Battery Charging and Storage
- Recharge the device when the battery indicator shows low power.
- Store the device in a cool, dry place, away from direct sunlight and extreme temperatures.
- Always replace the protection cap on the probe when storing the device.
6. Troubleshooting
- Device Not Turning On:
Ensure the device is fully charged. If the issue persists, try connecting it to a different USB power source. - Inaccurate Nitrate Readings:
Ensure the probe is clean and dry before each use. Make sure the probe is fully inserted into the food item and that the correct food category is selected. Avoid testing frozen or extremely hard food items. - Screen Unresponsive:
Try restarting the device by holding the power button. If the problem continues, ensure the device is charged. - Radiation Detector Not Responding:
Ensure you are in the correct 'Radiation' mode. If the issue persists, contact customer support.
7. Specifications
| Feature | Specification |
|---|---|
| Product Name | Digital Food Nitrate Tester |
| Battery Life | Up to 24 Hours |
| Nitrate Detection Range | 0-9999 mg/Kg |
| Measurement Time | 3 Seconds |
| Measurement Error | Less Than 10% |
| Charging Method | USB |
| Product Size (L x W x T) | 122 x 52 x 14 mm |
| Radiation Detection | Geiger-Müller Tube (Gamma, Beta, Alpha, X-Rays, Cosmic Radiation) |

Image 7.1: Physical dimensions of the device.
8. Safety Information
- Keep the device out of reach of children.
- Do not attempt to disassemble or modify the device.
- Avoid exposing the device to extreme temperatures, humidity, or direct water immersion.
- Handle the probe with care to prevent damage or injury.
- Dispose of the device and battery according to local regulations.
9. Warranty and Support
For warranty information and customer support, please refer to the documentation provided at the time of purchase or contact your retailer. Keep your purchase receipt as proof of purchase.