Introduction
Thank you for choosing the BEXEVUE 47 Inch L Shaped Computer Desk with Power Outlets. This manual provides essential information for the safe assembly, proper operation, and effective maintenance of your new desk. Please read these instructions thoroughly before beginning assembly and retain them for future reference.
Safety Information
- Always ensure the desk is properly anchored to the floor to prevent tipping, especially if heavy equipment is placed on it.
- Do not place heavy equipment on the desk that could cause it to tip over.
- Always follow the assembly instructions carefully to ensure the desk is assembled correctly and safely.
- Ensure the power outlets are connected to a grounded electrical source. Do not overload the outlets.
- Keep liquids away from the power outlets to prevent electrical hazards.
- Do not allow children to climb on or play with the desk.
Package Contents
Before assembly, please verify that all components are present and undamaged. If any parts are missing or damaged, please contact customer support.
- Desk Panels (Main desktop, L-shaped extension, shelf panels)
- Metal Frame Components (Legs, support bars, shelf frames)
- Hardware (Screws, bolts, Allen wrench, adjustable feet pads)
- Integrated Power Outlet Unit (with AC outlets, USB, Type-C ports, and power cord)
- Side Storage Bag
- Assembly Instructions
Assembly Instructions
Follow these steps carefully to assemble your BEXEVUE L Shaped Computer Desk. It is recommended to have two people for assembly.
Assembly Video Guide
This video demonstrates the general assembly process for the BEXEVUE L Shaped Computer Desk. It shows the step-by-step construction of the frame, shelves, and attachment of the desktop components.
Step-by-Step Guide
- Unpack and Identify Parts: Carefully unpack all components and lay them out on a clean, soft surface to prevent scratches. Refer to the parts list to identify each piece.
- Assemble the Shelf Frame: Attach the shelf panels to the vertical metal frames using the provided screws. Ensure all connections are secure. This forms the shelving unit.
- Assemble the Main Desk Frame: Connect the main desk legs and support bars. Attach the adjustable feet pads to the bottom of all legs.
- Attach Desktop Panels: Place the main desktop panel onto the main desk frame. Secure it with screws from underneath. Then, attach the L-shaped extension desktop panel, aligning it with the main desktop and the shelving unit. The shelving unit can be installed on either the left or right side to suit your preference (see image below for reversible options).
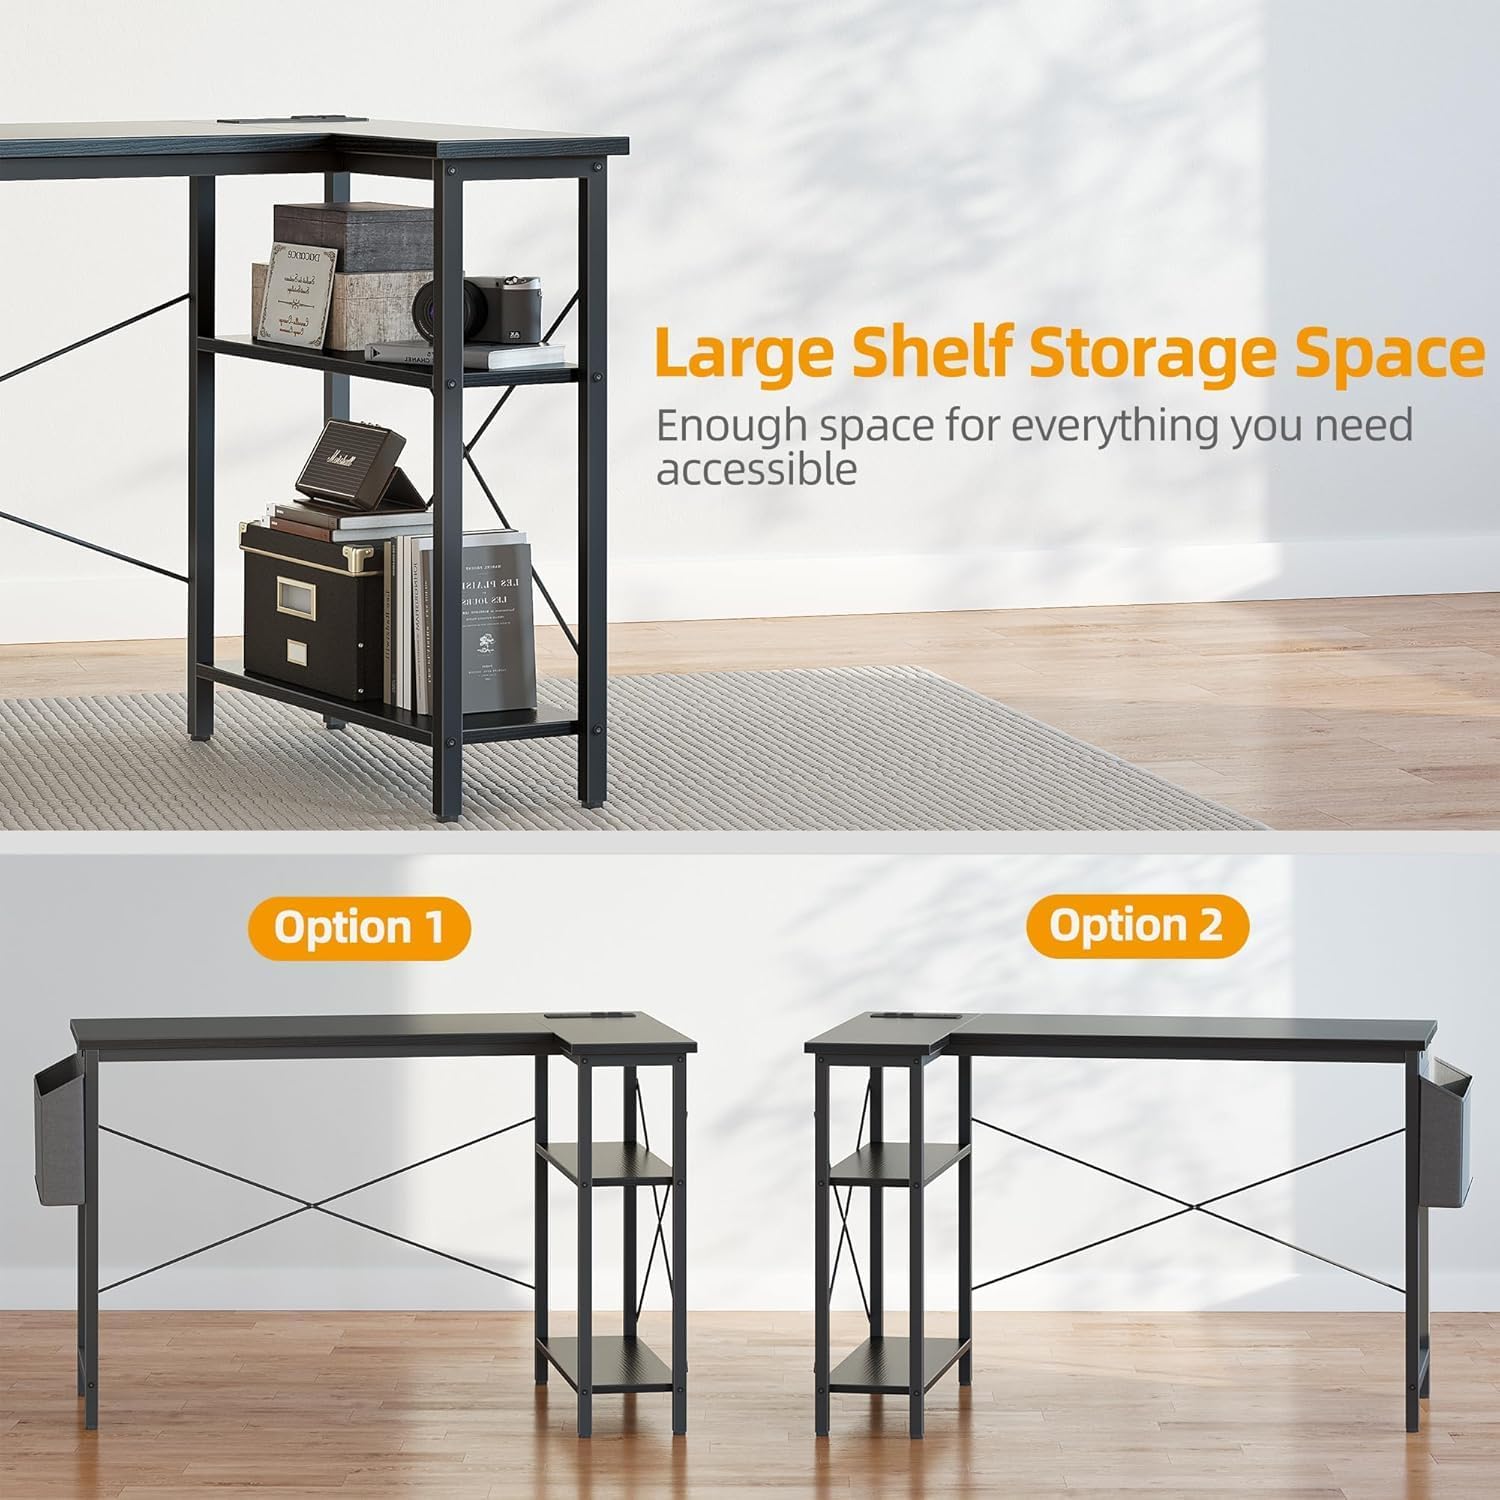
Image: The L-shaped desk features a reversible design, allowing the shelving unit to be positioned on either the left or right side during assembly.
- Install Cross Braces: Attach the X-shaped cross braces to the rear of the desk frame. These provide additional stability and minimize wobbling.
- Install Power Outlet Unit: Carefully insert the integrated power outlet unit into the designated cutout on the desktop. Secure it with the provided screws. Route the power cord neatly.

Image: The integrated power outlet unit provides convenient access to two AC outlets, one USB port, and one Type-C port.
- Attach Storage Bag: Hook or screw the side storage bag onto the designated points on the desk frame.
- Final Adjustments: Adjust the feet pads to ensure the desk is level and stable on your floor. Tighten all screws if necessary.
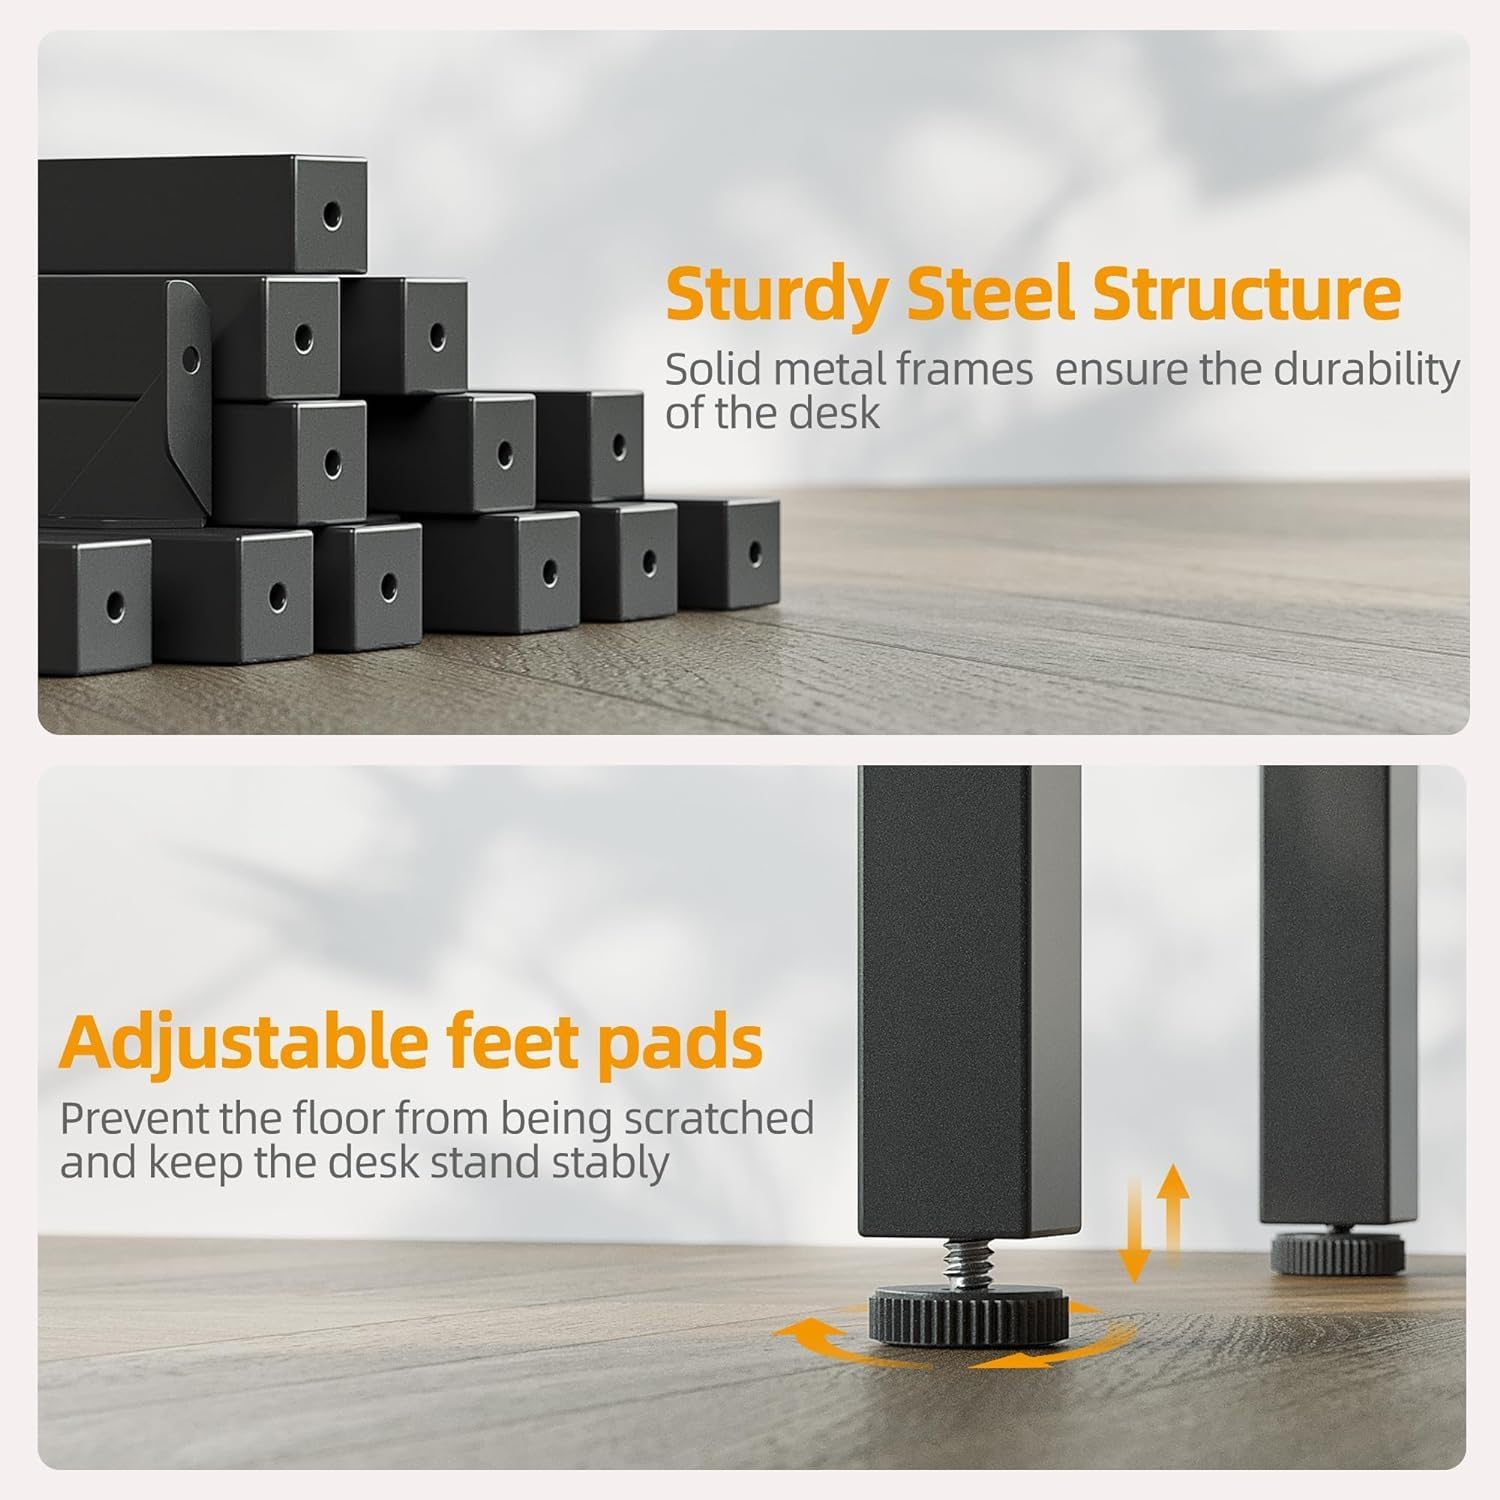
Image: The desk features a sturdy steel structure and adjustable feet pads for stability on uneven surfaces.
Operating Your Desk
Integrated Power Outlets
The desk is equipped with a built-in power strip featuring two 125V/16A AC outlets, one 5V/3A USB port, and one Type-C port. Simply plug the desk's main power cord into a wall outlet to activate these charging options. Use them to power your computer, monitor, phone, and other devices directly from your desktop, reducing cable clutter.
Storage Shelves
Utilize the multi-tiered shelves for organizing books, documents, computer towers, or decorative items. The open design provides easy access to your stored belongings.
Side Storage Bag
The fabric storage bag attached to the side of the desk is ideal for keeping smaller items like headphones, notebooks, pens, or other accessories within reach and off the desktop.

Image: The side storage bag offers convenient extra space for organizing accessories.
Care and Maintenance
Proper care will extend the life and appearance of your desk.
- Cleaning: The desktop is designed to be easy to clean, scratch-resistant, and waterproof. Wipe surfaces with a soft, damp cloth. Avoid harsh chemicals or abrasive cleaners that could damage the finish.

Image: The high-quality desktop is easy to clean, scratch-resistant, and waterproof.
- Regular Checks: Periodically check all screws and bolts to ensure they remain tight. Retighten as necessary to maintain stability.
- Avoid Overloading: Do not exceed the desk's maximum static load capacity of 220 lbs (100 kg).
Troubleshooting
- Desk is wobbly: Ensure all screws are tightened. Adjust the leveling feet pads on the bottom of the desk legs to compensate for uneven floors.
- Power outlets are not working: Check if the desk's main power cord is securely plugged into a functional wall outlet. Ensure no circuit breakers have tripped.
- Missing or damaged parts: Refer to the 'Package Contents' section. If parts are missing or damaged upon arrival, contact BEXEVUE customer support immediately for assistance.
Product Specifications
| Feature | Specification |
|---|---|
| Brand | BEXEVUE |
| Model Number | E10002040GY |
| Color | Black |
| Product Dimensions | 70D x 120W x 75H Centimetres (27.6D x 47.2W x 29.5H Inches) |
| Material | Engineered Wood, Metal |
| Special Features | Reversible L-Shape, Integrated Power Outlets (2 AC, 1 USB, 1 Type-C), Side Storage Bag, Adjustable Feet |
| Item Weight | 13 kg (28.6 lbs) |
| Max Static Load Capacity | 220 lbs (100 kg) |
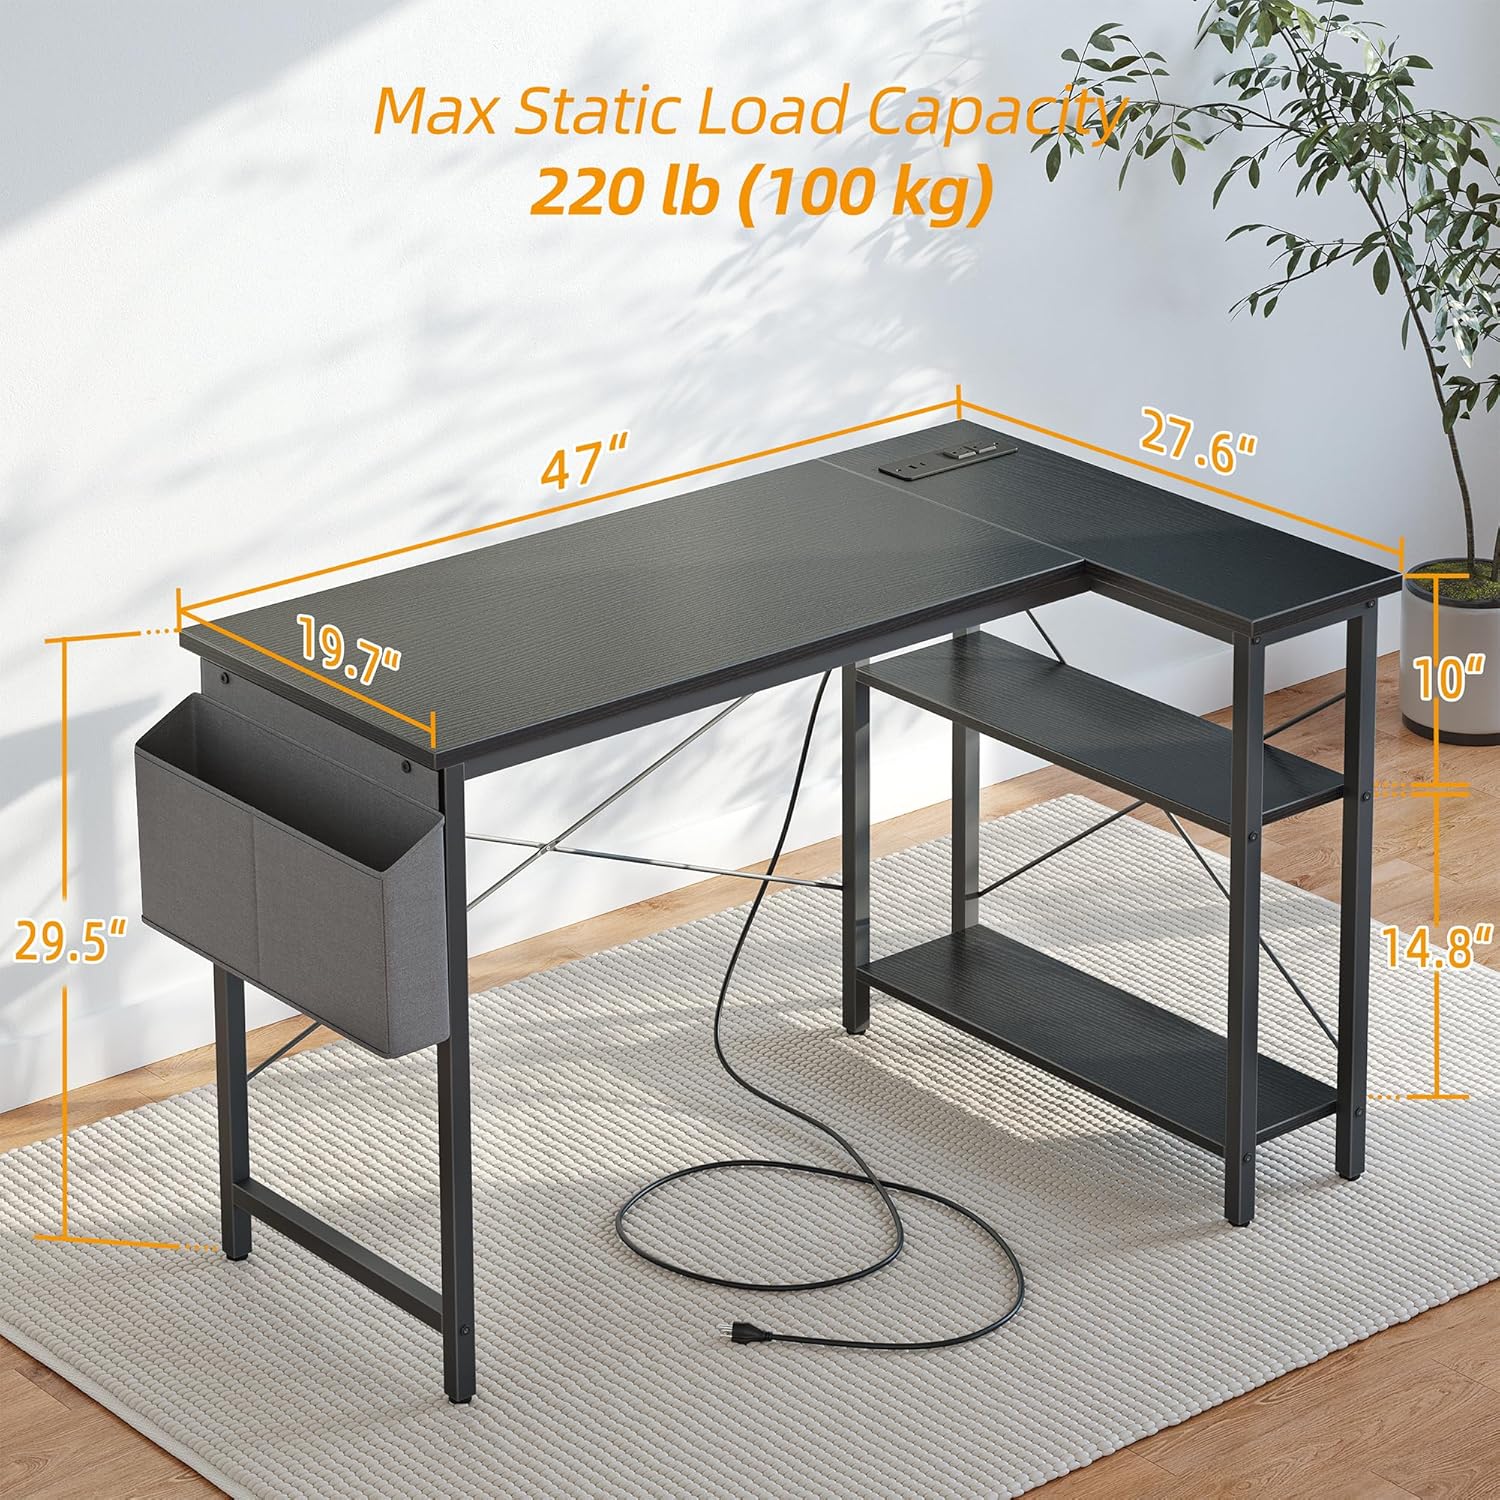
Image: Detailed dimensions of the BEXEVUE 47 Inch L Shaped Computer Desk.
Warranty and Customer Support
BEXEVUE stands by the quality of its products. For any questions, concerns, or warranty claims, please contact BEXEVUE customer support through the retailer's platform or the official BEXEVUE website. Please have your model number (E10002040GY) and purchase information ready when contacting support.