HOENGAGER SN-OPW5713213165
Superview Gaming PC Desktop Computer Instruction Manual
Model: SN-OPW5713213165 | Brand: HOENGAGER
1. Introduction
Welcome to the HOENGAGER Superview Gaming PC Desktop Computer. This manual provides essential information for setting up, operating, maintaining, and troubleshooting your new gaming system. Please read this manual thoroughly before using the product to ensure optimal performance and safety.

Figure 1.1: HOENGAGER Superview Gaming PC Desktop Computer (White model with RGB lighting)
2. Safety Information
Always observe the following safety precautions to prevent damage to the product or injury to yourself.
- Electrical Safety: Ensure the power supply voltage matches your local power grid. Do not overload power outlets. Disconnect the power cord before cleaning or servicing.
- Ventilation: Do not block ventilation openings. Ensure adequate airflow around the PC to prevent overheating.
- Liquid and Moisture: Keep the PC away from liquids. Do not operate in high humidity environments.
- Placement: Place the PC on a stable, flat surface. Avoid placing it near heat sources or in direct sunlight.
- Servicing: Do not attempt to open or repair the PC yourself. Refer all servicing to qualified personnel.
3. Package Contents
Verify that all items are present in the package before proceeding with setup.
- HOENGAGER Superview Gaming PC Desktop Computer
- Power Cable
- Documentation (Quick Start Guide, Warranty Card)
- (Optional) Keyboard and Mouse (if purchased as a bundle)

Figure 3.1: The HOENGAGER Superview Gaming PC, showcasing its design.
4. Setup
4.1 Unpacking
- Carefully remove the PC from its packaging.
- Remove any protective films or foam inserts from the exterior and interior of the PC.
- Place the PC on a flat, stable surface with good ventilation.
4.2 Connecting Peripherals
Connect your monitor, keyboard, mouse, and other peripherals to the appropriate ports on the back of the PC.
- Monitor: Connect your monitor to the graphics card's HDMI or DisplayPort output. Ensure it is connected to the dedicated graphics card (NVIDIA GeForce RTX 4060), not the motherboard's integrated graphics ports.
- Keyboard/Mouse: Connect to any available USB ports (USB 2.0 or USB 3.0).
- Network: For wired internet, connect an Ethernet cable to the LAN port. For wireless, ensure the Wi-Fi antenna is connected (if applicable).
- Power: Connect the power cable to the PC's power input and then to a wall outlet.
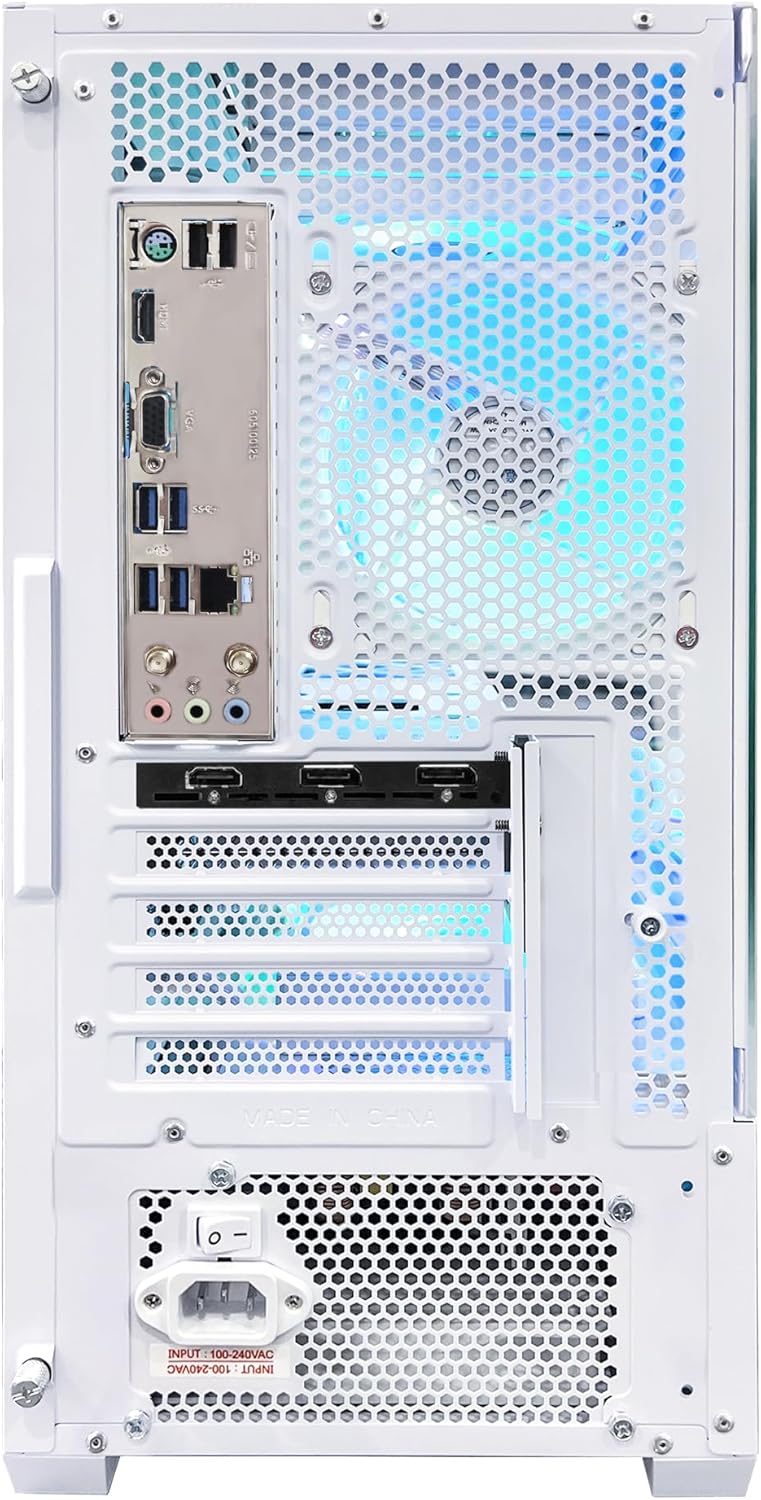
Figure 4.1: Rear view of the PC, highlighting connectivity ports.
4.3 Initial Power On
- After connecting all peripherals, press the power button located on the front of the PC.
- The system will boot into Windows 11 Pro. Follow the on-screen instructions for initial setup, including language, region, and user account creation.
5. Operating Your PC
5.1 Starting Up and Shutting Down
- To Start: Press the power button on the front of the PC.
- To Shut Down: Click the Start button in Windows, then select Power > Shut down. Avoid forced shutdowns unless absolutely necessary.
5.2 Using Windows 11 Pro
Your PC comes pre-installed with Windows 11 Pro 64-bit, offering a secure and efficient operating environment. Familiarize yourself with the Windows interface and its features for optimal use.
5.3 Gaming Performance
Equipped with an AMD Ryzen 7 5700X processor and NVIDIA GeForce RTX 4060 graphics card, this PC is designed for high-performance gaming. Expect smooth gameplay and high frame rates in popular titles.

Figure 5.1: Gaming performance benchmarks for popular titles at 1080p Ultra settings.
For best gaming experience, ensure your graphics drivers are up to date. You can download the latest drivers from the NVIDIA official website.
6. Maintenance
Regular maintenance helps prolong the life and performance of your PC.
6.1 Cleaning
- Exterior: Use a soft, damp cloth to wipe the exterior. Avoid harsh chemicals.
- Dust: Periodically clean dust from the ventilation grilles and fans using compressed air. Ensure the PC is powered off and unplugged before cleaning.

Figure 6.1: Illustration of the PC's heat dissipation design with ventilated dust meshes.
6.2 Software Updates
Regularly update your operating system (Windows Update) and graphics drivers (NVIDIA website) to ensure security, stability, and optimal performance.
6.3 System Optimization
Consider running disk cleanup and defragmentation tools periodically (for HDD, SSDs do not require defragmentation). Manage startup programs to improve boot times.
7. Troubleshooting
This section addresses common issues you might encounter. For more complex problems, please contact customer support.
| Problem | Possible Cause | Solution |
|---|---|---|
| PC does not power on. | Power cable loose, power supply switch off, faulty outlet. | Check power cable connections. Ensure PSU switch is ON. Try a different power outlet. |
| No display on monitor. | Monitor cable loose, connected to wrong port, monitor off. | Ensure monitor cable is securely connected to the graphics card. Check monitor power. |
| System is slow or freezing. | Too many programs running, insufficient RAM, overheating, malware. | Close unnecessary programs. Check task manager for resource usage. Ensure proper ventilation. Run antivirus scan. |
| Games perform poorly. | Outdated graphics drivers, high in-game settings, background applications. | Update graphics drivers. Lower in-game graphics settings. Close background applications. |
8. Specifications
| Feature | Detail |
|---|---|
| Processor | AMD Ryzen 7 5700X (8-Core, 3.4 GHz) |
| Graphics Card | NVIDIA GeForce RTX 4060 8GB |
| RAM | 32GB DDR4 3200MHz |
| Storage | 1TB M.2 PCIe SSD |
| Power Supply | 650W PSU |
| Cooling | 360mm AIO Liquid Cooler |
| Operating System | Windows 11 Pro 64-bit |
| Wireless Connectivity | 802.11AC Wi-Fi & Bluetooth |
| USB Ports | USB 2.0, USB 3.0 |
| Video Output | HDMI, DisplayPort |
| Dimensions (LxWxH) | 19 x 19 x 15 inches |
| Weight | 25 pounds |
9. Warranty and Support
HOENGAGER provides a 1-year warranty on parts and labor for this product. This warranty covers defects in materials and workmanship under normal use.
For technical support, warranty claims, or further assistance, please visit the official HOENGAGER Store on Amazon or contact their customer service directly.
Official HOENGAGER Store: HOENGAGER Store
Ask a question about this manual
Ask about setup, troubleshooting, compatibility, parts, safety, or missing instructions. Manuals+ will review the question and use this page’s manual context to help answer it.