1. Introduction
This manual provides instructions for the installation, operation, and maintenance of your Elite Projector Evanesce Tab-Tension B 100-inch 16:9 Recessed In-Ceiling Electric Tab-Tensioned Projector Screen, model ETB100HW3-E12. This screen is designed for concealed installations, offering a high-quality viewing surface for 4K Ultra HD and Active 3D projection.
The tab-tension system ensures a flat and uniform projection surface, free from distortions. The CineWhite UHD-B material provides a 1.3 gain with a 160-degree viewing angle, suitable for various projector types including Standard, Short Throw, and UHD/HD projectors.

Image: The Elite Projector Evanesce Tab-Tension B screen fully extended, showcasing its design and the included remote controls.
2. Safety Information
Please read all safety instructions carefully before installation and operation. Failure to follow these instructions may result in injury or damage to the product.
- Electrical Safety: Ensure the power supply matches the screen's requirements. Disconnect power before any installation or maintenance. All electrical work should be performed by a qualified electrician.
- Installation: The screen must be securely mounted to a structurally sound ceiling. Use appropriate fasteners and follow all installation kit instructions. Improper installation can lead to the screen falling, causing severe injury or damage.
- Handling: Handle the screen with care to avoid damage to the casing or projection surface. Do not touch the screen surface with bare hands or sharp objects.
- Children and Pets: Keep children and pets away from the screen during operation to prevent entanglement or injury.
- Environment: Do not expose the screen to excessive moisture, heat, or direct sunlight. The aluminum housing is moisture-resistant, but not waterproof.
3. Package Contents
Verify that all components are present and undamaged before proceeding with installation.
- Evanesce Tab-Tension B Projector Screen Unit
- Full In-Ceiling Installation Kit
- Infrared (IR) Remote Control
- Radio Frequency (RF) Remote Control
- Wall Box Controller with built-in IR sensor
- RJ50 Cable for wired 12-volt trigger feature
- User Manual (this document)
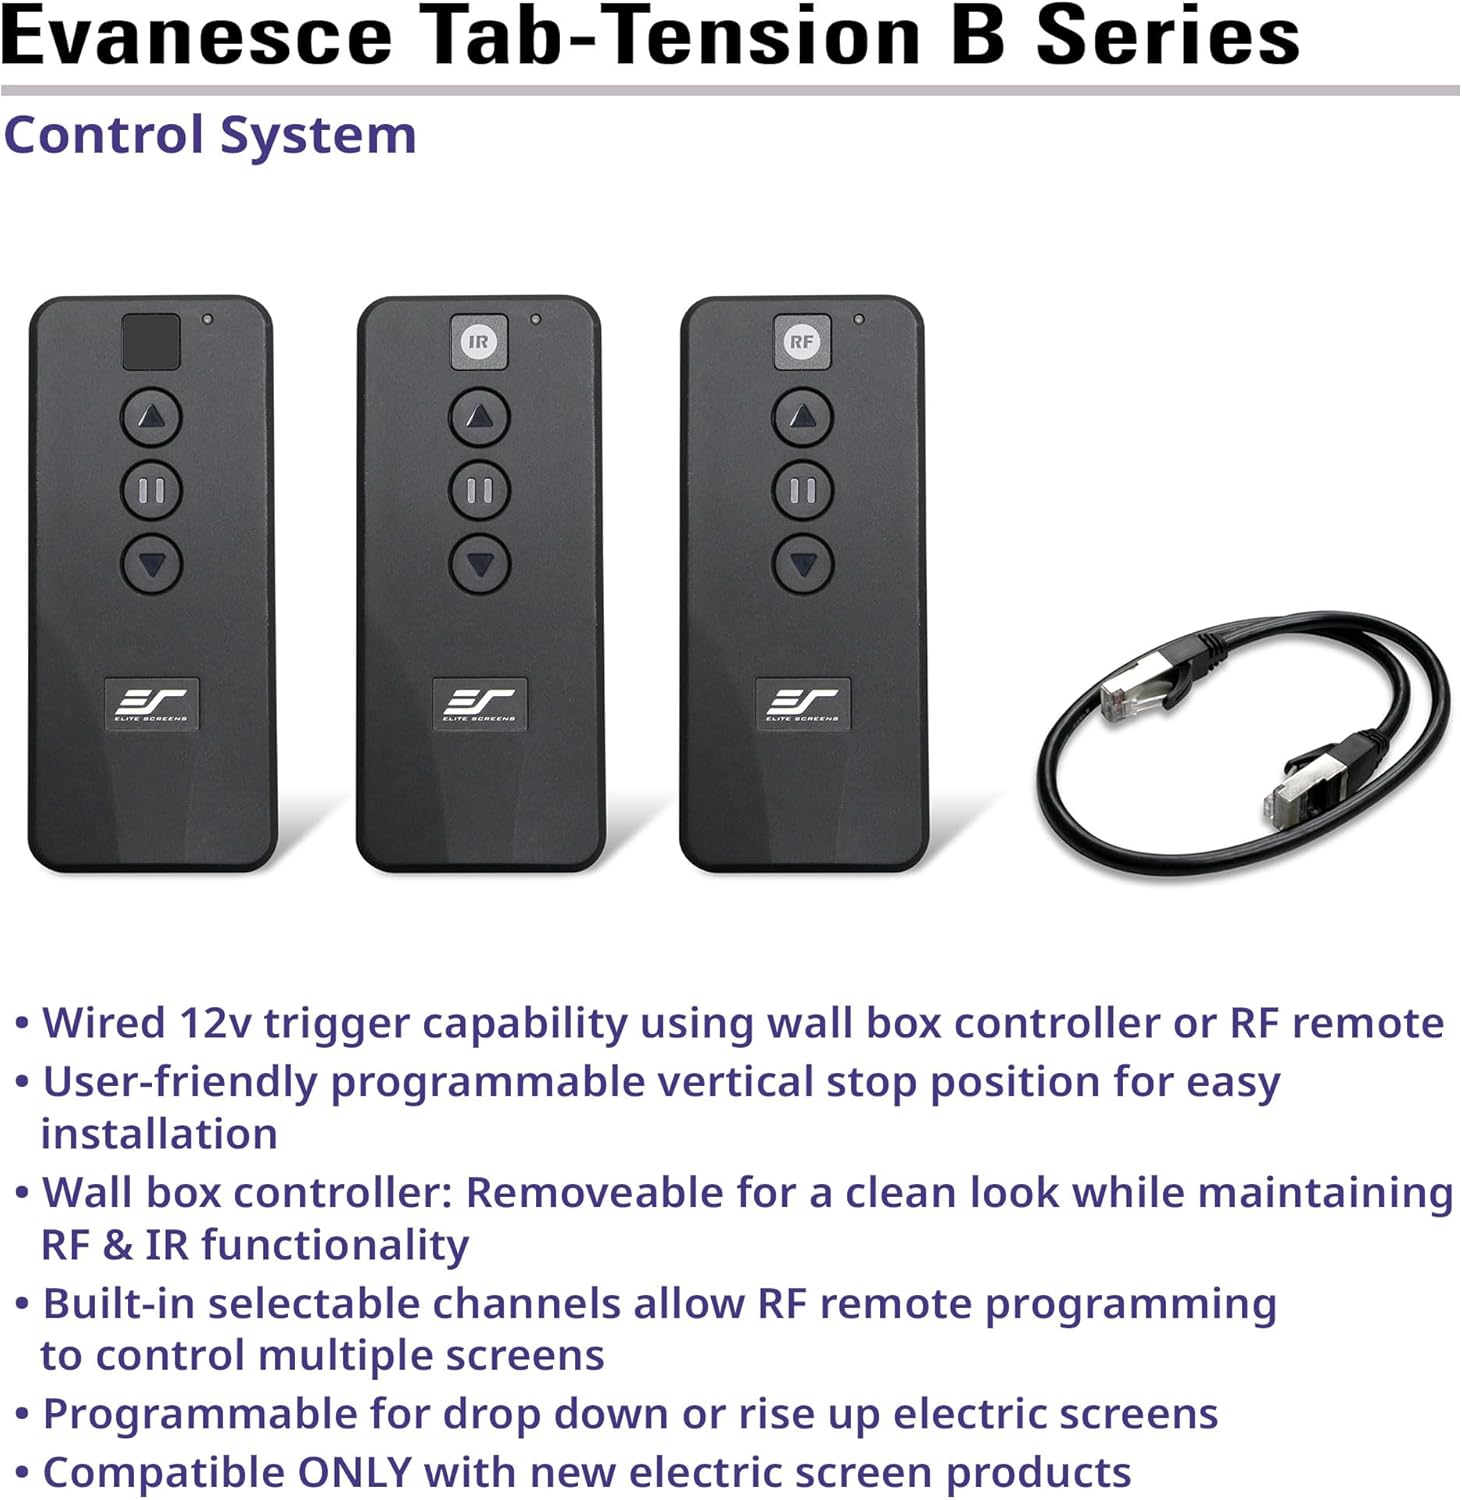
Image: The included control system components: IR remote, RF remote, and RJ50 cable.
4. Setup and Installation
The Evanesce Tab-Tension B screen is designed for recessed in-ceiling installation. The unit ships fully assembled and includes a complete installation kit.
4.1 Mounting
The screen features an integrated ceiling projection screen design, ready for installation. Ensure the ceiling structure can support the weight of the screen (approximately 31 lbs for the 100-inch model).
- Ceiling Access: The design allows for both below and above ceiling access for installation, providing flexibility for various room configurations.
- Recessed Installation: The screen is intended to be concealed within the ceiling for a clean, integrated look. Follow the detailed instructions provided in the separate installation kit for precise measurements and mounting procedures.
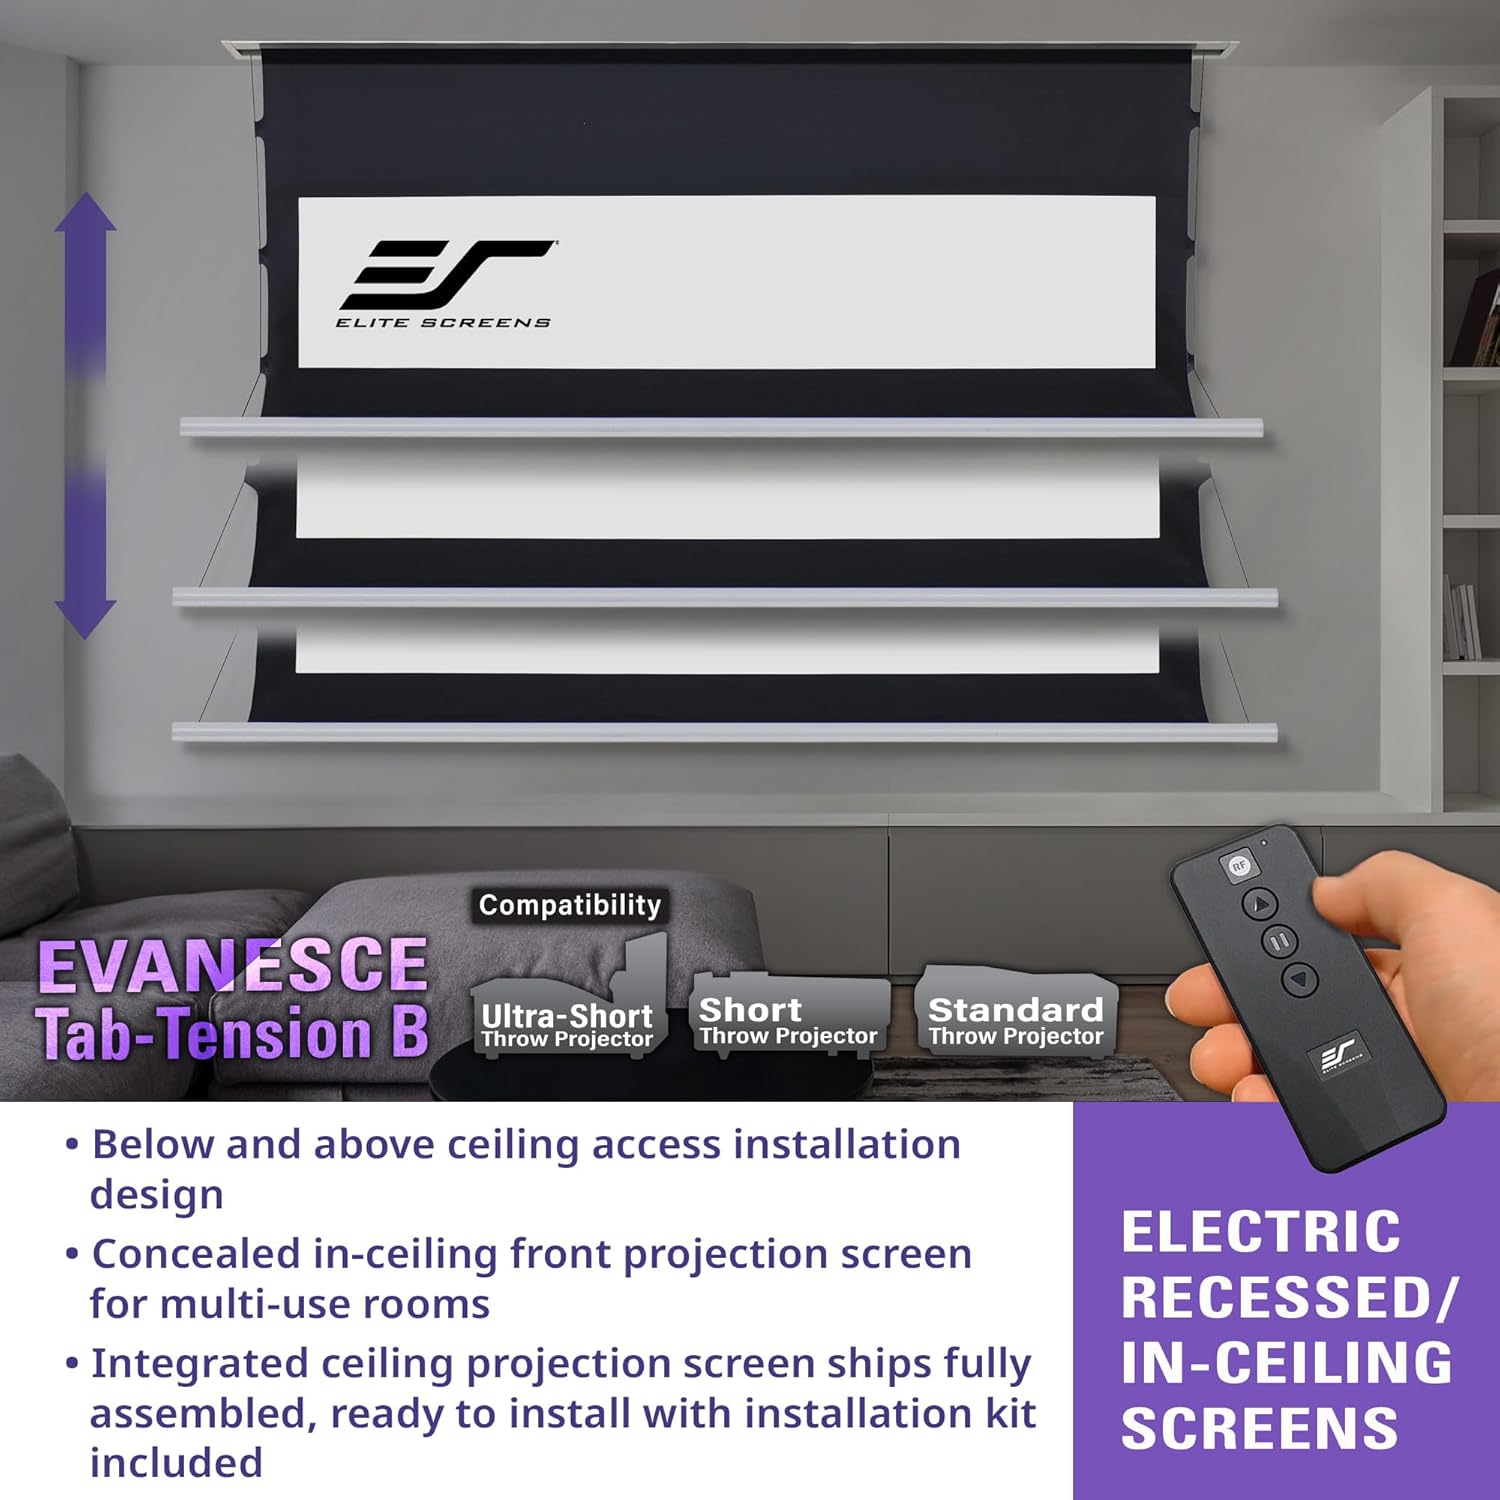
Image: A diagram illustrating the recessed in-ceiling installation of the projector screen, highlighting access points.
4.2 Electrical Connection
Connect the screen to a power source according to local electrical codes. The screen supports various control options:
- Wall Box Controller: The included wall box controller has a built-in IR sensor for direct control and can be removed for a cleaner aesthetic while maintaining IR and RF functionality.
- 12-Volt Trigger: Utilize the RJ50 port for a wired 12-volt trigger feature, allowing the screen to automatically deploy or retract in sync with your projector's power cycle. A wireless 12-volt trigger is also available using the RF remote.
5. Operating Instructions
The Evanesce Tab-Tension B screen can be operated using the included IR remote, RF remote, or the wall box controller.
5.1 Remote Control Usage
- IR Remote: Requires a direct line of sight to the IR sensor on the screen or wall box controller.
- RF Remote: Operates without line of sight, offering greater flexibility.
- Wall Box Controller: Provides direct control buttons for screen movement.
5.2 Screen Movement
Use the UP, DOWN, and STOP buttons on any control device to manage the screen's position.
- Programmable Vertical Drop: The screen features a user-friendly programmable vertical drop position. This allows you to set a custom lower limit for the screen, ensuring it stops at your preferred viewing height. Refer to the installation kit manual for detailed programming steps.
- Multi-Screen Control: Built-in selectable channels allow programming different RF remote codes for controlling multiple screens independently and reducing electrical interference.
6. Maintenance
Proper maintenance ensures the longevity and optimal performance of your projector screen.
- Screen Surface Cleaning: The CineWhite UHD-B screen material is easy to clean. Use a soft cloth dampened with mild soap and water. Do not use abrasive cleaners, solvents, or harsh chemicals, as these can damage the screen surface.
- Casing Cleaning: Wipe the aluminum casing with a soft, dry cloth.
- Inspection: Periodically inspect the mounting hardware and electrical connections to ensure they are secure.

Image: A close-up view of the CineWhite UHD-B screen material, highlighting its smooth texture and black backing.
7. Troubleshooting
If you encounter issues with your projector screen, refer to the following common problems and solutions:
| Problem | Possible Cause | Solution |
|---|---|---|
| Screen does not respond to remote. |
|
|
| Screen stops mid-way or does not fully extend/retract. |
|
|
| Wavy or uneven screen surface. |
|
|
If the problem persists after attempting these solutions, please contact Elite Projector customer support.
8. Specifications
| Feature | Detail |
|---|---|
| Model Number | ETB100HW3-E12 (100-inch/ 16:9) |
| Viewing Diagonal Size | 100 inches |
| Aspect Ratio | 16:9 HD Format |
| Viewing Size (H x W) | 49.0" H x 87.2" W |
| Overall Size (H x W x D) | 68.7" H x 102.0" W x 4.3" D |
| Top Black Masking Drop | 12 inches |
| Screen Material | CineWhite UHD-B (1.3 Gain) |
| Viewing Angle | 160 degrees |
| Compatibility | 4K Ultra HD, Active 3D, Standard, Short Throw, UHD/HD Projectors |
| Mounting Type | Recessed In-Ceiling Mount |
| Casing Material | Aluminum (White Finished) |
| Assembled Weight | 31 lbs |
| Control System | IR Remote, RF Remote, Wall Box Controller, 12V Trigger (Wired/Wireless) |
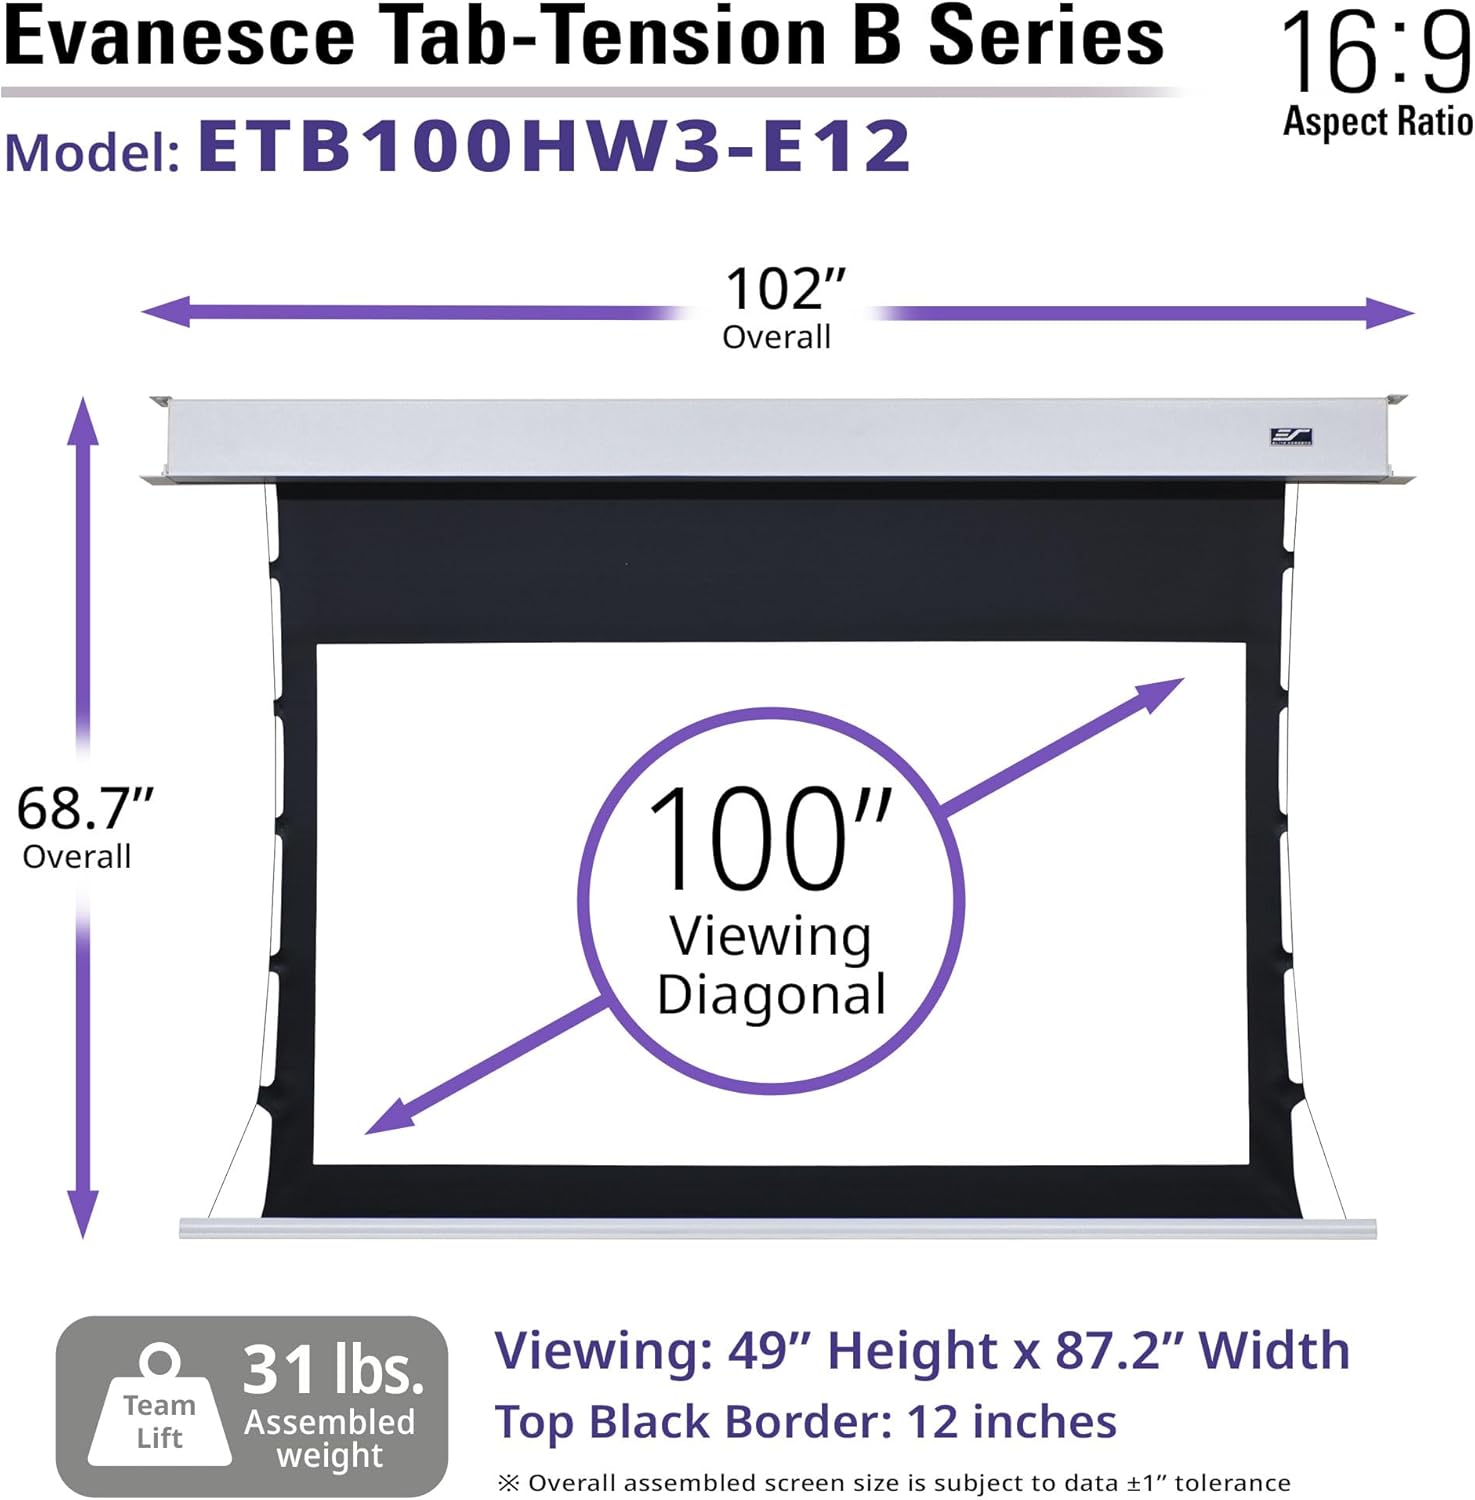
Image: A detailed diagram illustrating the overall and viewing dimensions of the 100-inch Evanesce Tab-Tension B projector screen.
9. Warranty and Support
Elite Projector provides comprehensive warranty and technical support for its products.
- Manufacturer's Warranty: A 2-Year/3-Year ENR-G Manufacturer's Warranty is provided by Elite Screens for products purchased new. Elite Screens is an ISO9001 manufacturer since 2004.
- Technical Support: Lifetime Technical Support is available via email or phone call from Elite Screens' Professional Service Team.
For warranty claims or technical assistance, please refer to the contact information provided with your product documentation or visit the Elite Projector official website.


