Introduction
The BAOFENG UV-5RM is a versatile multi-band two-way radio designed for reliable communication across various environments. It features a 1.77-inch LCD screen, 999 memory channels, and supports USB-C charging. This device is suitable for outdoor activities, professional use, and emergency communication, offering features like NOAA weather alerts, frequency hopping, and scramble functions for enhanced privacy.
This manual provides essential information for the proper setup, operation, and maintenance of your UV-5RM radio to ensure optimal performance and longevity.
Package Contents
Before proceeding with setup, please verify that all items are present in your package:
- BAOFENG UV-5RM Radio Unit
- Antenna
- Rechargeable Lithium-Ion Battery
- USB-C Charging Cable
- Desktop Charger Dock
- Belt Clip
- Hand Strap
- User Manual (this document)
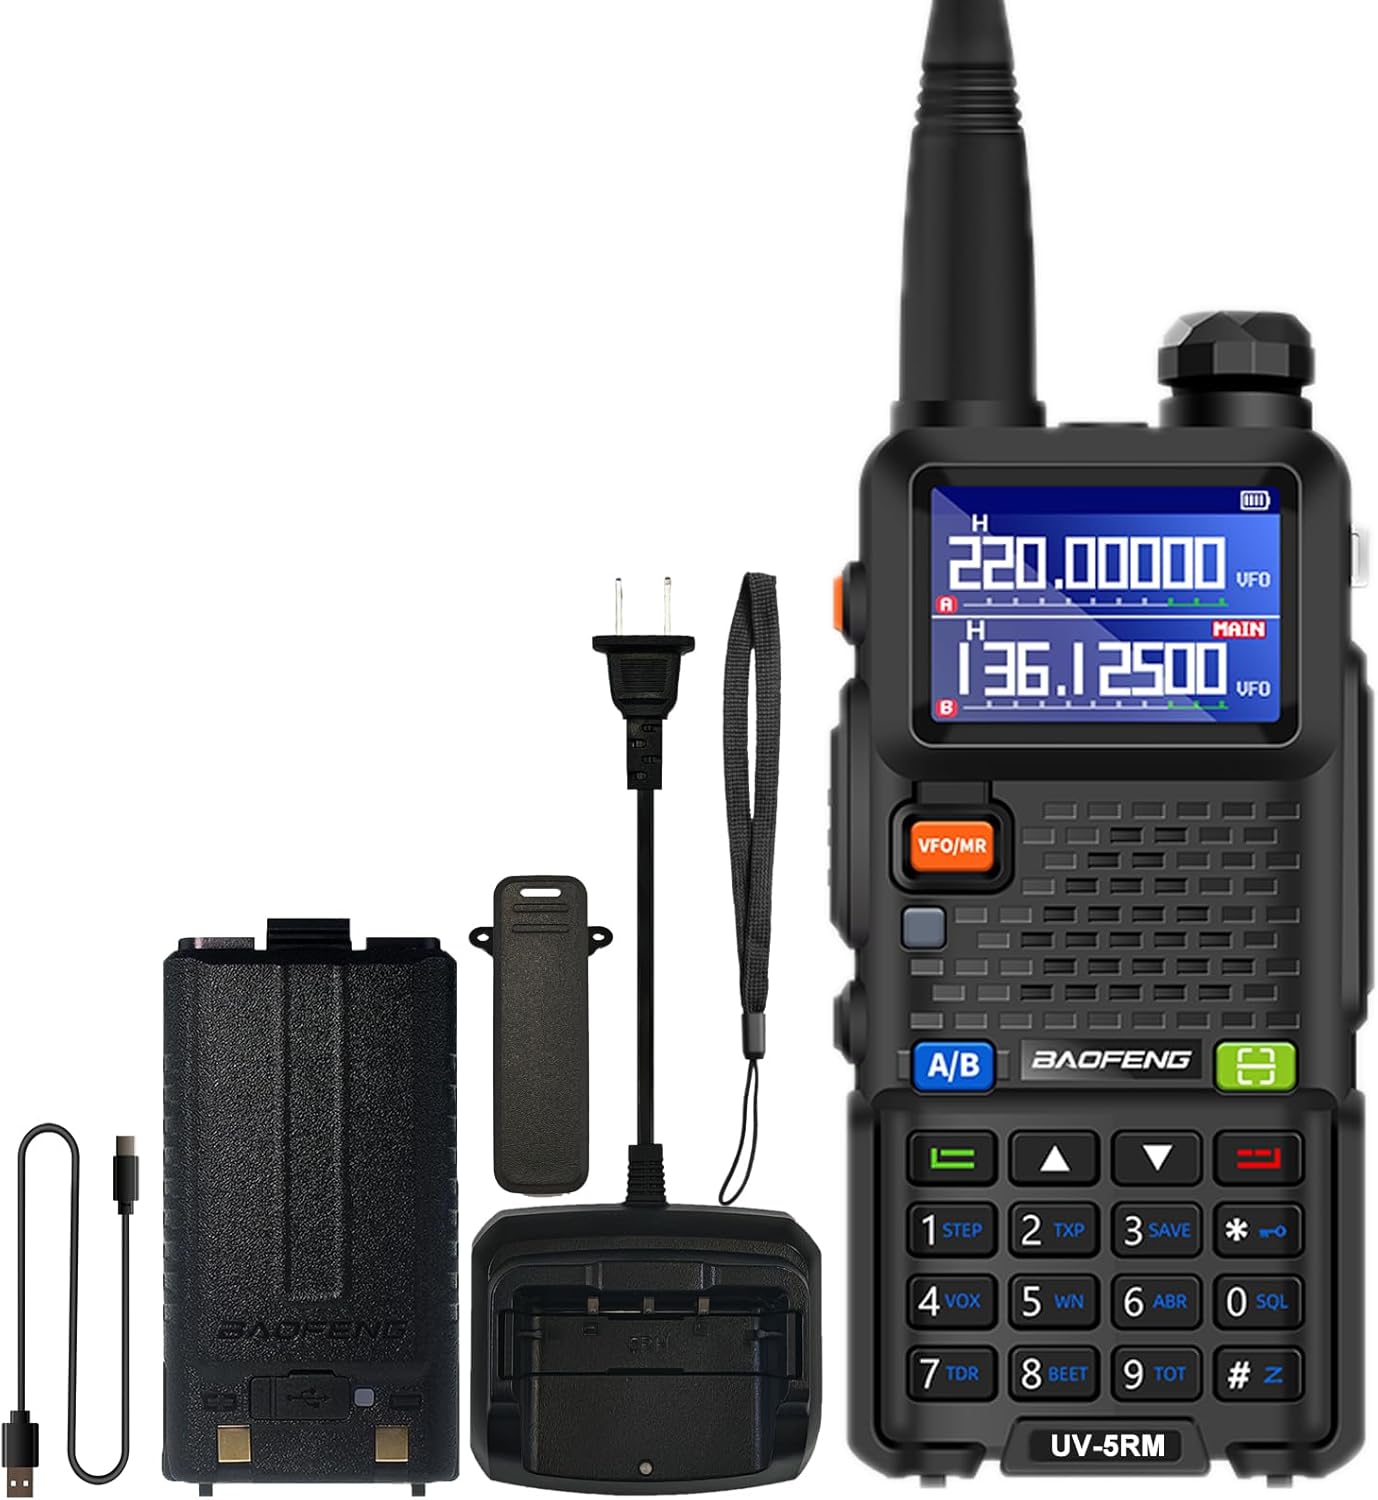
Image: The BAOFENG UV-5RM radio unit with its standard accessories, including the antenna, battery, and charging components.
Setup
1. Attaching the Antenna
Carefully screw the antenna clockwise into the connector on the top of the radio until it is finger-tight. Do not overtighten.
2. Installing the Battery
Align the battery pack with the grooves on the back of the radio. Slide the battery upwards until it clicks into place. To remove, press the release latch (if present) and slide the battery downwards.
3. Charging the Battery
The UV-5RM offers two charging methods:
- Using the Desktop Charger: Place the radio (with battery installed) into the charging dock. Ensure the charging contacts align. The indicator light on the charger will show the charging status.
- Using the USB-C Port: Connect the provided USB-C cable to the port on the back of the battery pack and to a compatible USB power source (e.g., car charger, power bank, laptop, USB wall adapter).
A full charge typically takes several hours. The radio can be charged in your car, with a power bank, or any USB interface device, providing flexibility for charging on the go.

Image: The BAOFENG UV-5RM radio demonstrating both USB-C direct charging and charging via its desktop dock.
4. Attaching the Belt Clip and Hand Strap
Secure the belt clip to the back of the radio using the provided screws. Attach the hand strap to the designated loop for added security during use.
Operating Instructions
Radio Overview and Controls

Image: Labeled diagram of the BAOFENG UV-5RM radio highlighting key components and controls.
- Antenna: For transmitting and receiving signals.
- Flashlight: Built-in LED light for illumination.
- Power/Volume Knob: Rotate to turn the radio on/off and adjust volume.
- 1.77" LCD Screen: Displays frequency, channel, battery status, and other information.
- FM Button: Activates the FM radio function.
- PTT (Push-To-Talk) Button: Press and hold to transmit, release to receive.
- VFO/MR Button: Switches between Frequency Mode (VFO) and Channel Mode (MR).
- 2-pin Jack: For connecting external audio accessories like headsets or programming cables.
- Mic: Microphone for voice input.
- Scan Button: Initiates frequency or channel scanning.
- Menu Button: Accesses the radio's menu settings.
- Keypad: For direct frequency input, channel selection, and menu navigation.
- USB-C Port: For direct battery charging.
1. Power On/Off and Volume Adjustment
Rotate the Power/Volume knob clockwise to turn the radio on. Continue rotating clockwise to increase volume, and counter-clockwise to decrease volume. Rotate fully counter-clockwise until a click is heard to turn the radio off.
2. Frequency and Channel Mode (VFO/MR)
Press the VFO/MR button to switch between:
- Frequency Mode (VFO): Allows direct input of frequencies using the keypad.
- Channel Mode (MR): Allows selection of pre-programmed memory channels (up to 999).
3. One Key Match Frequency Function
This feature allows for quick frequency matching with another radio.
- Step 1: Turn on your UV-5RM radio. Press and hold the SEARCH button (often labeled with a magnifying glass icon or similar) until the screen displays "SEARCH".
- Step 2: Press and hold the transmit button on the other radio you wish to match. Your UV-5RM will search for and decode its frequency and CTCSS/DCS tones. Once finished, press a confirmation button (e.g., MENU or EXIT) on your UV-5RM to save.
- Step 3: Switch to channel mode to select the newly matched channel. The screen will display the frequency of the other radio, enabling communication.

Image: Visual guide for the 'One Key Match Frequency' feature, illustrating the steps to quickly synchronize frequencies with another radio.
4. Transmitting and Receiving
To transmit, press and hold the PTT button and speak clearly into the microphone. Release the PTT button to switch to receive mode.
5. VOX Function (Hands-Free Communication)
The Voice Operated eXchange (VOX) function allows you to transmit without pressing the PTT button. When VOX is enabled, the radio will automatically transmit when it detects your voice. Adjust VOX sensitivity in the menu settings.
6. FM Radio Function
Press the FM button to activate the built-in FM radio. You can scan for local radio stations and enjoy entertainment when not actively communicating.
7. NOAA Weather Radio
The UV-5RM supports NOAA weather channels, providing access to real-time weather alerts and forecasts. Refer to the menu for specific NOAA channel settings and activation.
8. Programming
The radio can be programmed using CHIRP software and a compatible programming cable (sold separately). This allows for advanced customization of frequencies, channels, and other settings.
Maintenance
- Cleaning: Use a soft, damp cloth to clean the radio's exterior. Do not use harsh chemicals or abrasive cleaners.
- Battery Care: To prolong battery life, avoid overcharging or completely discharging the battery. Store the radio and battery in a cool, dry place when not in use for extended periods.
- Storage: Store the radio in a dry, dust-free environment away from direct sunlight and extreme temperatures.
- Water Resistance: The BAOFENG UV-5RM is not water resistant. Avoid exposing the radio to rain, splashes, or immersion in water.
Troubleshooting
| Problem | Possible Cause | Solution |
|---|---|---|
| Radio does not power on. | Battery is not charged or improperly installed. | Ensure battery is fully charged and correctly seated. |
| Cannot transmit or receive. | Incorrect frequency/channel, antenna not attached, or low battery. | Verify frequency/channel, check antenna connection, charge battery. |
| Poor audio quality. | Volume too low, squelch level too high, or interference. | Adjust volume, lower squelch level, move away from interference sources. |
| Keypad unresponsive. | Keypad lock activated. | Refer to the manual for keypad unlock procedure (usually a long press of a specific key). |
Specifications
| Model Number | UV-5RM |
| Brand | BAOFENG |
| Number of Channels | 999 |
| Frequency Range | VHF: 144-148 MHz / UHF: 420-450 MHz (Multi-Band) |
| Display | 1.77-inch LCD Screen |
| Charging | USB-C Charging, Desktop Charger |
| Battery Type | Lithium-Ion (included) |
| Battery Average Life | Up to 48 Hours |
| Talking Range Maximum | Up to 6 Miles (environment dependent) |
| Special Features | NOAA, VOX, FM Radio, LED Flashlight, Squelch, Battery Save, Repeater, CTCSS/DCS, Scan, TOT, BCL, DTMF, Power-on Password, Frequency Hopping, Scramble Functions |
| Water Resistance Level | Not Water Resistant |

Image: A comparison chart detailing the enhanced features of the BAOFENG UV-5RM model compared to the UV-5R, including channel capacity, screen size, battery, and charging options.
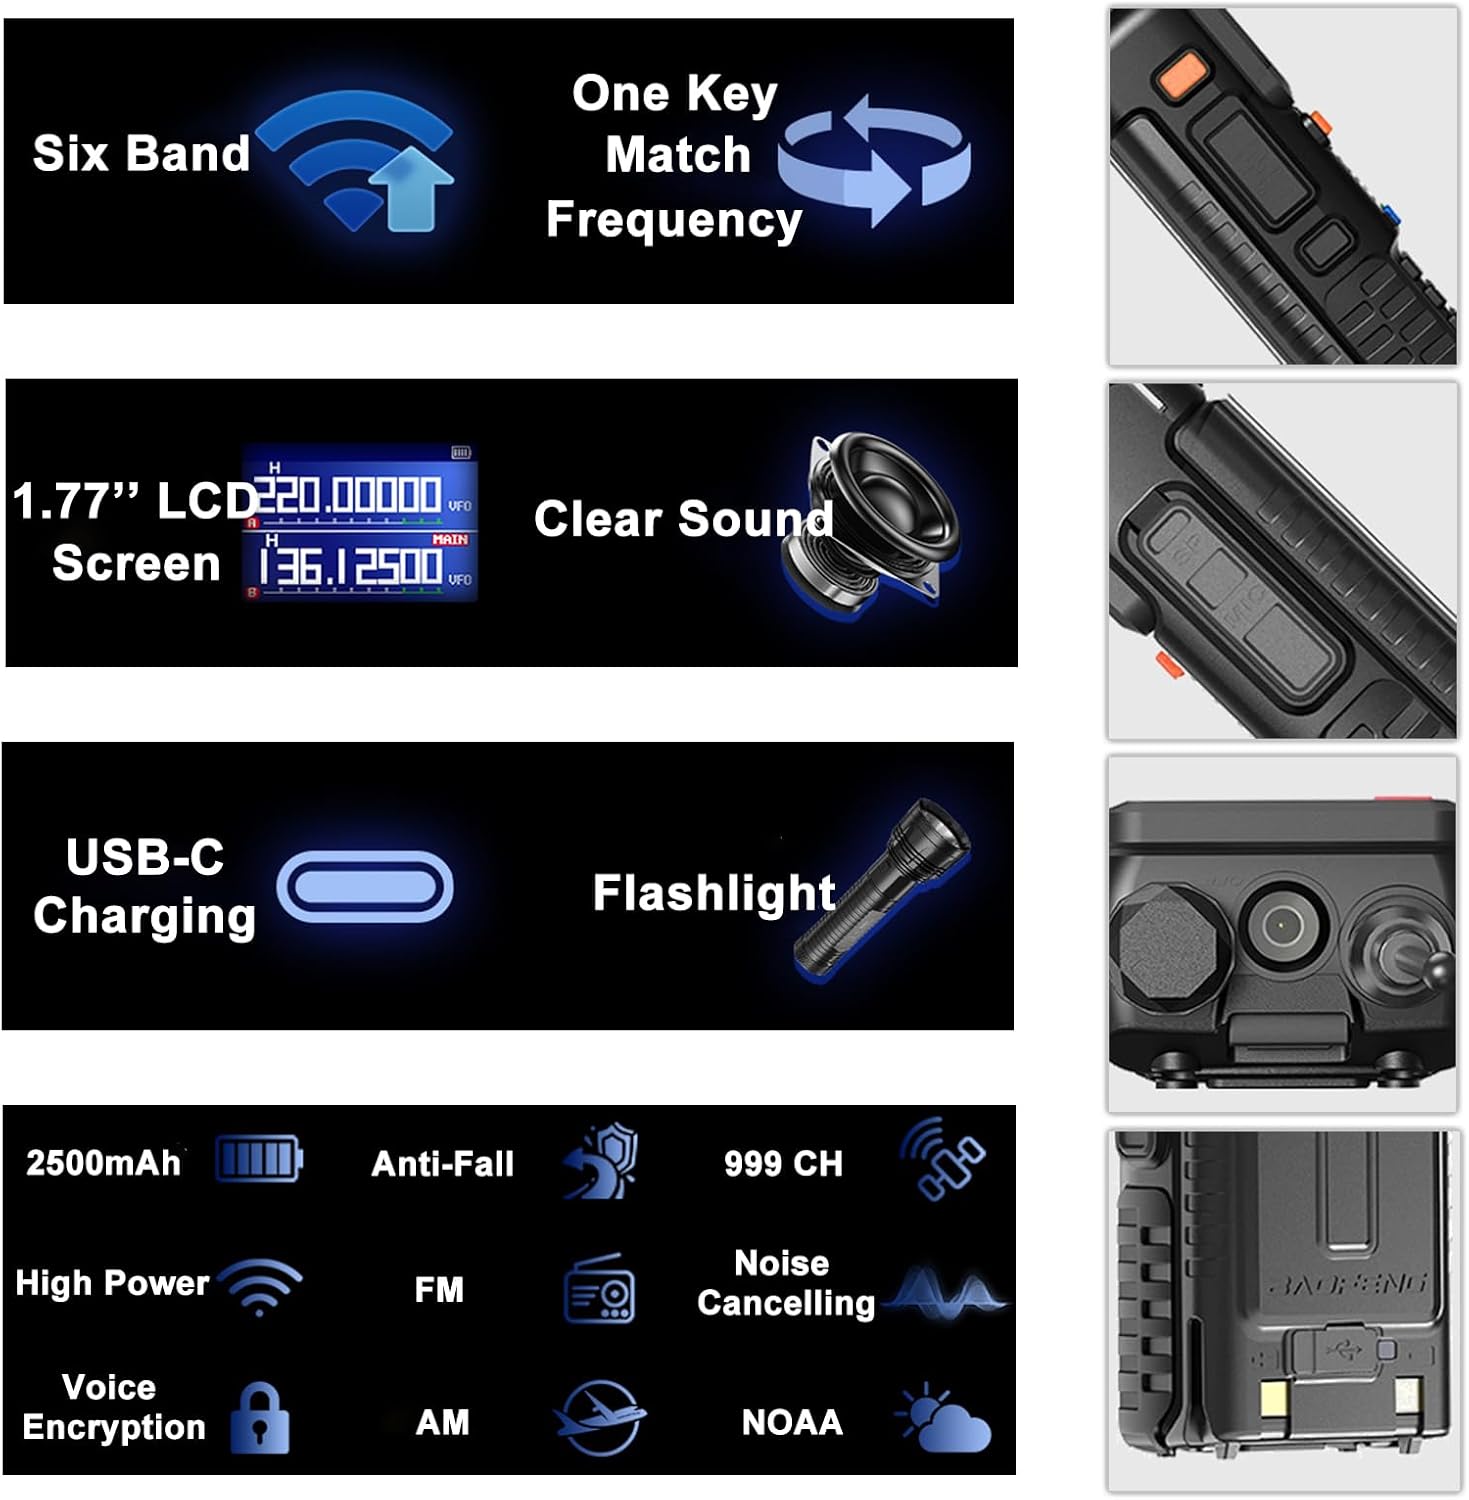
Image: An infographic summarizing the main features of the BAOFENG UV-5RM, such as multi-band capability, one-key frequency matching, USB-C charging, and a 1.77-inch LCD screen.

Image: Detailed view of the 1.77-inch LCD screen on the BAOFENG UV-5RM, illustrating its dual display capability and clear readability.
Warranty and Support
Warranty: The BAOFENG UV-5RM Two Way Radio comes with a 1-year warranty. This warranty is provided exclusively through "Shiqun Electronics Co., Ltd." Please retain your proof of purchase for warranty claims.
For technical support, troubleshooting assistance, or warranty inquiries, please contact the seller or authorized service center. Refer to your purchase documentation for specific contact details.


