
1. Introduction
This manual provides essential information for the safe and efficient operation of your NICE-POWER DC Power Supply Variable. This high-power bench power supply offers adjustable voltage and current, memory storage, and dedicated battery charging functions with multiple protection features. Please read this manual thoroughly before use and retain it for future reference.
2. Safety Information
WARNING:
- Always ensure proper charging voltage and current settings for the specific battery type being charged. Incorrect settings can lead to battery damage or safety hazards.
- The front panel output terminals are suitable for currents up to 5A. For output currents exceeding 5A, always connect to the high current terminals located on the back of the unit to prevent damage to the power supply.
- Ensure correct polarity when connecting to batteries or other loads to avoid reverse charging and potential damage to the power supply or connected devices.
- Do not operate the device in wet or damp conditions.
- Ensure adequate ventilation around the unit to prevent overheating.
3. Product Overview
The NICE-POWER DC Power Supply features a clear digital display and intuitive controls for precise operation.

Figure 1: Front and Rear Panel Overview. This image displays the front panel with digital readouts for voltage, current, power, and Ah, along with control knobs for voltage and current, memory buttons (M1, M2, M3), OCP, Lock, Output, and Battery functions. The rear panel shows the cooling fan, AC power input, high power output terminals, and fuse box.
Front Panel Controls:
- Digital Display: Shows Current (A), Voltage (V), Power (W), and Charge (Ah).
- C.V Indicator: Lights up when in Constant Voltage mode.
- C.C Indicator: Lights up when in Constant Current mode.
- Encoder Knobs: Separate knobs for precise Voltage and Current adjustment. Press to select digit, rotate to change value.
- Memory Buttons (M1, M2, M3): Store and recall up to 3 sets of frequently used voltage/current settings.
- OCP Button: Over Current Protection activation.
- LOCK Button: Locks current settings to prevent accidental changes.
- Output Button: Toggles power output on/off.
- Battery Button: Activates battery charging mode with status indicators.
- USB Charging Socket (5V/2A): For charging compatible USB devices.
- Output Terminals (Front): Positive (+), Negative (-), and Ground (GND) for currents up to 5A.
Rear Panel Features:
- Cooling Fan: Provides intelligent cooling during operation.
- AC Power Input: Standard AC power connection.
- High Power Output Terminals: Positive (+) and Negative (-) for currents above 5A.
- Fuse Box: Contains a replaceable fuse for circuit protection.
4. Setup
- Unpacking: Carefully remove the power supply and all accessories from the packaging.
- Placement: Place the unit on a stable, level surface with adequate ventilation around all sides, especially the rear cooling fan.
- Power Connection: Connect the provided input power cable to the AC power input on the rear panel of the power supply and then to a suitable AC power outlet.
- Output Connection:
- For loads requiring up to 5A, use the front panel output terminals (red for positive, black for negative, green for ground).
- For loads requiring more than 5A, use the high power output terminals on the rear panel. Ensure secure connections.
5. Operating Instructions
5.1 Power On/Off
- To power on the unit, flip the power switch located on the rear panel. The digital display will illuminate.
- To power off, flip the power switch back to the off position.
5.2 Voltage and Current Adjustment

Figure 2: Encoder Adjustment. This image highlights the encoder knobs for precise voltage and current adjustment, showing how pressing the knob selects a digit and rotating changes its value.
- Ensure the output is off before adjusting settings for a connected load.
- Press the desired encoder knob (Voltage or Current) to select the digit you wish to adjust. The selected digit will blink.
- Rotate the knob clockwise to increase the value or counter-clockwise to decrease it.
- Repeat steps 2 and 3 until the desired voltage and current values are set.
5.3 Output Control

Figure 3: Output Switch Button. This image shows the green 'Output' button, which controls the power delivery to connected loads.
- Press the Output button to toggle the power output to the connected load.
- The output indicator light will illuminate when the output is active.
5.4 Memory Storage (M1, M2, M3)

Figure 4: Data Storage Function. This image shows the three memory buttons (M1, M2, M3) used for saving and recalling settings.
- Set the desired Voltage and Current values using the encoder knobs.
- Press and hold one of the Memory buttons (M1, M2, or M3) for a few seconds until the display confirms the settings are saved.
- To recall saved settings, simply press the corresponding Memory button (M1, M2, or M3).
5.5 Lock Button
- Press the LOCK button to prevent accidental changes to the set voltage and current values.
- Press the LOCK button again to unlock the controls.
5.6 Battery Charging Function
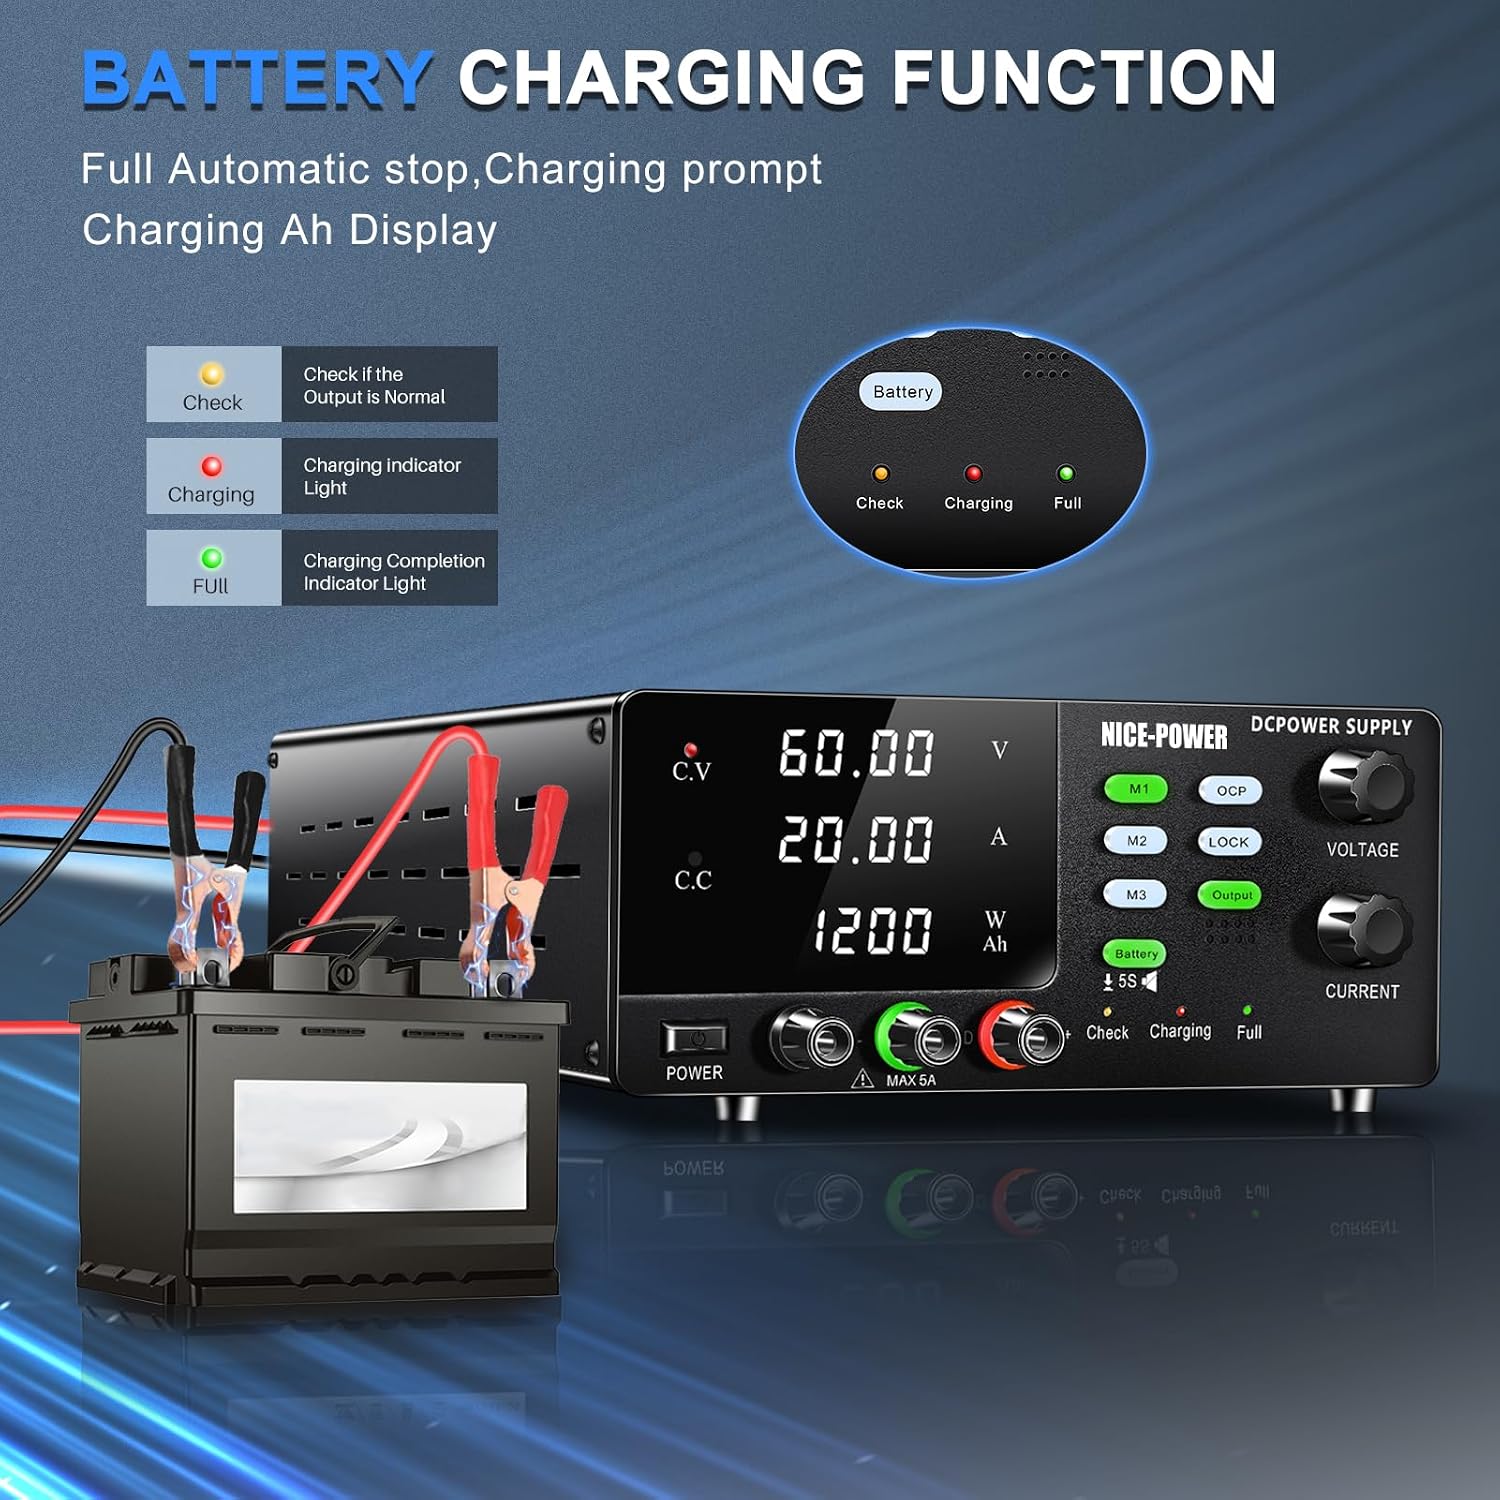
Figure 5: Battery Charging Function. The power supply is shown connected to a battery, with indicators for 'Check', 'Charging', and 'Full' status.

Figure 6: Charging Indicator Introduction. This image details the meaning of the 'Check' (yellow flashing for error), 'Charging' (red for in progress), and 'Full' (green for complete) indicator lights during battery charging.
- Connect the battery to the appropriate output terminals, ensuring correct polarity.
- Press the Battery button to enter battery charging mode.
- Observe the charging indicators:
- Check Indicator (Yellow Flashing): Indicates incorrect wiring or an error in the charging circuit. Verify connections.
- Charging Indicator (Red): Indicates that charging is in progress.
- Full Indicator (Green): Indicates that the battery is almost fully charged and the DC power supply will automatically stop charging.
- Once the 'Full' indicator lights up, you can safely disconnect the battery.
Video 1: Jesverty DC Power Supply Operation. This video demonstrates the basic operation of a similar DC power supply, including power on/off, voltage/current adjustment, and output control.
6. Multiple Protection Features

Figure 7: Multiple Protection Features. This image visually represents the various safety mechanisms built into the power supply, including Over Voltage Protection (U), Over Current Protection (OCP), Over Heat Protection, and Short Circuit Protection.
The NICE-POWER DC Power Supply is equipped with several protection functions to ensure safe operation and prevent damage to the unit and connected devices:
- Over-Temperature Protection (OTP): Automatically shuts down the unit if internal temperature exceeds safe limits.
- Over-Current Protection (OCP): Prevents excessive current draw, protecting the load and the power supply. Can be configured via the OCP button.
- Short-Circuit Protection (SCP): Automatically cuts off output in case of a short circuit.
- Over-Voltage Protection (OVP): Prevents output voltage from exceeding a set limit.
Video 2: NICE-POWER High Power DC Power Supply for Battery Charging. This video provides an overview of the power supply's features, including its high power output and battery charging capabilities.
Video 3: NICE-POWER DC Power Supply for Battery Charging. This video further demonstrates the battery charging function and general usage of the power supply.
7. Specifications
| Feature | Specification |
|---|---|
| Product Dimensions | 9.4 x 5.1 x 15 inches |
| Item Weight | 6.6 pounds |
| Manufacturer | NICE-POWER |
| Item model number | R-SPS6010C |
| Brand | NICE-POWER |
| Compatible Devices | Laptop |
| Connector Type | ATX |
| Output Wattage | 1200 watts |
| Form Factor | ATX |
| Wattage | 1200 watts |
| Cooling Method | Air |
| Number of Connectors | 4 |
8. Maintenance
- Cleaning: Disconnect the power supply from the AC outlet and all loads before cleaning. Use a soft, dry cloth to wipe the exterior. Do not use harsh chemicals or abrasive cleaners.
- Ventilation: Ensure the cooling fan and ventilation slots are kept clear of obstructions to maintain proper airflow.
- Storage: When not in use for extended periods, store the power supply in a cool, dry place away from direct sunlight and extreme temperatures.
- Fuse Replacement: If the power supply stops working due to a blown fuse, replace it with a fuse of the same specification. Refer to the fuse box location on the rear panel.
9. Troubleshooting
- No Power: Check the AC power cable connection and ensure the power switch is on. Verify the fuse in the fuse box.
- No Output: Ensure the Output button is pressed and its indicator light is on. Check all output cable connections.
- 'Check' Indicator during Battery Charging: This indicates incorrect wiring or an error. Immediately disconnect the battery and re-check all connections for correct polarity and secure contact.
- Inaccurate Readings: Ensure all connections are secure and the load is properly connected. If issues persist, contact support.
10. Warranty and Support
Your purchase includes the NICE-POWER DC Power Supply, 1 set of output power cables, 1 input power cable, and 1 user manual.
For any questions or support needs, please contact NICE-POWER customer service. Contact information can typically be found on the product packaging or the official brand website.


