1. Product Overview
The Keurig K-Express Single Serve Coffee Maker is designed for quick and convenient brewing of your favorite K-Cup pods. It offers a compact design with a removable water reservoir and multiple brew size options, including a strong brew setting for a more intense coffee flavor.

Image: The Keurig K-Express Coffee Maker in Warm Stone color, actively brewing coffee into a blue mug. The machine features a sleek, compact design.
Key Features:
- STRONG BREW: Increases the strength and bold taste of your coffee’s flavor.
- 3 CUP SIZES: Brew an 8, 10, or 12 oz. cup at the push of a button.
- MULTIPLE CUP WATER RESERVOIR: 42oz. removable reservoir lets you brew up to 4 cups (8 oz. cup size) before refilling.
- FAST & FRESH BREWED: Delicious coffee made in minutes.
- TRAVEL MUG FRIENDLY: Removable drip tray accommodates travel mugs up to 7.4” tall.

Image: A visual representation of the Keurig K-Express's key features, highlighting the three available cup sizes (8, 10, 12 oz), the strong brew option, and the 42 oz removable water reservoir.
2. Safety Information
Please read all safety instructions before using your Keurig K-Express Coffee Maker. Failure to do so may result in injury or damage to the appliance.
- Always use cold, filtered water in the reservoir.
- Do not immerse the brewer in water or other liquids.
- Ensure the brewer is placed on a stable, flat surface.
- Keep hands and cords away from hot surfaces.
- Unplug the brewer before cleaning or when not in use for extended periods.
- Do not operate the brewer if the power cord or plug is damaged.
- This appliance is for household use only.
3. Setup
Follow these steps for the initial setup of your Keurig K-Express Coffee Maker:
- Unpack: Remove all packaging materials and place the brewer on a clean, stable surface.
- Rinse Reservoir: Wash the water reservoir and lid with warm, soapy water. Rinse thoroughly and dry.
- Fill Reservoir: Fill the water reservoir with fresh, cold, filtered water up to the MAX fill line.

Image: A hand pouring water into the clear, removable water reservoir of the Keurig K-Express coffee maker, demonstrating the filling process.
- Power On: Plug the brewer into a grounded outlet. The power button will illuminate.
- Cleansing Brew: Perform a cleansing brew without a K-Cup pod.
- Place a large mug on the drip tray.
- Lift and lower the handle to close the K-Cup pod holder.
- Press the 8 oz brew button. The button will flash while brewing and remain solid when complete.
- Discard the hot water. Your brewer is now ready for use.
4. Operating Instructions
Brewing with your Keurig K-Express is simple:
- Fill Water Reservoir: Ensure the water reservoir is filled with fresh, cold water.
- Place Mug: Place a mug on the drip tray. If using a travel mug, remove the drip tray to accommodate taller mugs (up to 7.4 inches).

Image: The Keurig K-Express coffee maker with its drip tray removed, demonstrating how it can accommodate a tall travel mug for brewing on the go.
- Insert K-Cup Pod: Lift the handle and place a K-Cup pod into the K-Cup pod holder. Lower the handle completely to close.
- Select Brew Size: Choose your desired brew size (8 oz, 10 oz, or 12 oz) by pressing the corresponding button.
- For a bolder cup, press the STRONG button before selecting your brew size. The STRONG light will illuminate.
- Brew: The selected brew size button will flash while brewing and remain solid when the brew is complete.
- Enjoy: Carefully remove your mug and enjoy your freshly brewed beverage.
- Discard Pod: Lift the handle and remove the used K-Cup pod.
5. Maintenance
Regular cleaning and descaling will ensure your Keurig K-Express continues to perform optimally.
5.1. Cleaning
- Exterior: Wipe the exterior of the brewer with a damp, soapy cloth. Dry thoroughly.
- Drip Tray: The drip tray can accumulate up to 8 ounces of overflow. It should be emptied and cleaned regularly. Remove the drip tray, discard contents, and wash with warm, soapy water.
- Water Reservoir: Clean the water reservoir periodically with warm, soapy water. Rinse thoroughly.
- K-Cup Pod Holder: The K-Cup pod holder can be removed for cleaning. Lift the handle, grasp the top of the K-Cup pod holder with one hand, and push up on the bottom of the K-Cup pod holder from underneath with the other hand until it releases. Wash with warm, soapy water and rinse.
5.2. Descaling
Descaling removes mineral deposits that can build up in your brewer over time. The DESCALE light will illuminate when it's time to descale. It is recommended to descale every 3 months or when the DESCALE light appears.

Image: The Keurig K-Express coffee maker shown alongside a Keurig 3 Month Brewer Care Kit, which includes descaling solution and water filters, indicating compatibility for maintenance.
You will need: A large ceramic mug (min. 10 oz), fresh water, and Keurig Descaling Solution (recommended).
- Prepare: Turn off the brewer. Empty the water reservoir and remove any K-Cup pod.
- Add Descaling Solution: Pour the entire bottle of Keurig Descaling Solution into the water reservoir. Then, fill the empty bottle with water and pour it into the reservoir. Do not add K-Cup pods.
- First Descale Brew: Place a large mug on the drip tray. Lift and lower the handle. Press the 12 oz brew button. Repeat this process until the ADD WATER light illuminates.
- Rinse Cycle: Empty the reservoir and rinse it thoroughly with fresh water. Fill the reservoir with fresh water up to the MAX fill line.
- Second Descale Brew: Place a large mug on the drip tray. Lift and lower the handle. Press the 12 oz brew button. Repeat this process until the ADD WATER light illuminates.
- Final Rinse: The descaling process is complete when the DESCALE light is no longer illuminated. If the light is still on, repeat the rinse cycle.
6. Troubleshooting
| Problem | Possible Cause | Solution |
|---|---|---|
| Brewer does not turn on. | No power. | Ensure the brewer is securely plugged into a grounded outlet. Check if the outlet is working by plugging in another appliance. |
| Brewer not brewing. | Low water level; K-Cup pod not properly seated; Air in water line. | Fill water reservoir. Ensure K-Cup pod is correctly inserted and handle is fully lowered. Perform a cleansing brew without a K-Cup pod to clear air. |
| Coffee grounds in cup. | K-Cup pod puncture issue; Reusable filter issue. | Ensure K-Cup pod is not damaged. Clean the K-Cup pod holder. If using a reusable filter, ensure it is properly assembled and not overfilled. |
| Brew is weak or partial. | Mineral buildup; Low water level. | Descale the brewer. Ensure water reservoir is filled to the MAX line. |
| DESCALE light remains on. | Descaling process incomplete. | Repeat the rinse cycle of the descaling process until the light turns off. |
For further assistance, please refer to the official Keurig support website or contact customer service.
7. Specifications
| Attribute | Detail |
|---|---|
| Brand | Keurig |
| Model Name | K-Express |
| Item Model Number | 5000379844 |
| Color | Warm Stone |
| Product Dimensions (D x W x H) | 12.8"D x 5.1"W x 17.2"H |
| Item Weight | 4.1 pounds |
| Coffee Maker Type | Single-Serve Brewer |
| Coffee Input Type | K-Cup Pods |
| Water Reservoir Capacity | 42 oz |
| Brew Sizes | 8 oz, 10 oz, 12 oz |
| Special Feature | Auto Shut-Off, Strong Brew Option |
| Operation Mode | Manual (Button Operated) |
| Voltage | 120V |
| Included Components | Coffee Maker |
| UPC | 611247402634 |
| Country of Origin | Indonesia |
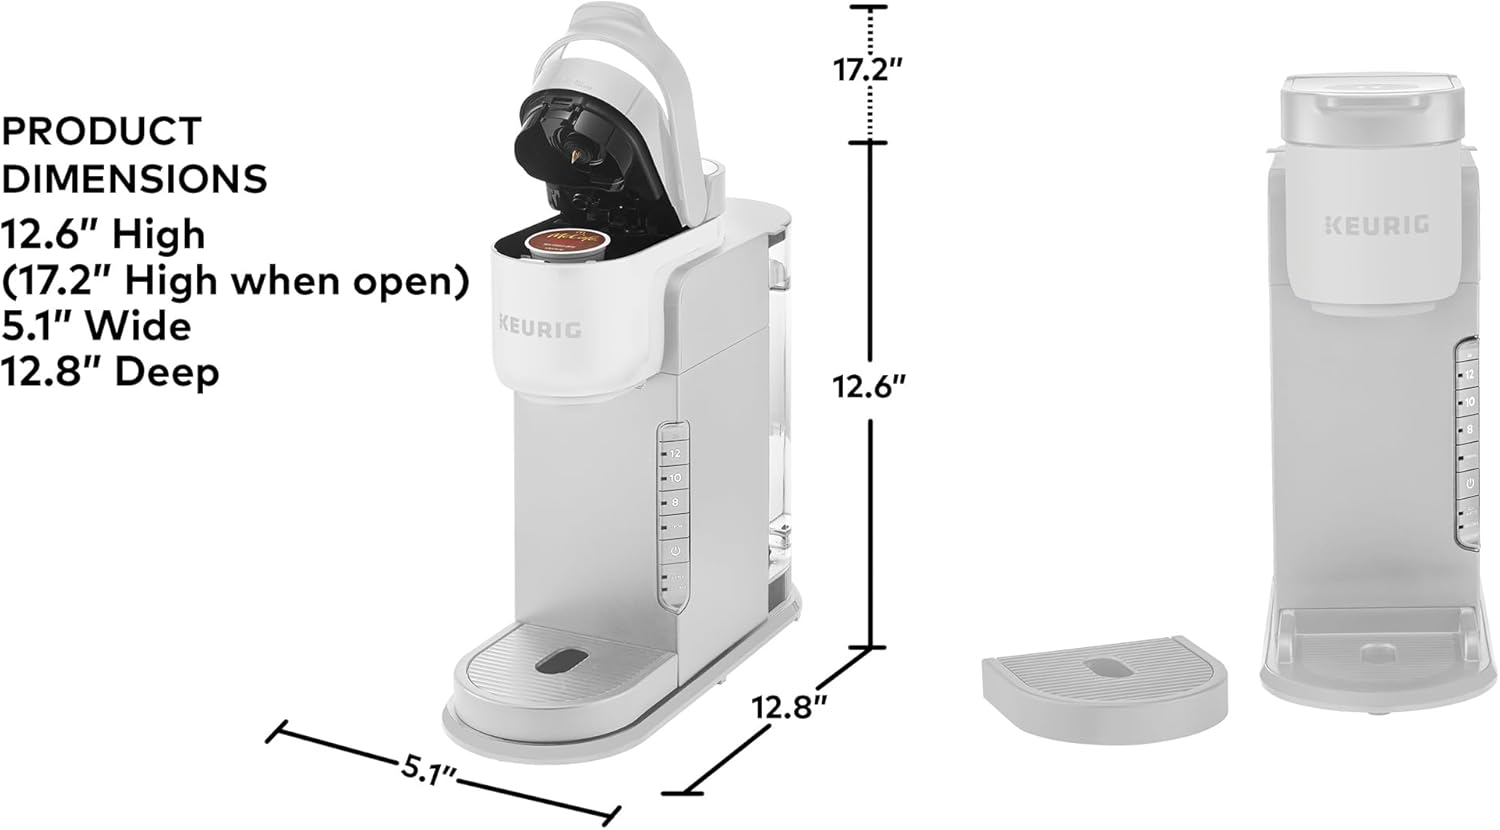
Image: A diagram illustrating the dimensions of the Keurig K-Express coffee maker, showing its height (12.6" / 17.2" when open), width (5.1"), and depth (12.8").
8. Warranty and Support
For detailed warranty information and customer support, please visit the official Keurig website or contact their customer service department. Keep your purchase receipt for warranty claims.
Online Support: www.keurig.com/support
Note: Specific warranty terms and conditions may vary by region and retailer.


