1. Introduction
The Soundstream BXM-100TR Digital Bass Machine is an advanced bass restorer and processor designed to dramatically improve the low-frequency response of your car audio system. It analyzes the audio signal and intelligently restores the missing bass information, providing a deeper, more impactful bass experience. This manual will guide you through the proper installation, operation, and maintenance of your BXM-100TR unit.
2. Safety Information
- Professional Installation Recommended: Due to the complexity of car audio wiring, professional installation is highly recommended to prevent damage to the unit or your vehicle.
- Power Source: Connect the unit only to a 12V DC negative ground electrical system.
- Wiring: Ensure all wiring is securely connected and properly insulated to prevent short circuits. Use appropriate gauge wires for power and ground connections.
- Mounting: Mount the unit securely in a dry location, away from excessive heat, moisture, or vibration.
- Volume Levels: Prolonged exposure to high volume levels can cause hearing damage. Adjust volume responsibly.
3. Package Contents
Please check the box for the following items:
- Soundstream BXM-100TR Digital Bass Machine Unit
- Remote Bass Control Knob
- Remote Bass Control Cable (RJ45)
- Power/Ground Wiring Harness (inferred from video)
- Mounting Hardware (screws, brackets - inferred from video)
- User Manual
Video: Unboxing and initial overview of the Soundstream BXM-100TR Digital Bass Machine, showing its components and design.
4. Product Overview
The BXM-100TR features a robust design with intuitive controls for precise bass adjustment.
4.1 Front Panel Controls and Connections

Image: Top view of the Soundstream BXM-100TR Digital Bass Machine, showing the control layout.
- MAX BASS CONTROL LEDs: These three red LEDs illuminate to indicate the level of bass restoration being applied. More LEDs lit mean more bass enhancement.
- WIDE Control (Min/Max): This knob adjusts the center frequency of the bass restoration. Turning it towards 'Max' will broaden the range of frequencies affected by the bass restoration.
- SWEEP Control (Min/Max): This knob adjusts the Q factor or width of the bass restoration. It allows you to fine-tune how narrow or wide the bass enhancement effect is around the chosen center frequency.
- Frequency Switches (35Hz, 50Hz, 80Hz): These switches allow you to select the low-frequency cut-off point for the bass restoration. Choose the setting that best complements your subwoofer and enclosure characteristics.
- BALANCED INPUTS (L/R): RCA inputs for connecting the audio signal from your head unit or signal processor.
- OUTPUT (L/R): RCA outputs for sending the processed audio signal to your amplifier.
- DASH REMOTE: RJ45 port for connecting the included remote bass control knob.
- +12V, GROUND, REMOTE: Power input terminals for connecting to your vehicle's electrical system.
4.2 Rear Panel Connections and Accessories

Image: Rear view of the Soundstream BXM-100TR Digital Bass Machine with included remote bass control and cables.
The rear panel provides the main audio and power connections. The included remote bass control allows for convenient adjustment of the bass level from the driver's seat.
5. Setup and Installation
Proper installation is crucial for optimal performance. If you are unsure about any steps, consult a professional installer.
5.1 Mounting the Unit
- Choose a secure, dry location in your vehicle, such as under a seat or in the trunk.
- Ensure adequate ventilation around the unit.
- Use the provided mounting hardware to firmly secure the BXM-100TR.
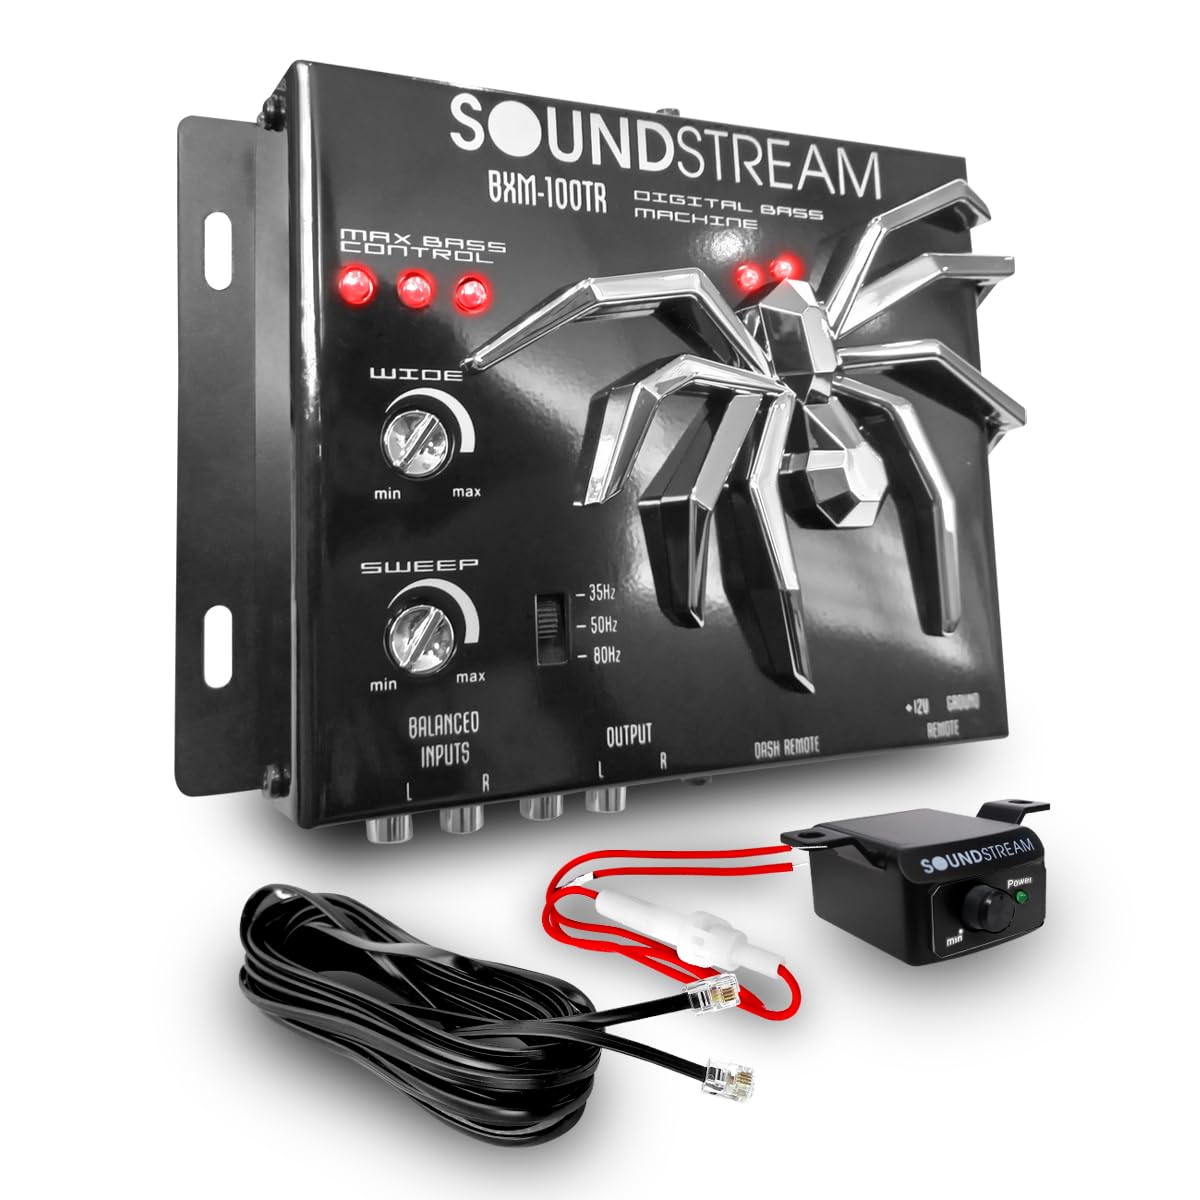
Image: Soundstream BXM-100TR Digital Bass Machine with approximate dimensions for mounting reference.
5.2 Wiring Connections
- Power (+12V): Connect the +12V terminal of the BXM-100TR to a constant +12V power source from your vehicle's battery. Use a fuse (not included) as close to the battery as possible.
- Ground: Connect the GROUND terminal to a solid chassis ground point in your vehicle. Ensure a clean, paint-free metal-to-metal connection.
- Remote (REM): Connect the REMOTE terminal to the remote turn-on output of your head unit or amplifier. This will turn the BXM-100TR on and off with your audio system.
- Audio Inputs: Connect RCA cables from the pre-amp outputs of your head unit or signal processor to the BALANCED INPUTS (L/R) of the BXM-100TR.
- Audio Outputs: Connect RCA cables from the OUTPUT (L/R) of the BXM-100TR to the input of your subwoofer amplifier.
- Remote Bass Control: Connect the remote bass control knob to the DASH REMOTE port using the provided RJ45 cable. Mount the knob in an easily accessible location for the driver.
6. Operating Instructions
Once installed, follow these steps to optimize your bass experience:
- Initial Setup: Start with the WIDE and SWEEP controls at their minimum settings. Set the remote bass control knob to its middle position.
- Frequency Selection: Use the 35Hz, 50Hz, or 80Hz switches to select the desired low-frequency cut-off. Experiment to find the best match for your subwoofer and enclosure.
- Adjusting WIDE: Play music with strong bass content. Slowly turn the WIDE control towards 'Max' until you achieve the desired range of bass frequencies being enhanced.
- Adjusting SWEEP: Once the WIDE control is set, adjust the SWEEP control to fine-tune the intensity and focus of the bass restoration. This allows you to emphasize specific bass notes.
- Remote Bass Control: Use the dash-mounted remote knob to adjust the overall bass level on the fly, according to your preference and the music being played.
- Monitor LEDs: Observe the MAX BASS CONTROL LEDs. If they are constantly fully lit, you may be overdriving the unit or your amplifier. Reduce the input gain or bass boost to prevent distortion.
7. Maintenance
- Cleaning: Use a soft, dry cloth to clean the exterior of the unit. Do not use harsh chemicals or abrasive cleaners.
- Environment: Ensure the unit remains in a dry environment, free from dust and extreme temperatures.
- Connections: Periodically check all wiring connections to ensure they are secure and free from corrosion.
8. Troubleshooting
If you encounter issues with your BXM-100TR, refer to the following common problems and solutions:
| Problem | Possible Cause | Solution |
|---|---|---|
| Unit does not power on | No +12V power, poor ground, no remote turn-on signal, blown fuse. | Check +12V, Ground, and Remote connections. Verify fuse integrity. |
| No sound output | Incorrect RCA connections, low input/output levels, amplifier issues. | Ensure RCA cables are correctly connected to inputs and outputs. Check amplifier functionality. |
| Distorted bass | Input signal too high, output level too high, amplifier clipping. | Reduce the input gain on the BXM-100TR or the output level. Check amplifier gain settings. |
| No bass enhancement | WIDE/SWEEP controls set too low, frequency switches incorrect. | Adjust WIDE and SWEEP controls. Experiment with frequency switches. |
9. Specifications
Here are the technical specifications for the Soundstream BXM-100TR Digital Bass Machine:
| Feature | Specification |
|---|---|
| Model Number | BXM-100TR |
| Product Dimensions | 19 x 13 x 3 cm |
| Product Weight | 450 g |
| Color | Black |
| Other Display Functions | Wireless (Note: This likely refers to the remote bass control's wireless capability or general connectivity, not the main unit's audio processing.) |

Image: Bottom view of the BXM-100TR showing the model label.
10. Warranty and Support
For warranty information and technical support, please refer to the warranty card included with your product or visit the official Soundstream website. Keep your purchase receipt as proof of purchase for any warranty claims.