Aepiraza HT-19-401-003-06, HT-19-401-003-07
User Manual: String Trimmer Replacement Spool
Model: HT-19-401-003-06, HT-19-401-003-07
Brand: Aepiraza
Product Overview
This user manual provides essential information for the installation, operation, and maintenance of your Aepiraza String Trimmer Replacement Spools. These spools are designed for compatibility with Hyper Tough 20V Max String Trimmers, specifically models HT-19-401-003-06 and HT-19-401-003-07, utilizing an auto single-line feed cutting system.
Each spool features a line diameter of 0.06 inches (1.6 mm) and a length of 16 feet (4.9 meters), ensuring reliable performance for your trimming needs. The spools are factory pre-wound to minimize tangling and simplify replacement.

Figure 1: A set of Aepiraza String Trimmer Replacement Spools and Caps.
Setup and Installation
Proper installation of the replacement spool is crucial for optimal performance and safety. Follow these steps carefully:
- Safety First: Before beginning any installation or maintenance, ensure your string trimmer's engine is turned off and the power source (battery or cord) is disconnected to prevent accidental startup.
- Remove Trimmer Head Cover: Locate the trimmer head cover, typically found at the bottom of the trimmer. Press any release tabs or twist the cover counter-clockwise to remove it.
- Remove Old Spool: Carefully remove the old, empty, or damaged string spool from the trimmer head. Note its orientation for reference.
- Insert New Spool: Take a new Aepiraza replacement spool. Align the spool with the internal mechanism of the trimmer head. Ensure the string is properly routed through any eyelets or guides as per your trimmer's design. The spool is pre-wound for convenience.
- Replace Spool Cap: If your trimmer uses a separate spool cap, place the new or existing cap over the installed spool. Ensure it clicks into place or is securely fastened.
- Reattach Trimmer Head Cover: Align the trimmer head cover with the base and twist clockwise or press until it locks securely. Verify that the cover is firmly attached and does not wobble.

Figure 2: The replacement spool is designed for seamless integration with compatible Hyper Tough string trimmers.
Operating Instructions
Once the replacement spool is installed, your string trimmer is ready for operation. These spools are designed for an auto single-line feed system, meaning the line will automatically extend as needed during use.
- Intended Use: These replacement spools are specifically designed for trimming small grasses and light vegetation.
- Limitations: Do not use these spools to clear large, thick, or old weeds, or for heavy-duty brush cutting. Attempting to do so may damage the line, the spool, or the trimmer itself, and could pose a safety risk.
- Line Feed: The auto-feed system will advance the line as it wears down. If you notice the line is too short, briefly tap the trimmer head on the ground while the trimmer is running to activate the auto-feed mechanism.
- Optimal Performance: For best results, operate your string trimmer at the recommended speed and maintain a consistent cutting angle.

Figure 3: The 0.06-inch diameter line provides efficient cutting for light trimming tasks.
Maintenance and Safety
Proper maintenance extends the life of your spools and ensures safe operation.
- Storage: Store unused replacement spools in a cool, dry place away from direct sunlight and extreme temperatures. This helps maintain the integrity and flexibility of the nylon line.
- Line Condition: Periodically inspect the line on the spool for any signs of wear, fraying, or damage. Replace the spool if the line appears compromised.
- Spool Cap: Ensure the spool cap is clean and free of debris. A dirty or damaged cap can hinder the auto-feed mechanism.
- Safety Warning: Winding Risk: Keep replacement spools and string trimmer line away from children and pets. The line can pose a winding or entanglement hazard. Always supervise children around gardening tools and accessories.
- Personal Protective Equipment: Always wear appropriate personal protective equipment (PPE) when operating a string trimmer, including safety glasses, long pants, and sturdy footwear.
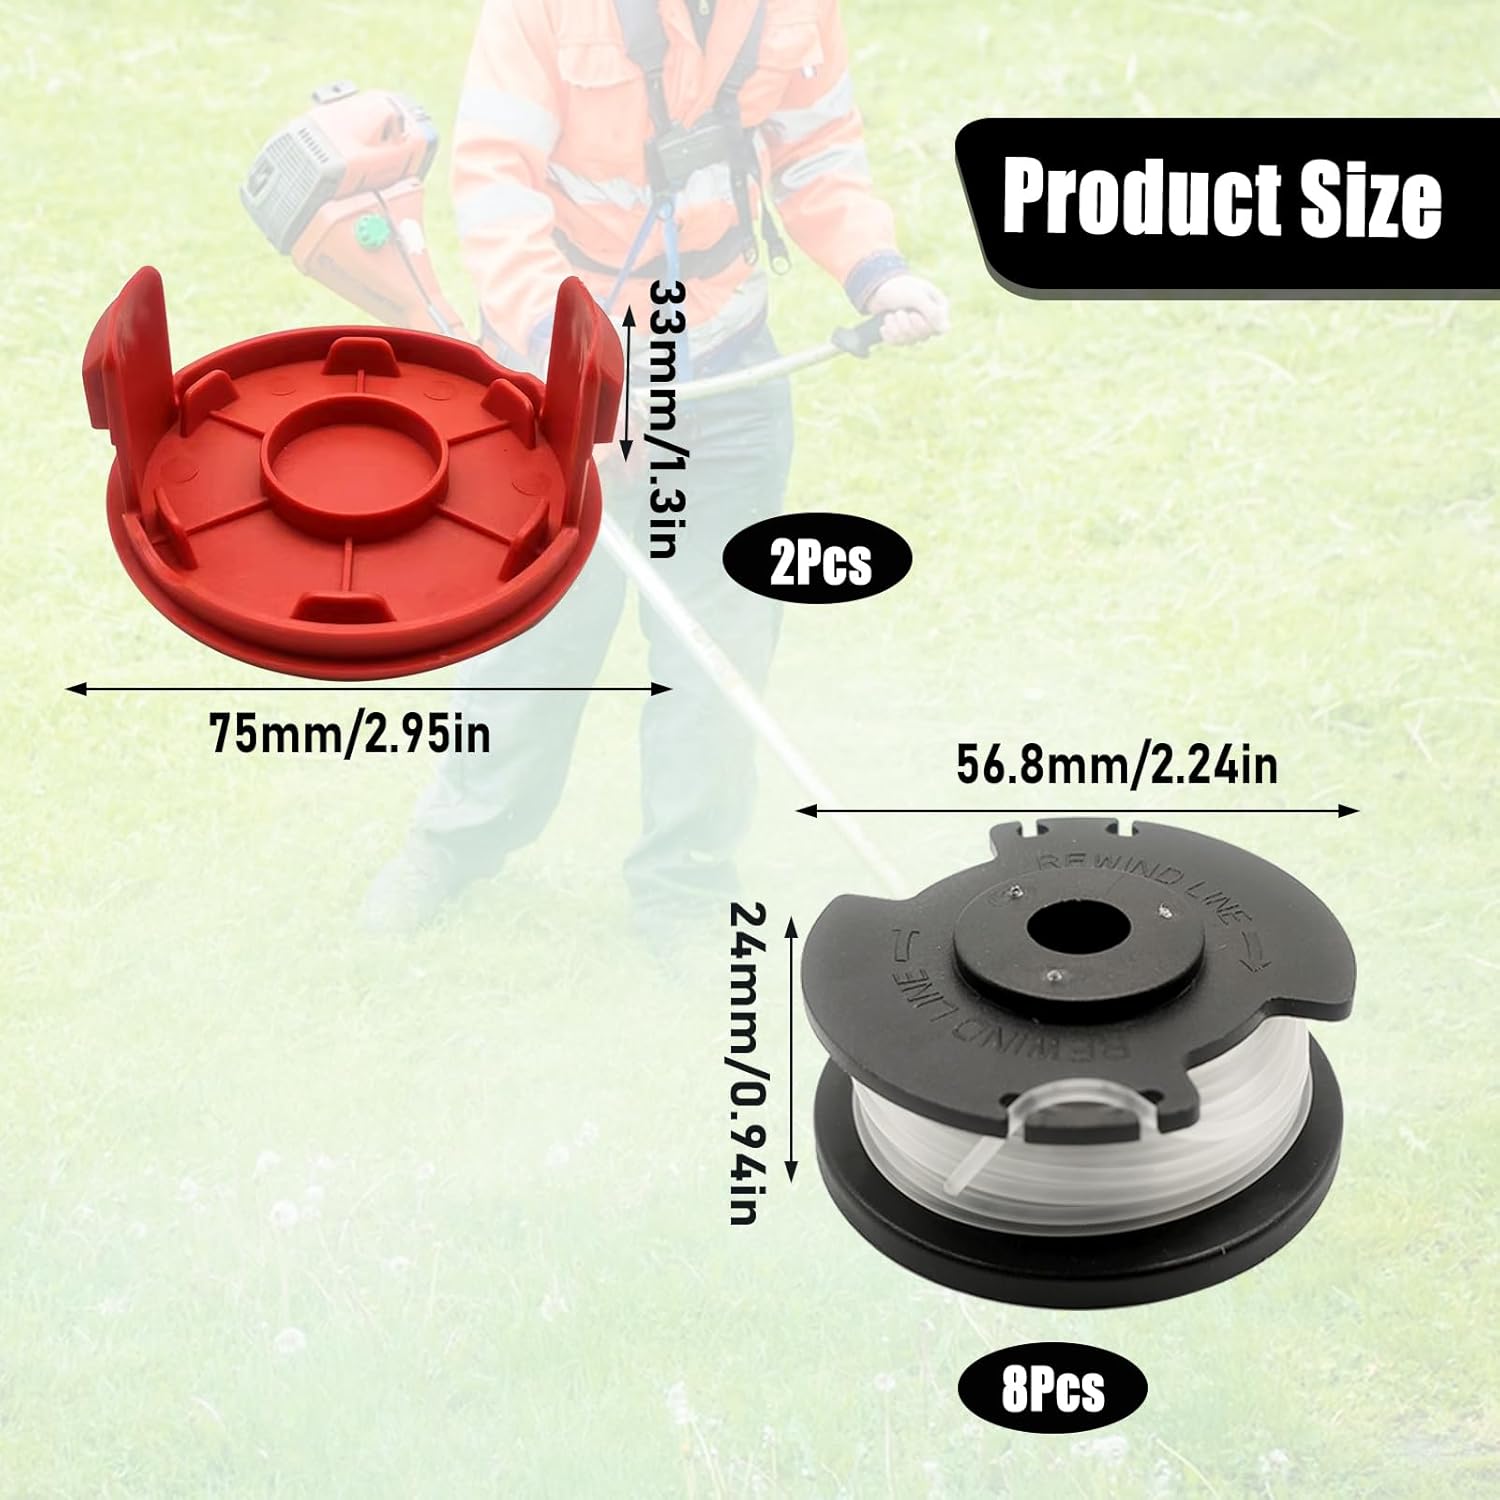
Figure 4: Dimensions of the replacement spool and cap for proper fit.
Troubleshooting
If you encounter issues with your replacement spools, consider the following:
- Line Not Feeding:
- Ensure the spool is correctly installed and seated in the trimmer head.
- Check if the spool cap is securely attached.
- Inspect the line for tangles or breaks near the feed eyelet.
- Verify that the line is not fused together due to heat or improper storage.
- Line Breaking Frequently:
- You might be attempting to cut material that is too thick or dense for the line. Refer to the "Operating Instructions" for intended use.
- The line may be old or stored improperly, leading to brittleness.
- Ensure the trimmer's cutting guard is not damaged, which could cause excessive line wear.
- Spool Not Fitting:
- Double-check the compatibility of your trimmer model with the listed models (HT-19-401-003-06, HT-19-401-003-07).
- Ensure no debris is obstructing the spool compartment.
Specifications
| Feature | Detail |
|---|---|
| Compatibility | Hyper Tough 20V Max String Trimmers (HT-19-401-003-06, HT-19-401-003-07) |
| Line Diameter | 0.06 inches (1.6 mm) |
| Line Length (per spool) | 16 feet (4.9 meters) |
| Feed System | Auto Single-Line Feed |
| Material | Quality ABS and Nylon |
| Package Dimensions | 5.51 x 4.33 x 0.79 inches |
| Item Weight | 6.4 ounces (total for the package) |
Warranty and Support
Specific warranty details for this product are not provided in this manual. For any warranty claims, technical support, or product inquiries, please contact the manufacturer, Aepiraza, directly through their official channels or the retailer from whom the product was purchased.
Please retain your proof of purchase for any support requests.
Ask a question about this manual
Ask about setup, troubleshooting, compatibility, parts, safety, or missing instructions. Manuals+ will review the question and use this page’s manual context to help answer it.