
1. Product Overview
The Ant Esports Crystal X4 is a mid-tower computer case designed for high-end gaming systems. It features a dual-chamber design with panoramic tempered glass panels on the front and side, offering a clear view of internal components. The case supports ATX, Micro-ATX, and Mini-ITX motherboards and comes with three pre-installed ARGB fans for efficient cooling and aesthetic appeal. It includes modern connectivity options such as USB 3.0 and a Type-C port on the I/O panel.

Figure 1.1: Ant Esports Crystal X4 Mid-Tower Gaming Cabinet with internal components and RGB lighting.
Video 1.1: An overview of the Ant Esports Crystal X4 features, including expansion slots, I/O panel, and fan support.
2. Setup and Installation
This section guides you through the installation of components into your Ant Esports Crystal X4 gaming cabinet. Ensure all power is disconnected before beginning installation.
2.1 Preparing the Case
- Unpacking: Carefully remove the case from its packaging. Inspect for any damage during transit.
- Panel Removal: The tempered glass side panel can be easily removed for access to the interior. Refer to the image below for visual guidance.
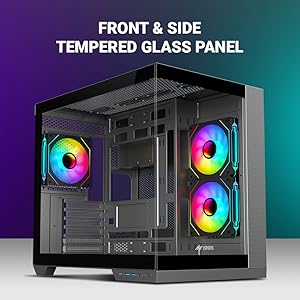
Figure 2.1: Front and side tempered glass panels of the Crystal X4 case.
2.2 Motherboard Installation
The Crystal X4 supports ATX, Micro-ATX, and Mini-ITX motherboards. Install the necessary standoffs for your motherboard size before securing it.
- Align your motherboard with the standoffs and I/O shield opening.
- Secure the motherboard with screws.
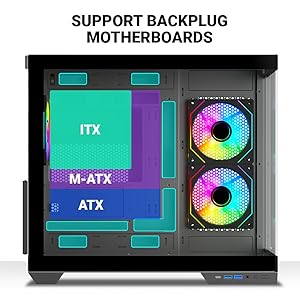
Figure 2.2: Motherboard compatibility and mounting areas within the Crystal X4 case.
2.3 Drive Installation
The case supports 2x 3.5" HDDs and 1x 2.5" SSD. Locate the designated drive bays and secure your storage devices.
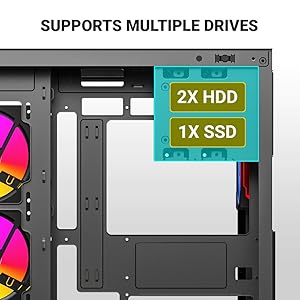
Figure 2.3: Drive bay locations for HDDs and SSDs.
2.4 Power Supply Unit (PSU) Installation
Install your power supply in the dedicated zone at the rear of the case.
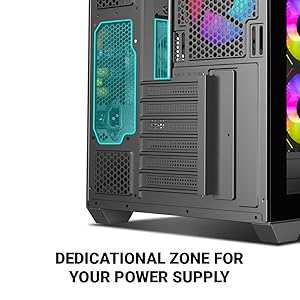
Figure 2.4: Dedicated power supply installation area.
2.5 Expansion Cards and Cooling
Install your graphics card and other expansion cards into the 6 available expansion slots. The case supports various fan and AIO liquid cooling configurations.
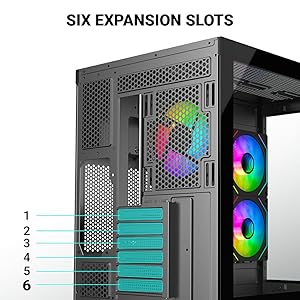
Figure 2.5: Six expansion slots for graphics cards and other components.
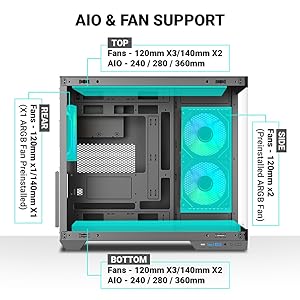
Figure 2.6: Fan and AIO liquid cooling support configurations.
3. Operating Instructions
Once all components are installed and cables are connected, you can power on your system. The front I/O panel provides convenient access to essential functions.
3.1 Front I/O Panel
The front I/O panel includes:
- Power Button
- Reset Button
- 2x USB 3.0 Ports
- 1x USB Type-C Port
- Audio In (Mic)
- Audio Out (SPK)
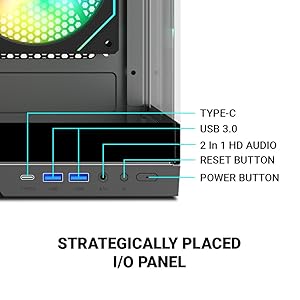
Figure 3.1: Front I/O panel with USB, audio, and power controls.
3.2 ARGB Fan Control
The pre-installed ARGB fans can be controlled via your motherboard's ARGB software (if supported) or a dedicated controller (if included with your specific model). Refer to your motherboard manual for ARGB header connection and software usage.
4. Maintenance
Regular maintenance ensures optimal performance and longevity of your PC components.
4.1 Cleaning
- Exterior: Use a soft, damp cloth to wipe down the exterior surfaces, including the tempered glass panels. Avoid abrasive cleaners.
- Dust Filters: The case may include removable dust filters. Clean these regularly by rinsing them with water and allowing them to dry completely before reinstallation.
- Interior: Periodically use compressed air to remove dust buildup from internal components and fans. Ensure the system is powered off and unplugged before cleaning.
4.2 Fan Maintenance
Check the fans for any obstructions or excessive dust buildup. Ensure all fan cables are securely connected. If a fan becomes noisy or stops working, consider replacing it.
5. Troubleshooting
This section addresses common issues you might encounter with your PC case.
5.1 No Power
- Ensure the power supply is switched on and properly connected to the wall outlet.
- Verify all power cables from the PSU are correctly connected to the motherboard and components.
- Check the front panel power button connection to the motherboard.
5.2 Fans Not Spinning / RGB Not Working
- Confirm fan power cables are securely connected to the motherboard or fan controller.
- For RGB, ensure ARGB cables are correctly connected to the motherboard's ARGB header or a dedicated controller.
- Check your motherboard's BIOS/UEFI settings or software for fan speed and RGB control.
5.3 USB Ports Not Functioning
- Verify that the USB 3.0 and USB Type-C headers from the front I/O panel are correctly connected to your motherboard.
- Ensure motherboard drivers are up to date.
6. Technical Specifications
Below are the detailed specifications for the Ant Esports Crystal X4 Mid-Tower Gaming Cabinet.

Figure 6.1: Ant Esports Crystal X4 detailed specifications.
| Feature | Detail |
|---|---|
| Model Name | Crystal X4 |
| Case Type | Mid Tower |
| Dimensions (D x W x H) | 43.3D x 29.5W x 38.8H Centimeters |
| Motherboard Compatibility | ATX, Micro-ATX, Mini-ITX |
| Materials | ABS, SPCC, Tempered Glass |
| Drive Bays | 2x 3.5" HDD, 1x 2.5" SSD |
| Expansion Slots | 6 |
| I/O Panel | 2x USB 3.0, 1x Type-C, Audio In, 1x Mic + SPK, Power Button |
| Fan Support (Top) | 3x 120mm / 2x 140mm |
| Fan Support (Bottom) | 3x 120mm / 2x 140mm |
| Fan Support (Rear) | 1x 120mm / 1x 140mm |
| Fan Support (Side) | 2x 120mm |
| Pre-Installed Fans | 2x 120mm ARGB Side Fans, 1x 120mm ARGB Rear Fan |
| Liquid Cooling Support (Top) | 240 / 280 / 360mm |
| Liquid Cooling Support (Bottom) | 240 / 280 / 360mm |
| Liquid Cooling Support (Rear) | 120mm |
| VGA Card Length (Max) | 400 mm |
| CPU Cooler Height (Max) | 175 mm |
| Item Weight | 6.2 Kilograms |
7. Warranty and Support
7.1 Warranty Information
The Ant Esports Crystal X4 Mid-Tower Gaming Cabinet comes with a 1-year warranty from the date of purchase. This warranty covers manufacturing defects and material faults under normal use. It does not cover damage caused by misuse, accident, modification, or unauthorized repair.
7.2 Customer Support
For technical assistance, warranty claims, or any product-related inquiries, please contact Ant Esports customer support through their official website or the retailer where the product was purchased. Please have your proof of purchase and product model information ready when contacting support.