ATTACK SHARK X3PRO
ATTACK SHARK X3PRO 4K/8K Lightweight Wireless Gaming Mouse User Manual
Model: X3PRO | Brand: ATTACK SHARK
1. Introduction
This manual provides detailed instructions for the setup, operation, and maintenance of your ATTACK SHARK X3PRO Wireless Gaming Mouse. The X3PRO features tri-mode connectivity (wired, 2.4GHz wireless, Bluetooth), a Pixart PAW3395 optical sensor, and adjustable DPI up to 26,000.
2. Package Contents
Verify that all items are present in the package:
- ATTACK SHARK X3PRO Wireless Gaming Mouse
- USB Charging Cable (USB-C)
- USB Receiver (2.4GHz)
- Grip Tape (optional, if included with your model)

Image: ATTACK SHARK X3PRO mouse with its included USB receiver, USB-C cable, and grip tape.
3. Product Overview
Familiarize yourself with the components of your X3PRO mouse:

Image: Detailed diagram showing the DPI indicator light, flexible paracord cable, DPI button, USB receiver, mode switch button, mode indicator light, and Type-C to USB-A adapter. The mouse dimensions are 118.5*39.7*61 mm.
- DPI Button: Adjusts the mouse sensitivity (DPI).
- DPI Indicator Light: Shows the current DPI setting.
- Mode Switch Button: Toggles between 2.4G wireless, Bluetooth, and Off modes.
- Mode Indicator Light: Indicates the active connection mode.
- USB Receiver: Stores securely under a cover on the mouse's underside for 2.4G wireless connection.
- USB-C Port: For wired connection and charging.
- Side Buttons: Programmable buttons for custom functions.
4. Setup
4.1. 2.4GHz Wireless Connection
- Open the cover on the underside of the mouse and remove the USB receiver.
- Insert the USB receiver into an available USB port on your computer.
- Slide the mode switch button on the mouse to the "2.4G" position. The mode indicator light will illuminate.
- Your computer should automatically detect the mouse.
4.2. Bluetooth Connection
- Slide the mode switch button on the mouse to the "BT" position. The mode indicator light will flash, indicating pairing mode.
- On your computer, navigate to Bluetooth settings and search for new devices.
- Select "ATTACK SHARK X3PRO" from the list of available devices to pair.
- The mode indicator light will become solid once connected.
4.3. Wired Connection
- Connect the provided USB-C cable to the mouse's USB-C port.
- Connect the other end of the USB-C cable to an available USB port on your computer.
- The mouse will automatically switch to wired mode and begin charging.
5. Operating Instructions
5.1. Switching Connection Modes
Use the mode switch button on the underside of the mouse to cycle between 2.4G wireless, Bluetooth, and wired (when connected via cable) modes. The mode indicator light will confirm the active mode.
5.2. Adjusting DPI (Sensitivity)
Press the DPI button on the underside of the mouse to cycle through the preset DPI levels (800/1600/2400/3200/5000/26000). The DPI indicator light will change to reflect the current setting.
5.3. Polling Rate
The X3PRO supports up to 4000Hz wireless polling rate and 8000Hz wired polling rate. Higher polling rates reduce input delay. To utilize 4K/8K polling rates, your computer should have an Intel Core i5 or higher CPU, AMD Ryzen 5 or higher CPU, and a USB 3.0 or higher port.
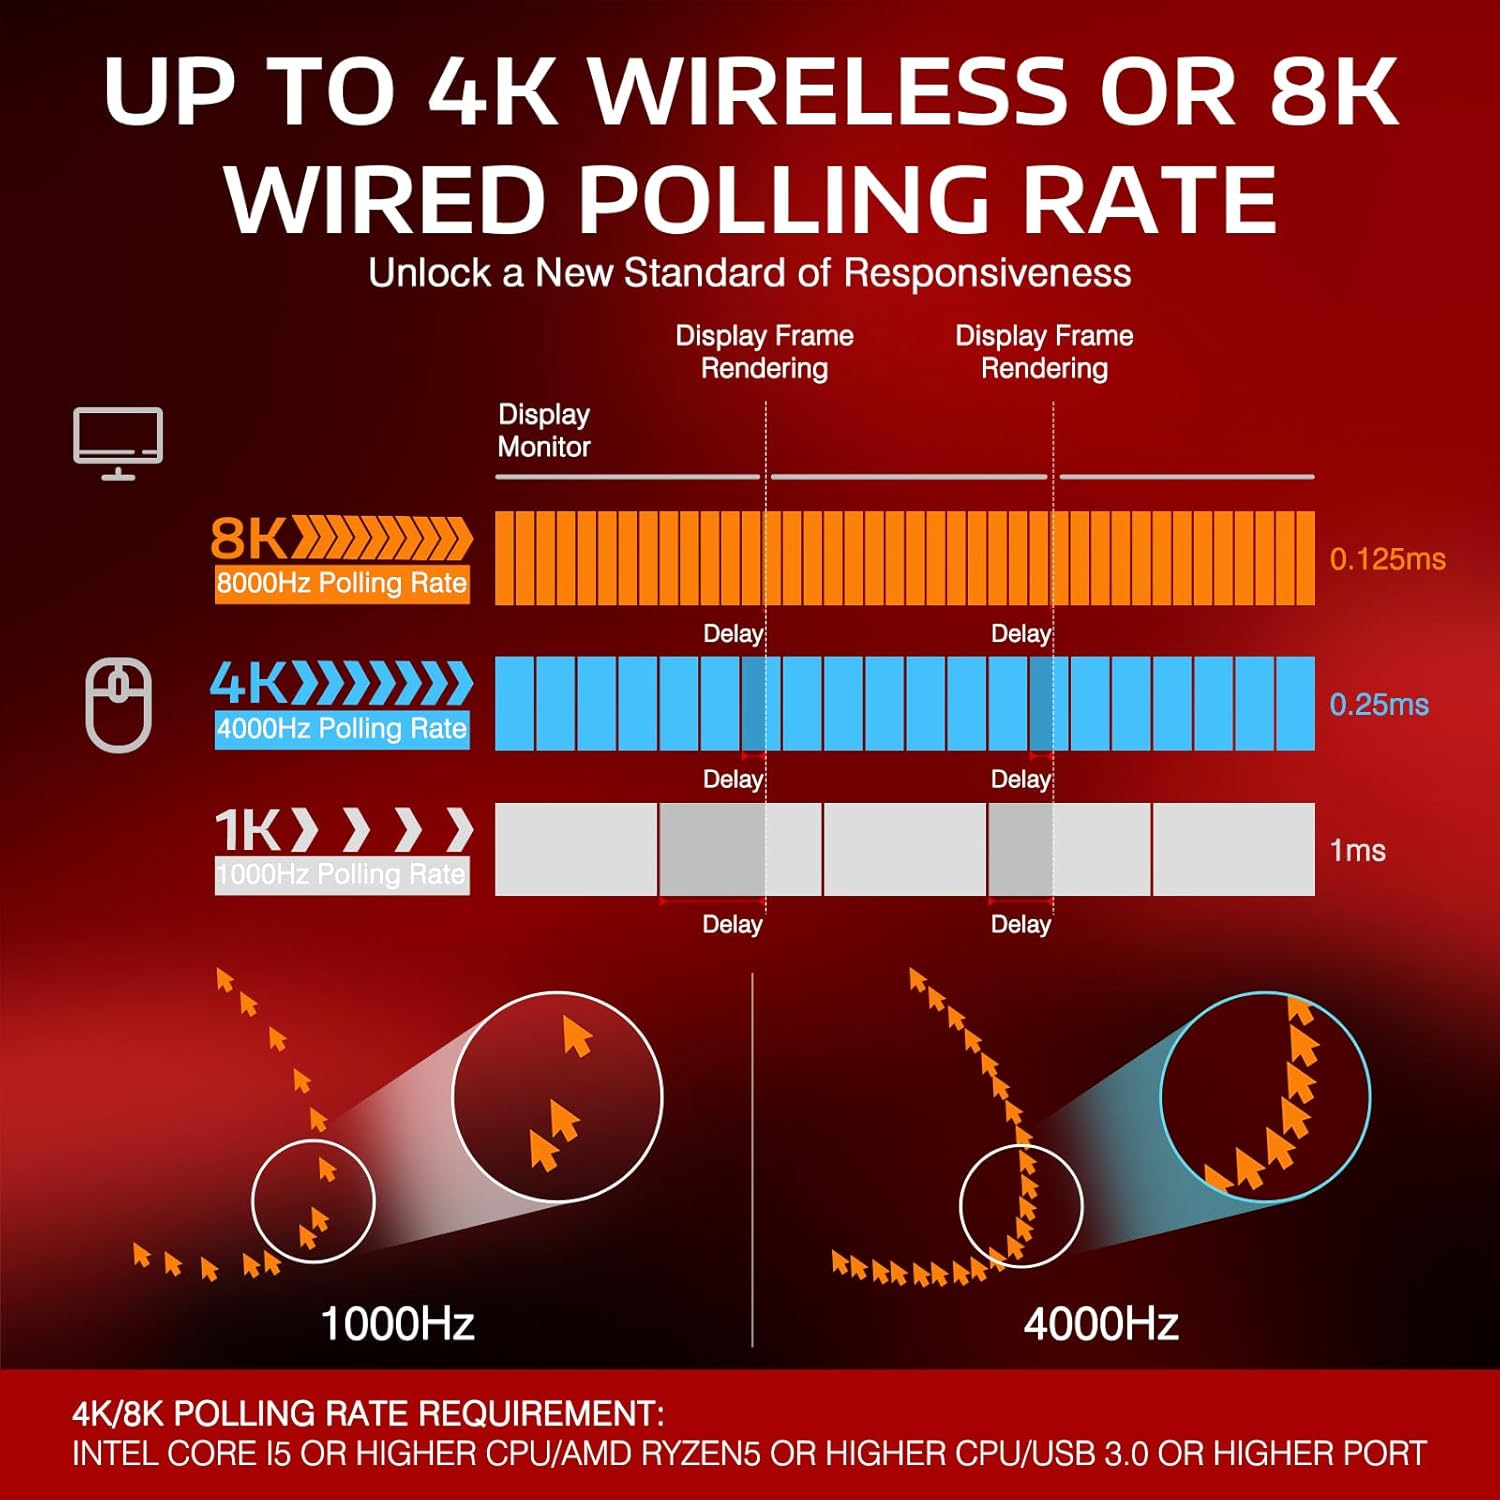
Image: Diagram illustrating the difference in delay between 1000Hz, 4000Hz, and 8000Hz polling rates, showing reduced delay with higher rates.
5.4. Charging the Mouse
Connect the mouse to your computer using the provided USB-C cable. The mouse will charge while connected. A full charge can provide up to 68 hours of continuous use.

Image: The ATTACK SHARK X3PRO mouse with an overlay indicating up to 68 hours of battery life.
5.5. Programmable Buttons
The X3PRO features 5 programmable buttons. Download the official ATTACK SHARK software to customize DPI settings, polling rate, Lift-Off Distance (LOD), shortcuts, and macros.
6. Maintenance
- Cleaning: Use a soft, dry cloth to clean the mouse. Avoid harsh chemicals or abrasive materials.
- Storage: Store the mouse in a cool, dry place when not in use.
- Battery Care: To prolong battery life, avoid fully discharging the mouse frequently. Charge it when the battery level is low.
- PTFE Feet: The mouse features 100% virgin grade PTFE feet for smooth gliding. Avoid scratching or damaging them.

Image: The underside of the ATTACK SHARK X3PRO mouse, highlighting the 100% virgin grade PTFE feet for consistent glide.
7. Troubleshooting
| Problem | Solution |
|---|---|
| Mouse not responding in 2.4G wireless mode. |
|
| Mouse not connecting via Bluetooth. |
|
| Inconsistent tracking or movement. |
|
| Mouse not charging. |
|
8. Specifications
| Feature | Detail |
|---|---|
| Brand | ATTACK SHARK |
| Model | X3PRO |
| Connectivity Technology | Bluetooth, 2.4GHz Wireless, USB-C Wired |
| Sensor | Pixart PAW3395 Optical Sensor |
| DPI (Sensitivity) | Adjustable: 800/1600/2400/3200/5000/26000 |
| Polling Rate | Up to 4000Hz (Wireless), Up to 8000Hz (Wired) |
| Tracking Speed | 650 IPS |
| Acceleration | 50G |
| Switches | Kailh GM8.0 Micro Switches (80 million click lifespan) |
| Encoder | TTC Scroll Wheel Encoder |
| Buttons | 7 (5 programmable) |
| Weight | 49 Grams |
| Battery Life | Up to 68 hours (continuous use) |
| Compatible Operating Systems | Windows XP / VISTA / 7 / 8 / 10 / MAC |
9. Product Demonstration
Watch this video for a visual overview of the ATTACK SHARK X3PRO Wireless Gaming Mouse.
Video: A demonstration of the ATTACK SHARK X3PRO 4K/8K Lightweight Wireless Gaming Mouse, showcasing its features and design.
10. Warranty and Support
For warranty information, technical support, or to download the latest software and drivers, please visit the official ATTACK SHARK website or contact their customer service. Keep your purchase receipt for warranty claims.
Official Website: ATTACK SHARK Store on Amazon
Ask a question about this manual
Ask about setup, troubleshooting, compatibility, parts, safety, or missing instructions. Manuals+ will review the question and use this page’s manual context to help answer it.