1. Product Overview
The MHCOZY CPEW01 WiFi Remote Desktop Power Switch is a wireless device designed to remotely control your computer's power functions (on/off/reset) via the eWelink mobile application. It offers convenient management of your desktop PC from anywhere with network access, and supports integration with smart home systems like Alexa and Google Home.
Key Features:
- Remote On/Off/Reset: Control your computer's power state from your mobile device.
- eWelink App Control: Manage functions through the intuitive eWelink application.
- Smart Home Compatibility: Works with Alexa and Google Assistant for voice control.
- Child Lock Function: Prevent unauthorized power changes.
- Timing & Scheduling: Set schedules for automatic power on/off.
- Device Sharing: Share control with multiple users.
- Real-time Status Feedback: Monitor your computer's power status.
- Safe Shutdown: Designed to prevent hard disk damage during remote shutdown.
2. Package Contents
- 1x MHCOZY Wireless App Remote Switch for Computer (CPEW01)
- 2x Cables for DIY and Brand Computers
3. Installation Guide
This device can be installed using either the PCIe slot for power or a USB 2.0 header for power, depending on your motherboard's available connections. Both methods require connecting the power and reset cables to your motherboard's front panel headers.
3.1 PCIe Power Mode Installation
- Locate Front Panel Headers: Identify the Power SW (Power Switch) and Reset SW (Reset Switch) wires connected to your computer's motherboard front panel headers. Carefully unplug these wires, noting their original positions.

Figure 3.1: Locating Power SW and Reset SW cables on the motherboard.
- Connect to the Module: Connect the Power and Reset lines from the MHCOZY module to the corresponding Power header and Reset header on your computer's motherboard.

Figure 3.2: Connecting the module to motherboard headers.
- Insert into PCIe Slot: Insert the MHCOZY module into an available PCIe slot on your motherboard. This slot provides power to the module. Secure the bracket screws if applicable.
Figure 3.3: Module inserted into a PCIe slot.
- Test Power On/Off: After installation, test the power on/off functionality.
Video 3.1: Demonstration of PCIe Power Mode installation and basic power control.
3.2 USB 2.0 Header Power Mode Installation
- Connect USB Cable: Connect the provided USB cable to the MHCOZY module.

Figure 3.4: MHCOZY module with USB cable.
- Connect to Motherboard USB Header: Plug the USB cable into an available USB 2.0 header on your motherboard. This provides power to the module.
- Connect Power/Reset Cables: Similar to PCIe mode, connect the Power and Reset lines from the MHCOZY module to the corresponding Power header and Reset header on your computer's motherboard.
- Test Power On/Off: After installation, test the power on/off functionality.
Video 3.2: Demonstration of USB 2.0 Header Power Mode installation and basic power control.
4. Operating Instructions
The MHCOZY CPEW01 is primarily controlled through the eWelink app. Ensure your device is connected to a 2.4GHz WiFi network for optimal performance.
4.1 eWelink App Control
- Download and Install: Download the eWelink app from your mobile device's app store (iOS or Android).
- Pair Device: Follow the in-app instructions to pair your MHCOZY CPEW01 switch with the eWelink app. Ensure your phone and the switch are on the same 2.4GHz WiFi network during pairing.
- Remote Power On/Off/Restart: Once paired, you can use the app interface to power on, power off, or restart your computer remotely.
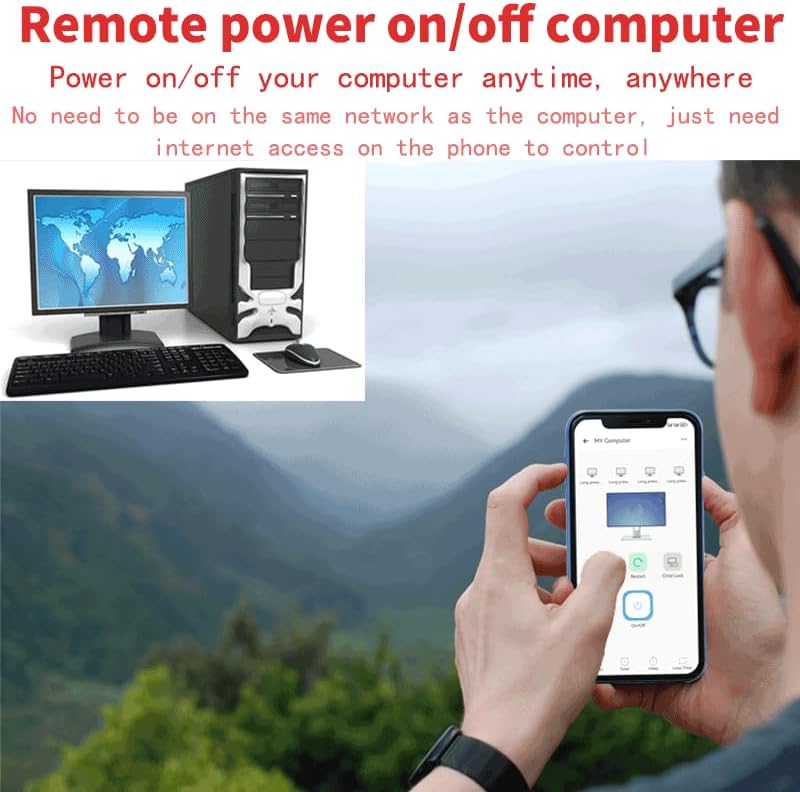
Figure 4.1: eWelink app interface for remote power control.
Video 4.1: Demonstration of remote power on, restart, and power off using the eWelink app.
- One-Click Force Shutdown: In cases of computer crashes or blue screens, the app provides a one-click force shutdown option to restart the computer and restore normal operation.

Figure 4.2: One-click force shutdown feature.
- Child Lock Function: Activate the child lock feature within the eWelink app to prevent unintended power changes.
- Timing and Scheduling: Set up schedules for your computer to automatically power on or off at specific times.
- Device Sharing: Share control of the switch with up to 19 other users through the eWelink app.
4.2 Voice Control (Alexa & Google Assistant)
Integrate your MHCOZY CPEW01 with Amazon Alexa or Google Assistant for hands-free voice control.
- Enable Skill/Service: In the Alexa or Google Home app, search for and enable the "eWelink Smart Home" skill or service.
- Link Account: Link your eWelink account to your Alexa or Google Home account.
- Discover Devices: Ask Alexa or Google Assistant to discover new devices. Your MHCOZY switch should appear.
- Voice Commands: Use commands such as "Alexa, turn on my computer" or "Hey Google, turn off my PC."

Figure 4.3: Voice control with Alexa.
5. Troubleshooting
- Device Not Connecting to WiFi:
- Ensure your WiFi network is 2.4GHz. The device does not support 5GHz networks.
- Check that the device is within range of your WiFi router.
- Verify your WiFi password is entered correctly in the eWelink app.
- Try restarting your router and the MHCOZY module.
- Remote Control Not Responding:
- Confirm the MHCOZY module is properly installed and receiving power.
- Check your internet connection on both your mobile device and the computer's network.
- Ensure the eWelink app is updated to the latest version.
- If the issue persists, try re-pairing the device with the eWelink app.
- Computer Does Not Power On/Off/Restart:
- Double-check that the Power SW and Reset SW cables from the module are correctly connected to the motherboard's front panel headers.
- Ensure the original Power SW and Reset SW cables from your PC case are disconnected from the motherboard and connected to the module's input ports, if applicable for your setup.
- Verify that your computer's BIOS settings allow for power on via external signals (e.g., Wake-on-LAN settings might be related, though this device uses direct power signals).
6. Specifications
| Brand | MHCOZY |
| Model Number | CPEW01 |
| Product Dimensions | 2.95 x 2.09 x 0.63 inches |
| Item Weight | 2.89 ounces (0.08 Kilograms) |
| Hardware Interface | PCIe (for power) or USB 2.0 Header (for power) |
| Data Link Protocol | WiFi (2.4GHz only) |
| Compatible Devices | Desktop PCs with available PCIe slot or USB 2.0 header |
| Smart Home Compatibility | eWelink App, Amazon Alexa, Google Assistant |
7. Warranty and Support
For warranty information and technical support, please refer to the manufacturer's official website or contact their customer service directly. Keep your purchase receipt for warranty claims.

