EPOMAKER F99
EPOMAKER x Aula F99 Wireless Mechanical Keyboard User Manual
Model: F99 | Brand: EPOMAKER
Introduction
The EPOMAKER x Aula F99 is a versatile 96% layout wireless mechanical keyboard designed for both gaming and productivity. It features a gasket-mounted structure, tri-mode connectivity (Bluetooth, 2.4GHz wireless, and wired USB-C), hot-swappable switches, and vibrant RGB lighting. This manual provides detailed instructions for setting up, operating, maintaining, and troubleshooting your F99 keyboard to ensure optimal performance and user experience.

Figure 1: EPOMAKER x Aula F99 Wireless Mechanical Keyboard (White Grey)
Setup
Unboxing and Initial Inspection
Upon receiving your EPOMAKER x Aula F99 keyboard, carefully open the packaging and inspect all contents. The box should contain the keyboard, a USB-C cable, a keycap puller, and a quick guide. Ensure no components are missing or damaged.

Figure 2: Packaging and included accessories for the F99 keyboard.
Video 1: Unboxing and initial overview of the EPOMAKER x Aula F99 Wireless Mechanical Keyboard, demonstrating its contents and build quality.
Connectivity Modes
The F99 keyboard offers three versatile connectivity options:
- 2.4GHz Wireless: For a stable and fast wireless connection, ideal for gaming. The USB dongle is stored conveniently on the keyboard.
- Bluetooth: Connect up to three Bluetooth devices, perfect for switching between multiple computers, tablets, or smartphones.
- Wired USB-C: For a direct, zero-latency connection and simultaneous charging.

Figure 3: Illustration of the keyboard's three connectivity options: Bluetooth, 2.4GHz Wireless, and Type-C Wired.

Figure 4: Detailed view of the keyboard's side, showing the two-stage kickstand, power switch, NUM indicator, Capslock indicator, 2.4G dongle storage, and Type-C port.
To switch between modes, use the toggle switch located on the side of the keyboard. For 2.4GHz wireless, insert the USB receiver into your device. For Bluetooth, ensure the keyboard is in Bluetooth mode and pair it with your device. For wired connection, simply connect the USB-C cable to the keyboard and your device.
System Compatibility
The F99 keyboard is compatible with a wide range of operating systems:
- Windows
- macOS
- iOS
- Android
Use the following key combinations to switch between operating system modes:
- FN + E: Mac/iOS Mode
- FN + Q: Win/Android Mode
- FN + R: iOS Mode
- FN + W: Windows Mode

Figure 5: The keyboard's compatibility with various operating systems including PS4/5, Xbox, PC, Laptop, Tablet, and Playstation.
Operating Instructions
Key Layout and Design
The F99 features a 96% layout with 99 keys, providing a compact design while retaining essential keys like arrow keys and a full number pad. Its gasket-mounted structure with a silicone pad ensures a soft and responsive typing experience.
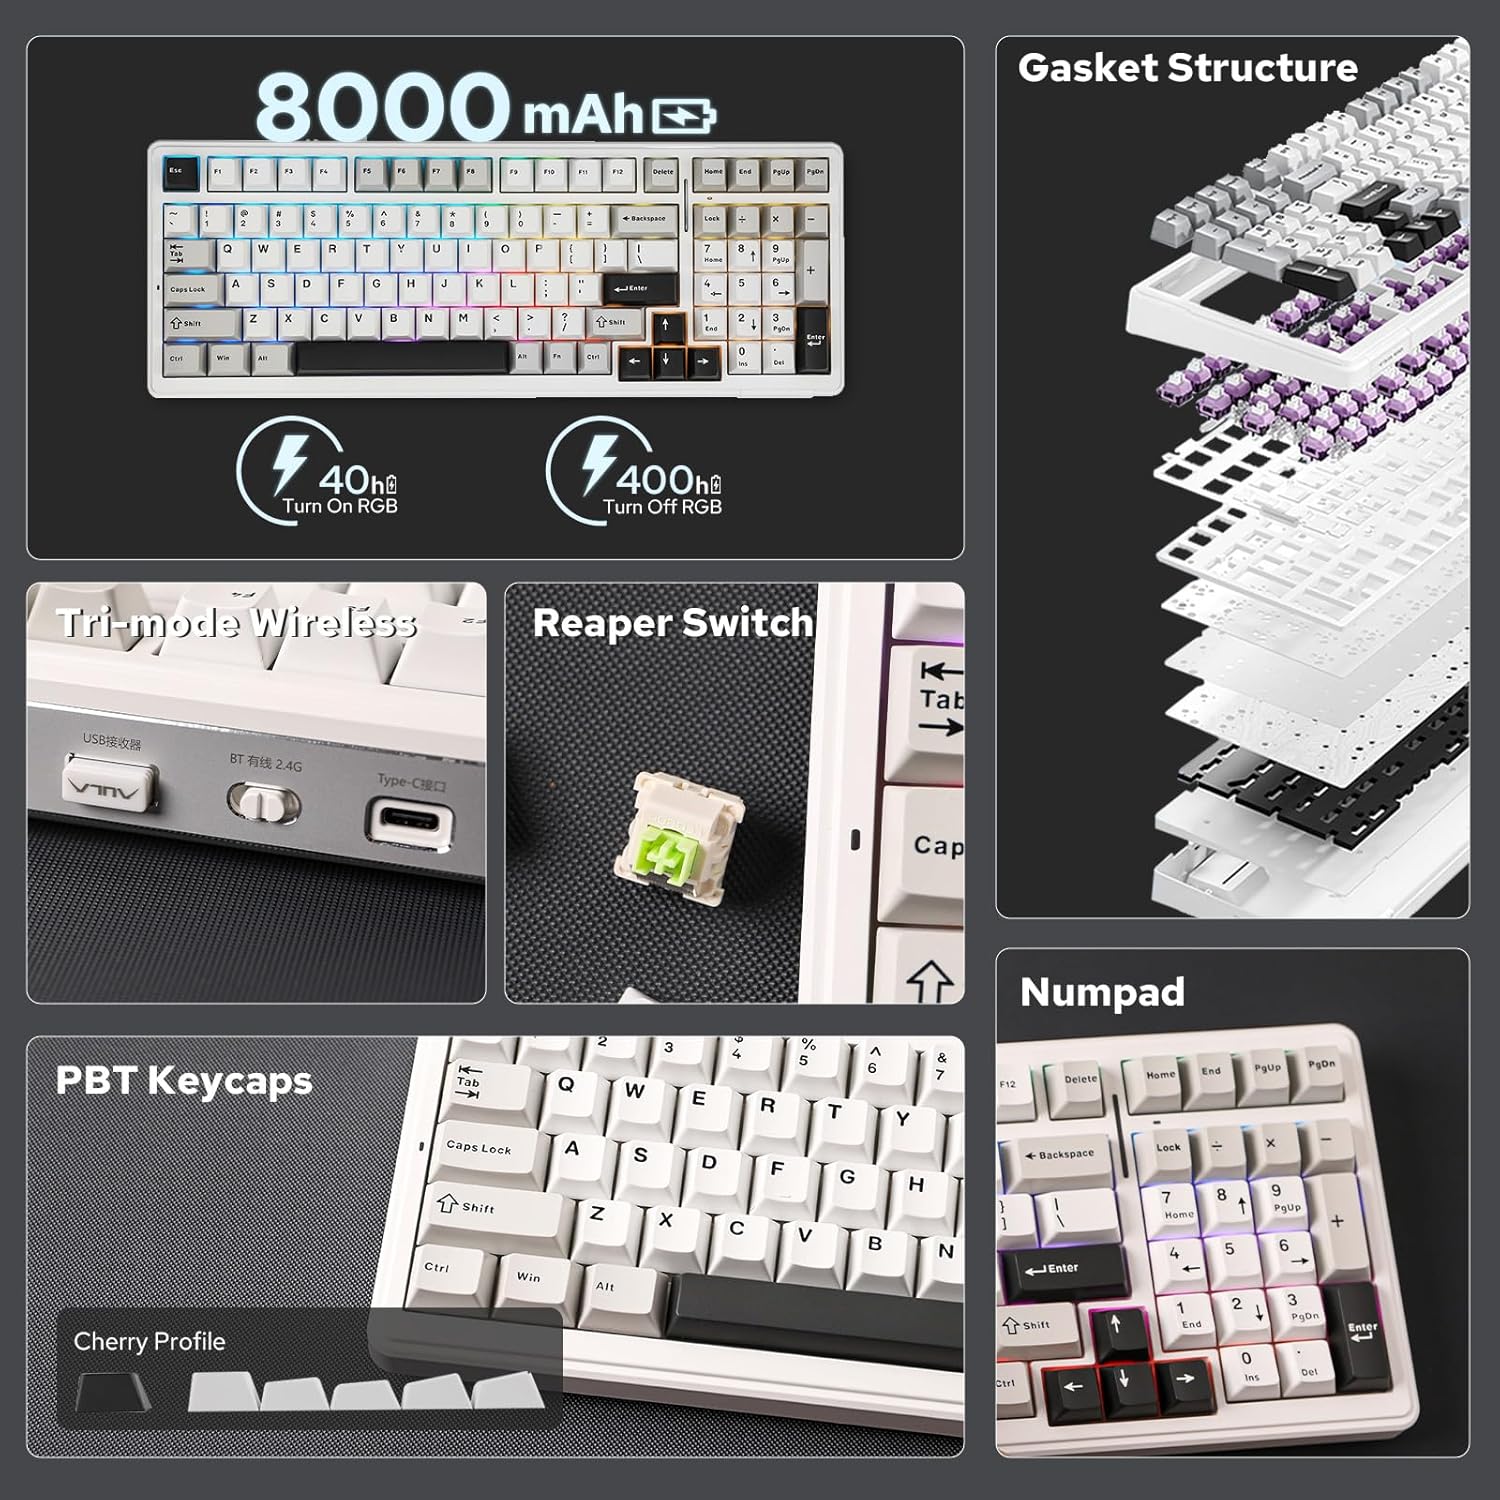
Figure 6: Overview of key features including 8000mAh battery, gasket structure, Reaper Switch, PBT Keycaps, and Numpad.

Figure 7: Dimensions and layout of the 1800 layout with 99 keys.

Figure 8: Internal structure highlighting 5 layers of sound-improving materials, PCB Flex-Cut, and PC Plate Flex-cut for enhanced typing feel.
Backlight Control
The F99 keyboard features immersive RGB lighting with 16 effects, macro customization, and music rhythm lighting. Adjust the backlight to your preference:
- FN + \|: Toggle Backlight Effect
- FN + Tab: Toggle Backlight Color
- FN + ↑/↓: Adjust Backlight Brightness
- FN + ←/→: Adjust Backlight Speed

Figure 9: Demonstrates key combinations for toggling backlight effects and colors.
Video 2: Demonstrates various RGB backlight effects on the EPOMAKER x Aula F99 keyboard.
Video 3: Shows how to adjust RGB backlight settings on the F99 keyboard.
Hot-Swappable Switches
The F99 features full-key hot-swappable sockets, allowing you to easily interchange 3/5 pin mechanical switches without soldering. This enables personalization of your typing experience.
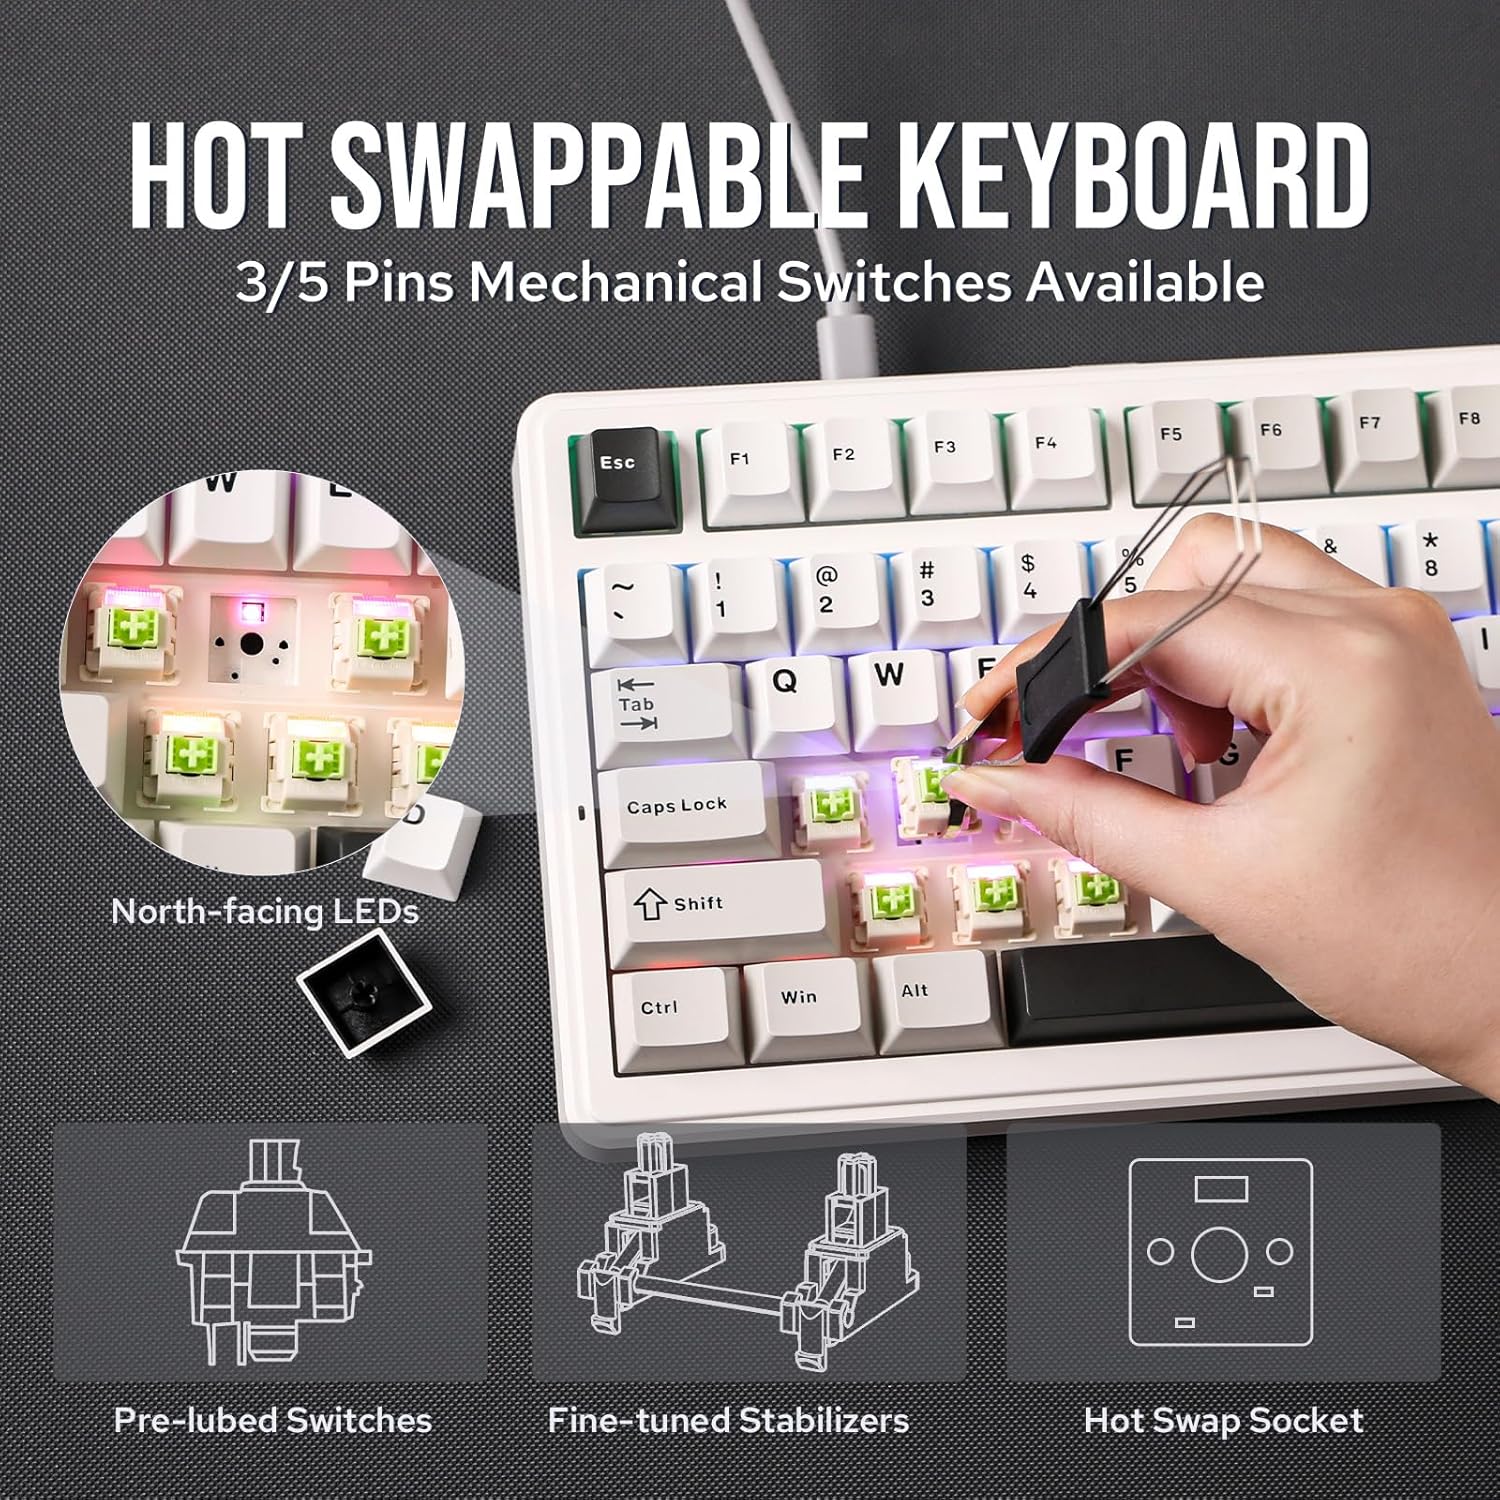
Figure 10: Illustrates the hot-swappable design, showing how to remove and insert switches, along with pre-lubed switches, fine-tuned stabilizers, and hot-swap sockets.

Figure 11: Close-up of the hot-swappable PCB, emphasizing DIY customization for mechanical keyboards.
The keyboard comes with factory pre-lubricated linear switches for a smooth and durable typing experience. The PBT keycaps are double-shot for longevity and a premium feel.

Figure 12: Details on the Dye-Sub Premium PBT Keycaps, designed for comfortable long-time typing with Cherry Profile.
Programmable Software
Customize your F99 keyboard further using the dedicated programmable software. This software allows for:
- Macro Recording
- Key Remapping
- RGB Effect Setting
- Music Rhythm Lighting

Figure 13: Screenshot of the programmable software interface, showing options for macro recording, key remapping, RGB effect setting, and music rhythm.

Figure 14: Highlights the customization capabilities of the keyboard, including key assignment, macro editing, light effects, and music rhythm.
Battery Management
The F99 is equipped with an 8000mAh ultra-high capacity battery, providing extended usage times between charges. It utilizes low-power consumption technology for efficient performance.

Figure 15: Visual representation of the 8000mAh battery and its extended battery life with low-power chip and energy-saving technology.
For optimal battery life, turn off the keyboard when not in use for extended periods. The keyboard can be charged via the USB-C cable.
Maintenance
Cleaning Your Keyboard
To maintain the longevity and appearance of your F99 keyboard:
- Regularly wipe the keycaps and chassis with a soft, dry, lint-free cloth.
- For deeper cleaning, use the included keycap puller to remove keycaps and clean dust and debris from beneath them using compressed air or a small brush.
- Avoid using harsh chemicals or abrasive materials, as these can damage the keycaps and finish.
Keycap and Switch Replacement
Thanks to the hot-swappable design, replacing keycaps and switches is straightforward:
- Use the keycap puller to gently remove keycaps by hooking it onto the keycap and pulling upwards.
- To remove a switch, use a switch puller (not included, but compatible) to grasp the switch from two sides and pull it straight up.
- To install a new switch, align its pins with the holes on the PCB and press down firmly until it clicks into place. Ensure the pins are not bent.
- Place the desired keycap onto the switch stem and press down gently until it is secure.
Troubleshooting
- Keyboard not responding:
- Ensure the keyboard is charged or connected via USB-C.
- Check the connectivity mode switch (2.4G, BT, Wired) is set correctly.
- For wireless modes, ensure the USB dongle is properly inserted or Bluetooth is paired.
- Try restarting the keyboard by turning it off and on.
- Keys not registering or double-typing:
- This might indicate a loose or faulty switch. Try reseating the switch or replacing it if necessary.
- Ensure the keyboard firmware is up to date via the programmable software.
- Backlight issues:
- Adjust brightness using FN + ↑/↓.
- Cycle through effects using FN + \|.
- Ensure the keyboard is not in a low-power state.
- Connectivity issues (Bluetooth/2.4G):
- Ensure the keyboard is within range of your device.
- Remove previous pairings on your device and re-pair the keyboard.
- For 2.4G, try a different USB port for the dongle.
- If the WIN key or Alt key stops working properly, use the shortcuts (FN+E, FN+Q, FN+R, FN+W) to switch to the correct OS mode.
- Software not detecting keyboard:
- Ensure the keyboard is connected via wired USB-C mode.
- Reinstall the programmable software.
Specifications
| Product Dimensions | 15.75 x 5.51 x 1.57 inches |
| Item Weight | 2.2 pounds |
| Manufacturer | EPOMAKER |
| Model Number | F99 |
| Connectivity Technology | USB-C, 2.4GHz Wireless, Bluetooth |
| Number of Keys | 99 |
| Battery Capacity | 8000mAh |
| Keyboard Backlighting | RGB |
| Special Features | Ergonomic, Backlit, 3 Modes, Customizable Display Keys, Hot-Swappable |
Warranty and Support
The EPOMAKER x Aula F99 Wireless Mechanical Keyboard comes with a standard manufacturer's warranty. For detailed warranty information, technical support, or service inquiries, please refer to the official EPOMAKER website or contact their customer support directly. Keep your purchase receipt for warranty claims.
Ask a question about this manual
Ask about setup, troubleshooting, compatibility, parts, safety, or missing instructions. Manuals+ will review the question and use this page’s manual context to help answer it.