Introduction
This manual provides essential information for the installation, operation, maintenance, and troubleshooting of the Cisco Catalyst C9300L-24P-4X-E Network Essentials Switch. This device is designed for enterprise-grade access, offering 24 Gigabit PoE+ ports and four 10 Gbps SFP+ uplinks for robust network connectivity.

This image displays the rear panel of the Cisco Catalyst C9300L-24P-4X-E switch, highlighting the various ports, cooling fans, and the power supply unit.
Safety Information
Observe the following safety precautions to prevent injury and damage to the equipment:
- Ensure proper grounding before connecting power.
- Do not operate the switch in wet or excessively humid environments.
- Use only approved power cords and accessories.
- Ensure adequate ventilation to prevent overheating.
- Disconnect power before performing any maintenance or installation procedures.
Package Contents
Verify that your package contains the following items:
- Cisco Catalyst C9300L-24P-4X-E Switch
- Power Cord
- Rack-mount Kit (if applicable)
- Console Cable (RJ-45 to DB-9)
- Documentation (Quick Start Guide, Safety Information)
Physical Description
The Cisco Catalyst C9300L-24P-4X-E switch features a robust design for network deployments. The rear panel includes:
- 24 Gigabit Ethernet PoE+ Ports: For connecting network devices and providing power over Ethernet.
- 4x 10Gbps SFP+ Uplink Ports: For high-speed connections to the distribution or core layer.
- Console Port: For command-line interface access.
- USB Ports: For file management and system configuration.
- Modular Power Supply Bay: For installing power supply units.
- Cooling Fans: For thermal management.
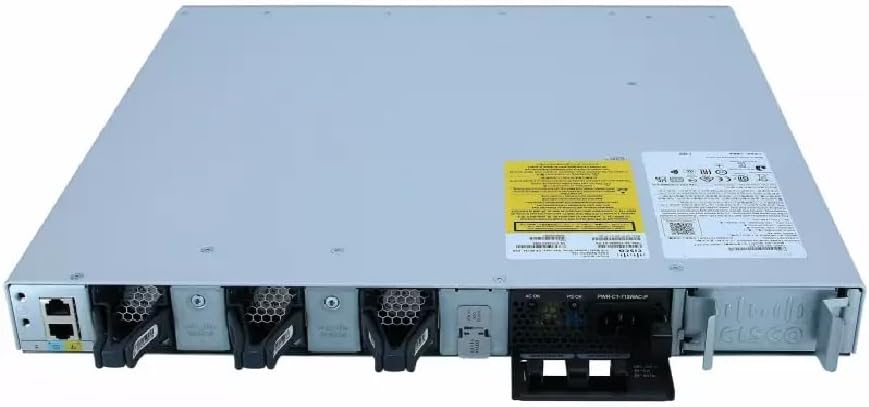
A detailed view of the rear panel of the Cisco Catalyst C9300L-24P-4X-E switch, illustrating the 24 Gigabit PoE+ ports, four 10Gbps SFP+ uplink ports, and the modular power supply bay.
Setup
1. Unpacking and Inspection
Carefully remove the switch from its packaging. Inspect the device for any signs of physical damage. If damage is found, contact your supplier immediately.
2. Mounting the Switch
The switch can be mounted in a standard 19-inch equipment rack or placed on a desktop.
- Rack-Mount Installation: Attach the provided rack-mount brackets to the sides of the switch using the screws. Secure the switch into the rack using appropriate rack screws.
- Desktop Installation: Ensure the surface is flat, stable, and allows for adequate ventilation around the switch. Attach the rubber feet (if provided) to the bottom of the switch.
3. Connecting Power
Insert the power cord into the AC power connector on the rear of the switch. Connect the other end of the power cord to a grounded electrical outlet. Ensure the power supply is properly seated in its bay.
4. Network Connections
- PoE+ Ports: Connect Ethernet cables from your network devices (e.g., IP phones, access points, surveillance cameras) to the 24 Gigabit PoE+ ports. These ports will provide both data connectivity and power.
- SFP+ Uplink Ports: Insert compatible SFP+ transceivers into the four 10Gbps SFP+ uplink ports. Connect fiber optic cables from these transceivers to your distribution or core network devices.
- Console Port: For initial configuration or troubleshooting, connect a console cable from your management workstation to the console port on the switch.
Operating the Switch
1. Initial Power On
After connecting power, the switch will automatically power on. Observe the system LED indicators for boot status. The system LED should turn green once the boot process is complete.
2. Basic Configuration
The Cisco Catalyst C9300L-24P-4X-E runs on Cisco IOS XE. Initial configuration can be performed via the console port using a command-line interface (CLI) or through a web-based graphical user interface (GUI) if enabled. Refer to Cisco's official documentation for detailed configuration guides.
3. LED Indicators
The switch features various LED indicators to provide status information:
- System LED: Indicates overall system status (e.g., green for normal operation, amber for warning).
- PoE LED: Indicates Power over Ethernet status for the ports.
- Port Status LEDs: Indicate link status and activity for each network port.
Maintenance
Regular maintenance ensures optimal performance and longevity of your switch:
- Cleaning: Periodically clean the exterior of the switch with a soft, dry cloth. Ensure ventilation openings are free from dust and debris. Do not use liquid cleaners directly on the device.
- Firmware Updates: Keep the switch firmware updated to the latest version provided by Cisco. This ensures access to new features, security patches, and performance improvements.
- Environmental Control: Maintain the operating environment within specified temperature and humidity ranges to prevent hardware failure.
- Cable Management: Ensure all cables are neatly organized and properly secured to prevent accidental disconnections or damage.
Troubleshooting
If you encounter issues with your switch, consider the following troubleshooting steps:
- No Power: Verify the power cord is securely connected to both the switch and the power outlet. Check the power source and any circuit breakers. Ensure the power supply unit is correctly installed.
- No Network Connectivity: Check the link status LEDs on the affected ports. Ensure Ethernet cables are properly connected and undamaged. Verify connected devices are powered on and functioning correctly.
- PoE Device Not Powering On: Confirm the PoE+ port is enabled and the device is PoE compatible. Check the PoE budget and ensure it's not exceeded.
- Slow Performance: Check for network congestion, duplex mismatches, or errors on ports. Ensure uplink bandwidth is sufficient.
- Accessing the Switch: If unable to access via network, try connecting directly to the console port for CLI access.
Specifications
| Feature | Detail |
|---|---|
| Brand | Cisco |
| Model Number | C9300L-24P-4X-E |
| Number of Ports | 24 Gigabit PoE+ ports, 4x 10Gbps SFP+ uplinks |
| Interface | PoE, SFP+ |
| Data Transfer Rate | 1 Gigabits Per Second (Gigabit Ethernet), 10 Gigabits Per Second (Uplinks) |
| Voltage | 240 Volts (AC) |
| Switch Type | Managed, Fixed, PoE+, Layer 2 |
| Case Material Type | Plastic |
| Compatible Devices | Desktop, Laptop, Printer (and other network devices) |
Warranty Information
This product comes with a 90 days limited warranty. Please refer to the warranty documentation provided with your purchase for specific terms and conditions. For warranty claims, contact your reseller or the manufacturer's support channels.
Technical Support
For further assistance, technical support, or advanced configuration guidance, please refer to the official Cisco documentation available on their website. You may also contact your authorized Cisco reseller or support provider for specialized assistance.
Cisco Support Website: https://www.cisco.com/c/en/us/support/index.html


