1. Product Overview
This document provides comprehensive guidance for the installation and care of your new Generic Laptop Keyboard. This keyboard is designed as a replacement part for specific Gateway laptop models, featuring a Spanish (SP) layout and a black finish. It is important to note that this model does not include backlighting and is supplied without a frame, requiring the reuse of the original laptop's keyboard frame.
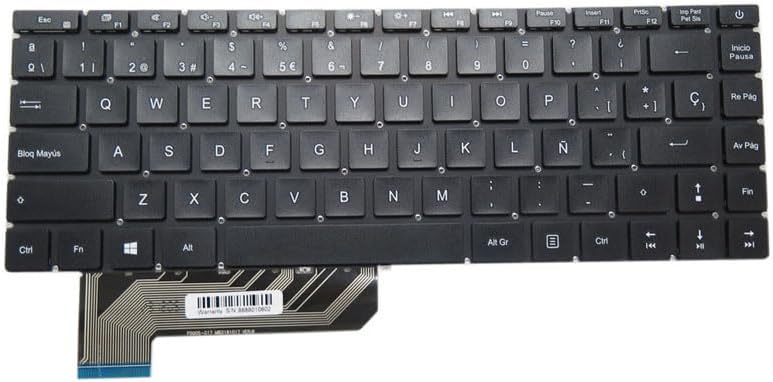
Figure 1: Top view of the Generic Spanish SP Black Laptop Keyboard.
2. Compatibility
This replacement keyboard is compatible with the following Gateway laptop models:
- Gateway GWTN141-6
- Gateway GWTN141-6BL
- Gateway GWTN141-6BK
- Gateway GWTN141-6GR
- Gateway GWTN141-6PR
Please verify your laptop's model number before proceeding with installation to ensure proper fit and function.
3. Installation Guide
3.1. Preparation
- Power Off: Ensure your laptop is completely powered off and disconnected from all power sources. Remove the battery if it is user-removable.
- Tools: Gather necessary tools, which typically include a small Phillips head screwdriver, a plastic spudger or pry tool, and possibly tweezers.
- Static Precautions: Work on a clean, static-free surface. Consider using an anti-static wrist strap.
3.2. Removal of Old Keyboard
- Carefully locate the tabs or screws securing the keyboard to the laptop's top case. These are often found along the top edge or underneath the laptop.
- Gently pry up the keyboard using a plastic spudger, starting from one corner and working your way around. Be cautious not to damage the laptop's casing or the keyboard itself.
- Once the keyboard is loose, carefully lift it to expose the ribbon cable connector underneath.
- Unlock the ribbon cable connector. This usually involves flipping up a small retaining clip on the connector.
- Gently pull the ribbon cable out of the connector. Remove the old keyboard.
3.3. Installation of New Keyboard

Figure 2: Detail of the keyboard ribbon cable with serial number.
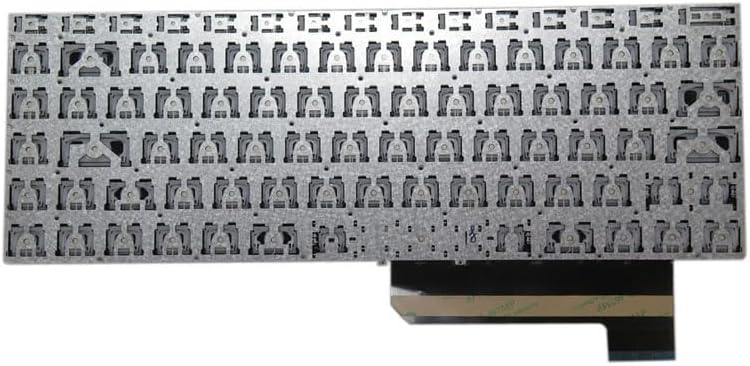
Figure 3: Underside view of the keyboard showing mounting points.
- Carefully insert the new keyboard's ribbon cable into the connector on the laptop's motherboard. Ensure it is fully seated and aligned correctly. The serial number on the ribbon cable is 8888010602.
- Secure the ribbon cable by flipping down the retaining clip on the connector. Double-check that the cable is firmly held in place.
- Align the new keyboard with the laptop's top case, ensuring all mounting points and tabs are correctly positioned.
- Gently press down on the keyboard until it snaps into place. If there are screws, reinsert and tighten them.
- Reconnect the battery (if removed) and power on your laptop to test the new keyboard's functionality.
4. Operation
Your new keyboard functions identically to the original. All standard keys, including alphanumeric, numeric, function keys (F1-F12), and special characters, will operate as expected. The Spanish layout includes specific keys for characters such as 'Ñ' and 'Ç', and dedicated keys for accent marks.
For specific laptop functions tied to the 'Fn' key (e.g., volume control, screen brightness), refer to your laptop's original user manual, as these functions are typically controlled by the laptop's firmware and not the keyboard hardware itself.
5. Maintenance and Care
To ensure the longevity and proper function of your keyboard, follow these maintenance guidelines:
- Cleaning: Use a soft, lint-free cloth slightly dampened with water or a mild, non-abrasive cleaning solution to wipe the keycaps. Avoid spraying liquids directly onto the keyboard.
- Dust Removal: Use compressed air to remove dust and debris from between the keys.
- Avoid Spills: Protect the keyboard from liquid spills, as moisture can cause permanent damage to the internal circuitry.
- Gentle Use: Avoid excessive force when typing or cleaning, which can damage key mechanisms.
6. Troubleshooting
6.1. Keyboard Not Responding
- Check Connection: Ensure the ribbon cable is securely and correctly seated in its connector on the motherboard.
- Restart Laptop: A simple restart can often resolve temporary communication issues.
- Driver Check: Verify that your laptop's operating system has the correct keyboard drivers installed. This is usually automatic, but can be checked in Device Manager (Windows) or System Information (macOS).
6.2. Specific Keys Not Working
- Inspect Keys: Check for any visible debris or obstructions under the non-functional keys.
- Re-seat Keyboard: If only a few keys are affected, it might indicate a slight misalignment or an issue with the ribbon cable connection. Consider re-seating the keyboard and its cable.
6.3. Incorrect Character Output
- Language Settings: Ensure your operating system's keyboard language settings are set to 'Spanish (Spain)' or the appropriate Spanish variant.
- Driver Update: Update or reinstall keyboard drivers.
7. Product Specifications
| Feature | Specification |
|---|---|
| Product Dimensions | 11.81 x 7.87 x 3.94 inches |
| Item Weight | 2.2 pounds |
| Manufacturer | Generic |
| ASIN | B0CSYSW96S |
| Country of Origin | China |
| Item Model Number | GWTN141-6 SP |
| Brand | Generic |
| Compatible Devices | Laptop |
| Keyboard Description | Ergonomic |
| Special Feature | No Backlight (as per product title) |
| Color | Black |
| Number of Keys | 104 |
| Style | Modern |
| Material | Acrylonitrile Butadiene Styrene |
| Power Source | Wired |
| Keyboard Layout | QWERTY (Spanish SP) |
8. Warranty and Support
This product comes with a 90-day warranty from the date of purchase, covering manufacturing defects. Please retain your proof of purchase for warranty claims.
In addition, a 30-day return policy is typically offered for this item, allowing for refunds or replacements under specified conditions. Please refer to the retailer's return policy for detailed terms.
For technical assistance or warranty inquiries, please contact the seller or manufacturer directly. You may also refer to the serial number 8888010602 found on the ribbon cable for product identification during support requests.
For general support, you can often find assistance through the retailer's customer service portal or by searching for the product model number online. Contact Support


