1. Product Overview
The Quest X1 Metal Detector is a lightweight, high-performance device designed for both adults and children, making treasure hunting accessible and enjoyable for the whole family. It features fast discrimination speed, a built-in rechargeable battery, and a durable TurboD coil for efficient metal detection.
Key features include:
- Versatile Design: Innovative structure allows easy conversion for use by adults or children by removing the middle rod.
- Lightweight: Weighing only 945g, it is highly portable and easy to handle during extended use.
- USB-C Rechargeable: Equipped with a built-in Li-Po battery, offering up to 12 hours of continuous operation and convenient USB-C charging via wall charger, power bank, or solar pad.
- Multiple Search Modes: Includes Jewelry mode, All Metal mode, and Coin mode for efficient target identification.
- Intuitive LCD Display: A 3-inch (60x45mm) LCD provides detailed information such as depth reader, Target ID, sensitivity level, and battery status.
- TurboD Coil: Features a 9x5 inch TurboD coil for deeper penetration and enhanced mineralization resistance.

Figure 1.1: Quest X1 Metal Detector with included accessories.
2. What's in the Box
Upon opening the package, verify that all components listed below are present and in good condition:
- 1x Control box & handle
- 1x Arm band
- 1x Armrest
- 1x 9x5" Search coil (TurboD)
- 1x Coil cover
- 1x USB Recharge cable (Type-C)
- 1x Digger
- 1x String bag
- 1x Coil screw & nut set
- 1x Rod Set (multiple sections)

Figure 2.1: Visual representation of the Quest X1 package contents.
3. Setup and Assembly
Follow these steps to assemble your Quest X1 Metal Detector:
- Attach the Search Coil: Secure the 9x5" TurboD search coil to the lower rod using the provided coil screw and nut set. Ensure it is firmly attached but do not overtighten.
- Assemble the Rods: Connect the rod sections. The X1 features a detachable middle rod, allowing adjustment for different user heights (22" to 41" adjustable shaft length). For adult use, connect all sections. For child use, remove the middle rod.
- Attach Control Box and Handle: Slide the control box and handle assembly onto the upper rod. Adjust its position for comfortable grip and viewing of the LCD display.
- Connect Coil Cable: Carefully wrap the coil cable around the rod, securing it with any integrated clips or ties to prevent tangling. Plug the coil cable connector into the corresponding port on the control box.
- Attach Armrest and Arm Band: Secure the armrest to the upper rod. Attach the arm band to the armrest for added stability and comfort during use.
- Charge the Battery: Before first use, fully charge the built-in Li-Po battery using the provided USB-C cable. Connect it to a wall charger, power bank, or solar panel. The battery status will be indicated on the LCD display.

Figure 3.1: The Quest X1 Metal Detector fully assembled.
4. Operating Instructions
The Quest X1 is designed for intuitive operation. Familiarize yourself with the control panel and display before use.
4.1. Control Panel and LCD Display

Figure 4.1: Detailed view of the Quest X1 control panel and LCD display.
The 3-inch LCD provides critical information at a glance:
- ID Indicator: Displays the Target ID (0-9 segments).
- ID Gauge Arch: Visualizes the type of metal detected (Hot rock/Iron, Gold Zone, Silver Zone).
- Volume Level: Indicates the current audio output volume.
- Battery Gauge: Shows the remaining battery life.
- Sensitivity Level: Displays the current sensitivity setting.
- Depth Indicator: Estimates the depth of the detected target.
- Detection Modes: Shows the active search mode.
Control buttons and their functions:
- Power on/off: Press and hold to turn the device on or off.
- Mode selection: Cycle through Jewelry, All Metal, and Coin modes.
- Sensitivity +/-: Adjust the detection sensitivity.
- Pinpoint Mode: Activates pinpointing for precise target location.
- Ground Balance: Automatic or manual adjustment for ground mineralization.
- Volume +/-: Adjust the audio volume.
- Flashlight: Activates the built-in flashlight.
4.2. Search Modes
The Quest X1 offers three distinct search modes:
- Jewelry Mode: Optimized for detecting small metallic objects like rings, earrings, and other jewelry.
- All Metal Mode: Detects all types of metals without discrimination, providing maximum depth.
- Coin Mode: Specifically tuned to identify coins, often discriminating against iron and other unwanted targets.
Select the appropriate mode based on your target and environment.
4.3. Ground Balance
Ground balance is crucial for stable operation and accurate detection, especially in mineralized soil. The X1 supports automatic and manual ground balance. Refer to the on-screen prompts for manual adjustment if needed, or rely on the automatic setting for general use.
4.4. Target Identification (IDmaxX)
The IDmaxX system provides a stable and sharp 12kHz single frequency platform. The Target ID and ID Gauge Arch on the LCD help you identify the probable type of metal before digging. Higher numbers typically indicate more conductive metals (e.g., silver, copper), while lower numbers indicate less conductive metals (e.g., iron).
5. Key Features Explained
5.1. Recovery Speed
The Quest X1 boasts a fast recovery speed, which is essential for distinguishing valuable targets from trash, especially in areas with high metallic debris. This allows the detector to quickly reset after detecting one target, enabling it to detect another nearby target without missing it.

Figure 5.1: Comparison of fast recovery speed (Quest X1) versus slow recovery speed in metal detection.
5.2. TurboD Coil Technology
The 9x5" TurboD coil is a key component of the X1's performance. It combines two kidney-shaped coils, providing deeper penetration and higher resistance to ground mineralization. This design enhances target separation and stability.

Figure 5.2: TurboD coil construction and available optional coil sizes.
The coil is constructed with:
- High strength PC+ABS top layer
- EMI shielding carbon layer
- Copper coil for transmitter & receiver
- Lightweight epoxy resin protection
- Includes a protection coil cover
5.3. USB-C Rechargeable Battery
The X1 features a built-in 1000mAh Li-Po battery, eliminating the need for disposable batteries. It provides approximately 12 hours of battery life by speaker. The USB-C charging port allows for convenient recharging from various sources, including wall chargers, power banks, or solar pads, making it ideal for outdoor use.
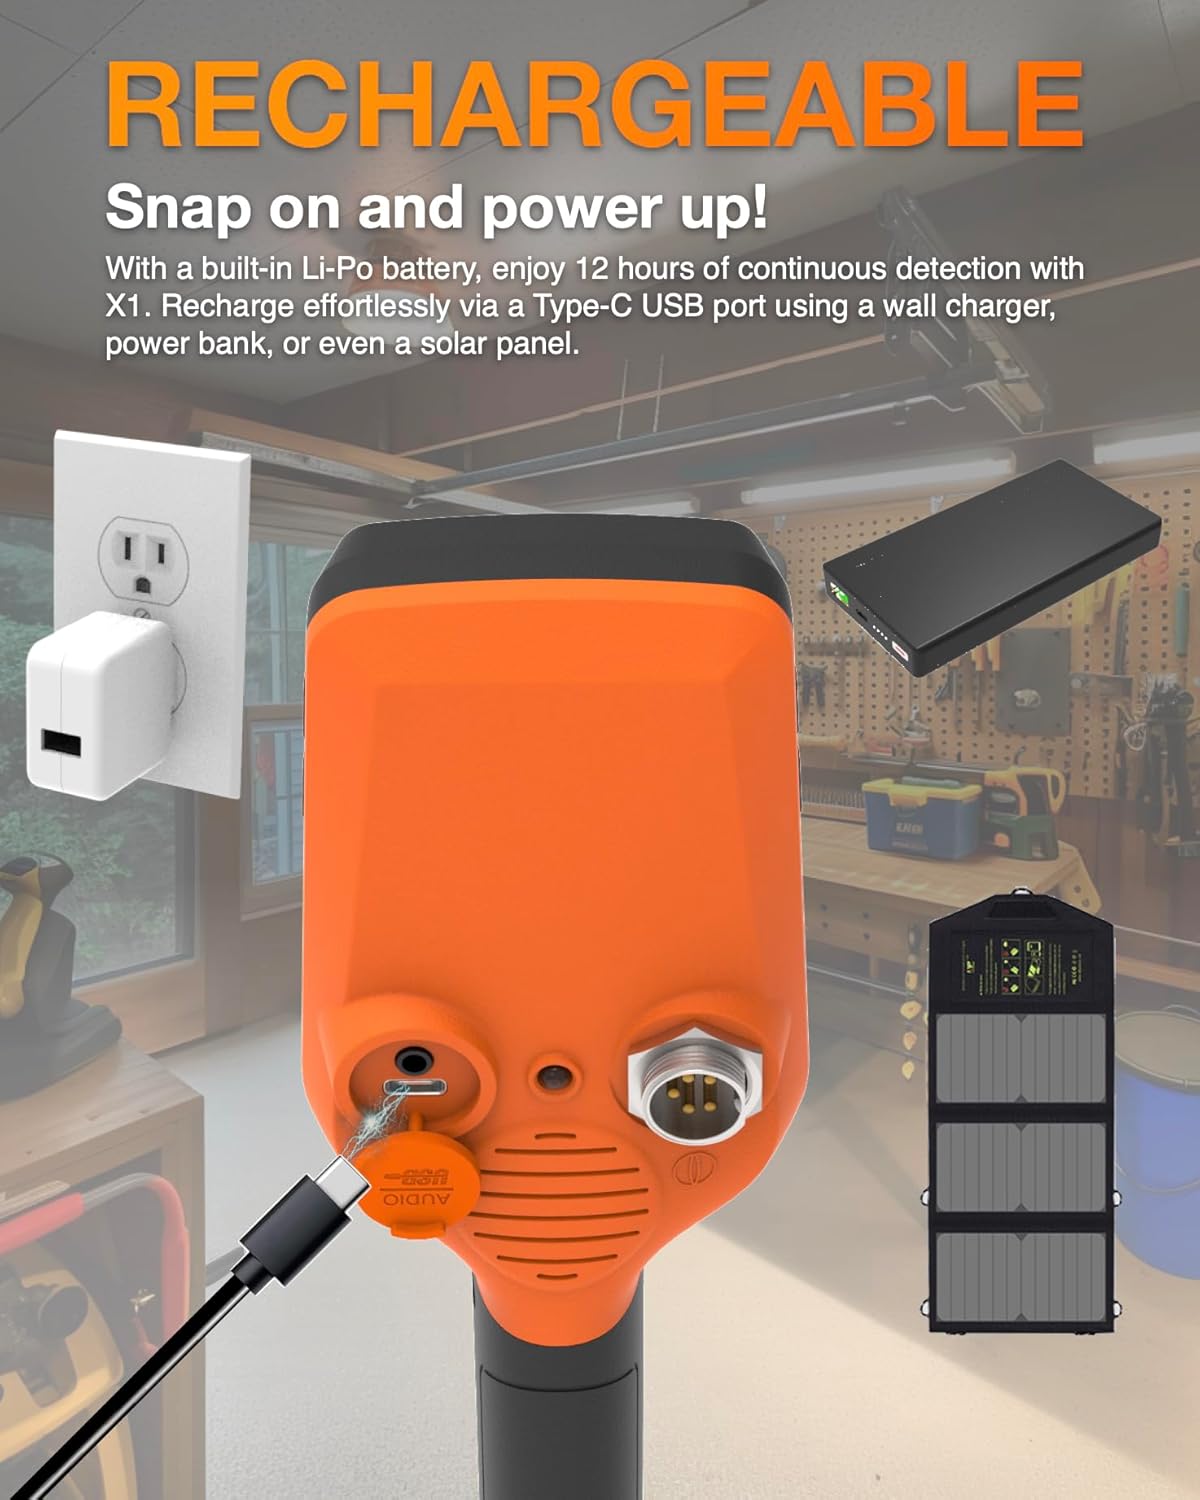
Figure 5.3: USB-C charging port on the Quest X1 control box.
6. Maintenance
Proper maintenance will extend the life and performance of your Quest X1 Metal Detector:
- Cleaning: After each use, especially in dirty or wet conditions, wipe down the coil and shaft with a damp cloth. Ensure the control box is clean and dry. Do not use abrasive cleaners or solvents.
- Coil Care: The TurboD coil is waterproof, but the control box is rainproof. Avoid submerging the control box. Always use the included coil cover to protect the coil from scratches and impacts.
- Battery Care: Recharge the battery regularly, even if not in frequent use, to maintain its health. Avoid completely draining the battery before recharging. Store the detector in a cool, dry place when not in use.
- Storage: Disassemble the detector into its rod sections and store it in the provided string bag for protection and easy transport.
- Cable Inspection: Periodically check the coil cable for any signs of wear, cuts, or damage. Ensure the connector is clean and free of debris.
7. Troubleshooting
This section addresses common issues you might encounter with your Quest X1 Metal Detector.
| Problem | Possible Cause | Solution |
|---|---|---|
| Detector does not power on. | Battery is depleted. | Charge the battery using the USB-C cable. Ensure the charging indicator is active. |
| Erratic signals or false positives. | High ground mineralization; high sensitivity setting; electromagnetic interference (EMI). | Perform ground balance. Reduce sensitivity. Move away from power lines, cell phones, or other electronic devices. |
| No detection or weak signals. | Coil cable not properly connected; low sensitivity; incorrect search mode. | Check coil cable connection. Increase sensitivity. Switch to "All Metal" mode to confirm basic functionality. |
| LCD display is dim or unresponsive. | Low battery; extreme temperatures. | Charge the battery. Operate within recommended temperature range (32° to 95° F / 0° to 35° C). |
| Difficulty pinpointing targets. | Improper technique; high sensitivity. | Practice pinpointing technique (slow, small sweeps). Reduce sensitivity slightly if necessary. |
If the issue persists after attempting these solutions, please contact Quest Metal Detectors customer support.
8. Specifications
Detailed technical specifications for the Quest X1 Metal Detector:
| Feature | Detail |
|---|---|
| Working Method | 12kHz VLF (Very Low Frequency) |
| Structure | Detachable Middle Rod From 55CM to 104CM (22"~41") |
| Detection Coil | 5"x9" Blade TurboD Waterproof Coil |
| Gauge | Depth Reader, Target ID Indication, Battery Status, etc. |
| Target ID Portions | 5 Segments from 0 to 9 |
| Audio Output | Built-in Buzzer, or by Wire Headphones |
| LCD Display | Customized LCD w/o Backlight |
| Search Modes | Jewelry, All Metal, Coin |
| Weight | Lower to 850Gram (w/o Mid Rod w/ Blade Coil) |
| Battery | Li-Po 1000mAh USB Rechargeable (included) |
| Battery Life | 12 Hrs Battery Life by Speaker |
| Operation Temp Range | 32° to 95° F (0° to 35° C) |
| Non-Operation Temp | -4° to 113° F (-20° to 45° C) |
| Handle | Textured Surface Increase Gripping Stability |
| Armrest Cup | V shape Robust PP material, Ergonomic Design w/ Kickstand |
| Ground Balance | Automatic (pump) or manually (selecting) |
| Metal ID | 9 Metal I.D. Level for Target Identification |
| Shortcut Functions | Ground Balance, Pinpoint, Volume, Flashlight |
| Product Dimensions | 11.4"L x 5"W x 53.5"H |
| Item Weight | 2.44 pounds (1.11 Kilograms) |

Figure 8.1: Visual summary of Quest X1 specifications and typical air test distances for common coins.
9. Warranty Information
Specific warranty details for the Quest X1 Metal Detector are not provided in the available product information. Please refer to the product packaging or the official Quest Metal Detectors website for the most current warranty policy and registration procedures. Typically, manufacturers offer a limited warranty covering defects in materials and workmanship for a specified period from the date of purchase.
10. Customer Support
For technical assistance, troubleshooting beyond this manual, or inquiries regarding your Quest X1 Metal Detector, please contact Quest Metal Detectors customer support. Contact information can typically be found on the product packaging, the official brand website, or through your point of purchase.
You can visit the official Quest Metal Detectors store on Amazon for more information and product updates: Quest Metal Detectors Store