1. Important Safety Instructions
Always observe basic safety precautions when operating this belt sander to reduce the risk of fire, electric shock, and serious personal injury. Read all instructions carefully before use.
- Personal Protective Equipment (PPE): Always wear safety glasses or goggles, hearing protection, and a dust mask. Use appropriate gloves when handling materials.
- Work Area Safety: Keep your work area clean and well-lit. Cluttered or dark areas invite accidents. Do not operate power tools in explosive atmospheres, such as in the presence of flammable liquids, gases, or dust.
- Electrical Safety: Do not expose power tools to rain or wet conditions. Water entering a power tool will increase the risk of electric shock. Do not abuse the cord. Never use the cord for carrying, pulling, or unplugging the power tool. Keep cord away from heat, oil, sharp edges, or moving parts.
- Tool Use and Care: Do not force the power tool. Use the correct power tool for your application. It will do the job better and safer at the rate for which it was designed. Disconnect the plug from the power source before making any adjustments, changing accessories, or storing power tools.
- Maintenance: Maintain power tools and accessories. Check for misalignment or binding of moving parts, breakage of parts, and any other condition that may affect the power tool’s operation. If damaged, have the power tool repaired before use.
2. Product Overview
The CNCEST 1x30 Inch Belt Sander is a versatile and high-precision machine designed for various grinding and polishing tasks. Its robust construction and adjustable features make it suitable for a wide range of applications.
Key Features:
- Multi-Function Sander: CNC machined for high precision, suitable for metal processing, jewelry making, plastic resin art, acrylic polishing, and tool making.
- Easy Sanding: Supports both vertical and horizontal sanding configurations for convenience. Features a 3.9-inch wheel for concave surfaces and larger arcs, and a flat grinding frame for large areas or complex shapes.
- Adjustable Angles: The worktable can be adjusted at multiple angles. The machine body can rotate 90° for horizontal sanding, allowing easier access for tubes or pipes.
- Outstanding Performance: Equipped with a 550W DC brushless motor, offering high speed (up to 5000rpm) and high torque for efficient task completion with low noise.
- High Quality Material: Constructed from premium stainless steel and Al-alloy materials with a galvanizing process, ensuring stable performance, strength, wear-resistance, and a thickened base for stability during high-speed operation.

Figure 2.1: The CNCEST 1x30 Inch Belt Sander, showcasing its compact and robust design.

Figure 2.2: Illustration of the belt sander's various configurations, including the flat grinding frame and driving wheel options for different sanding needs.
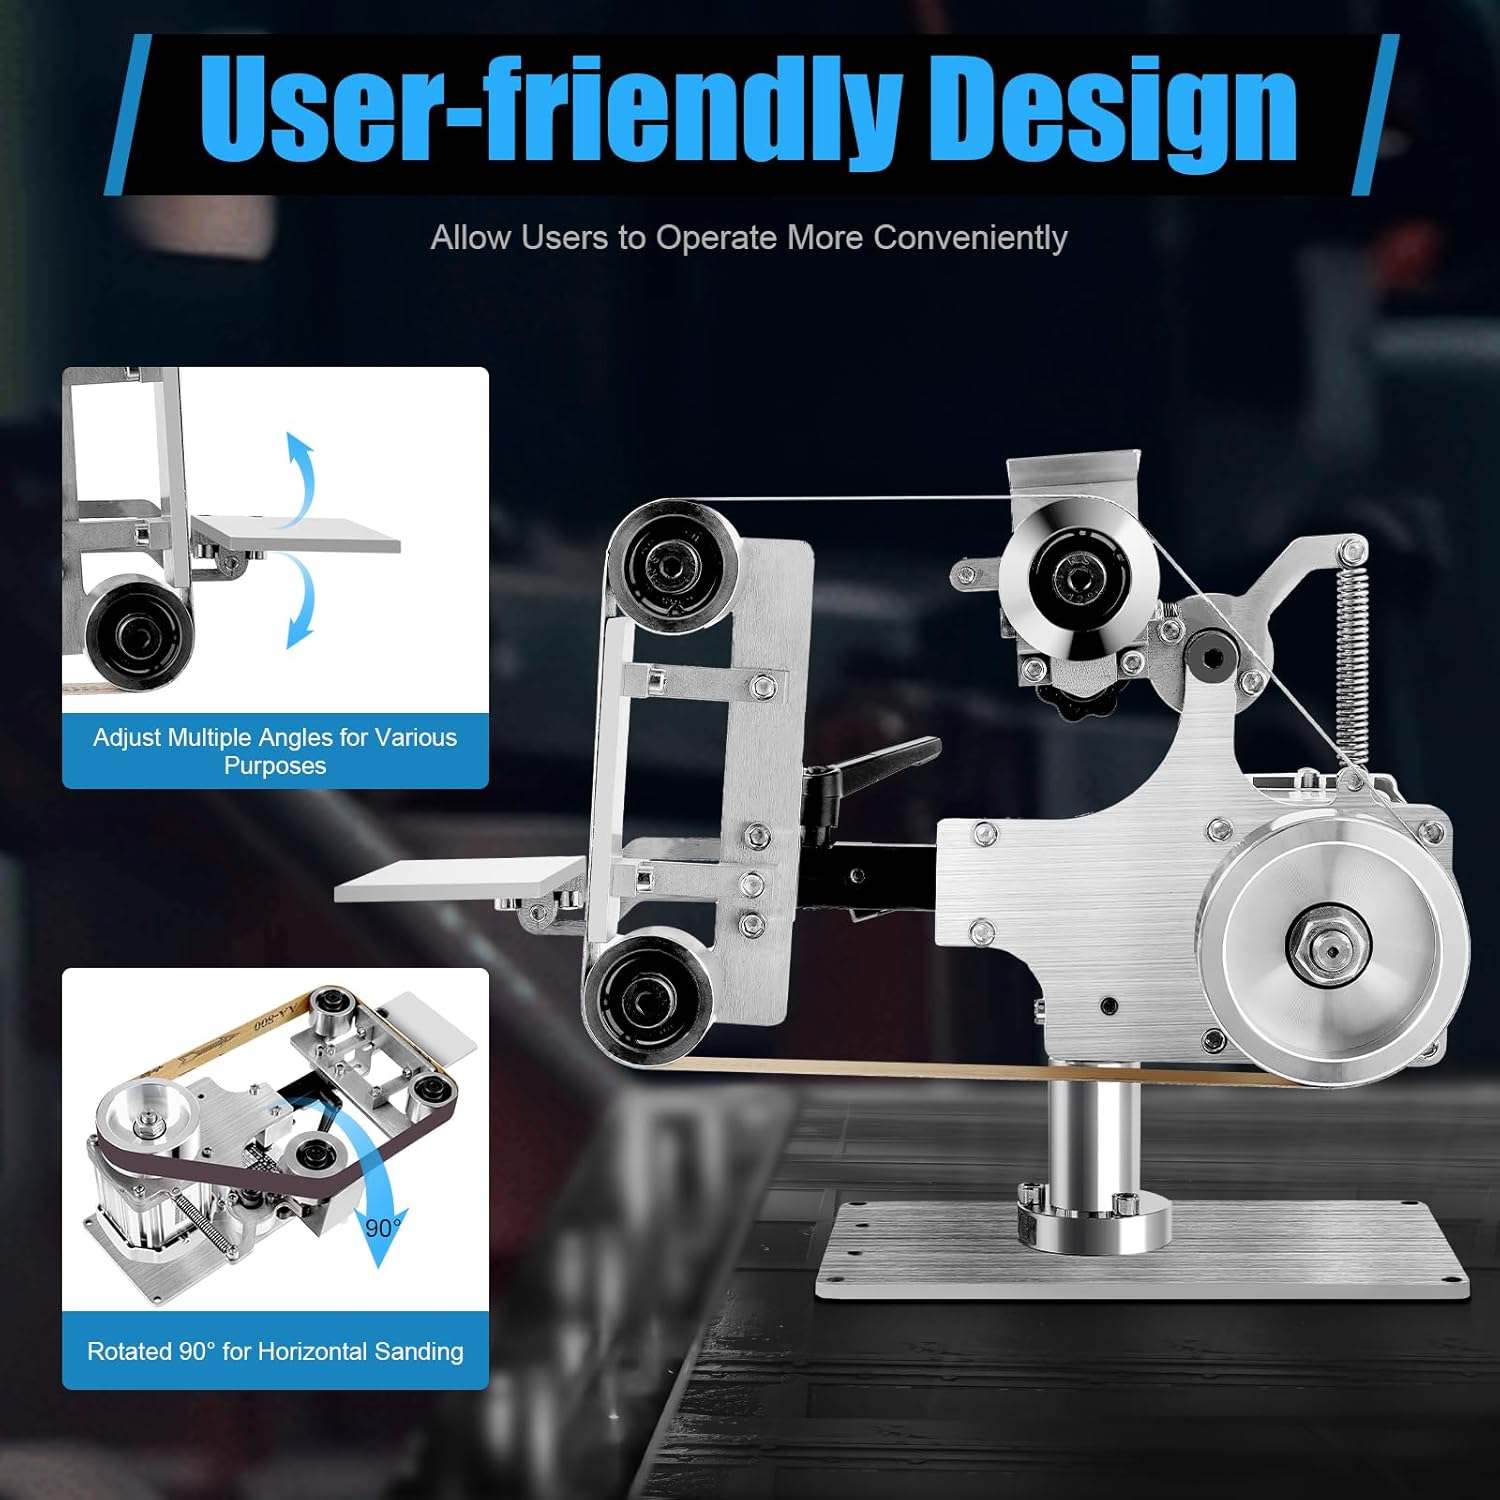
Figure 2.3: Depiction of the user-friendly design, highlighting the adjustable angles and the ability to rotate the machine 90 degrees for horizontal sanding.
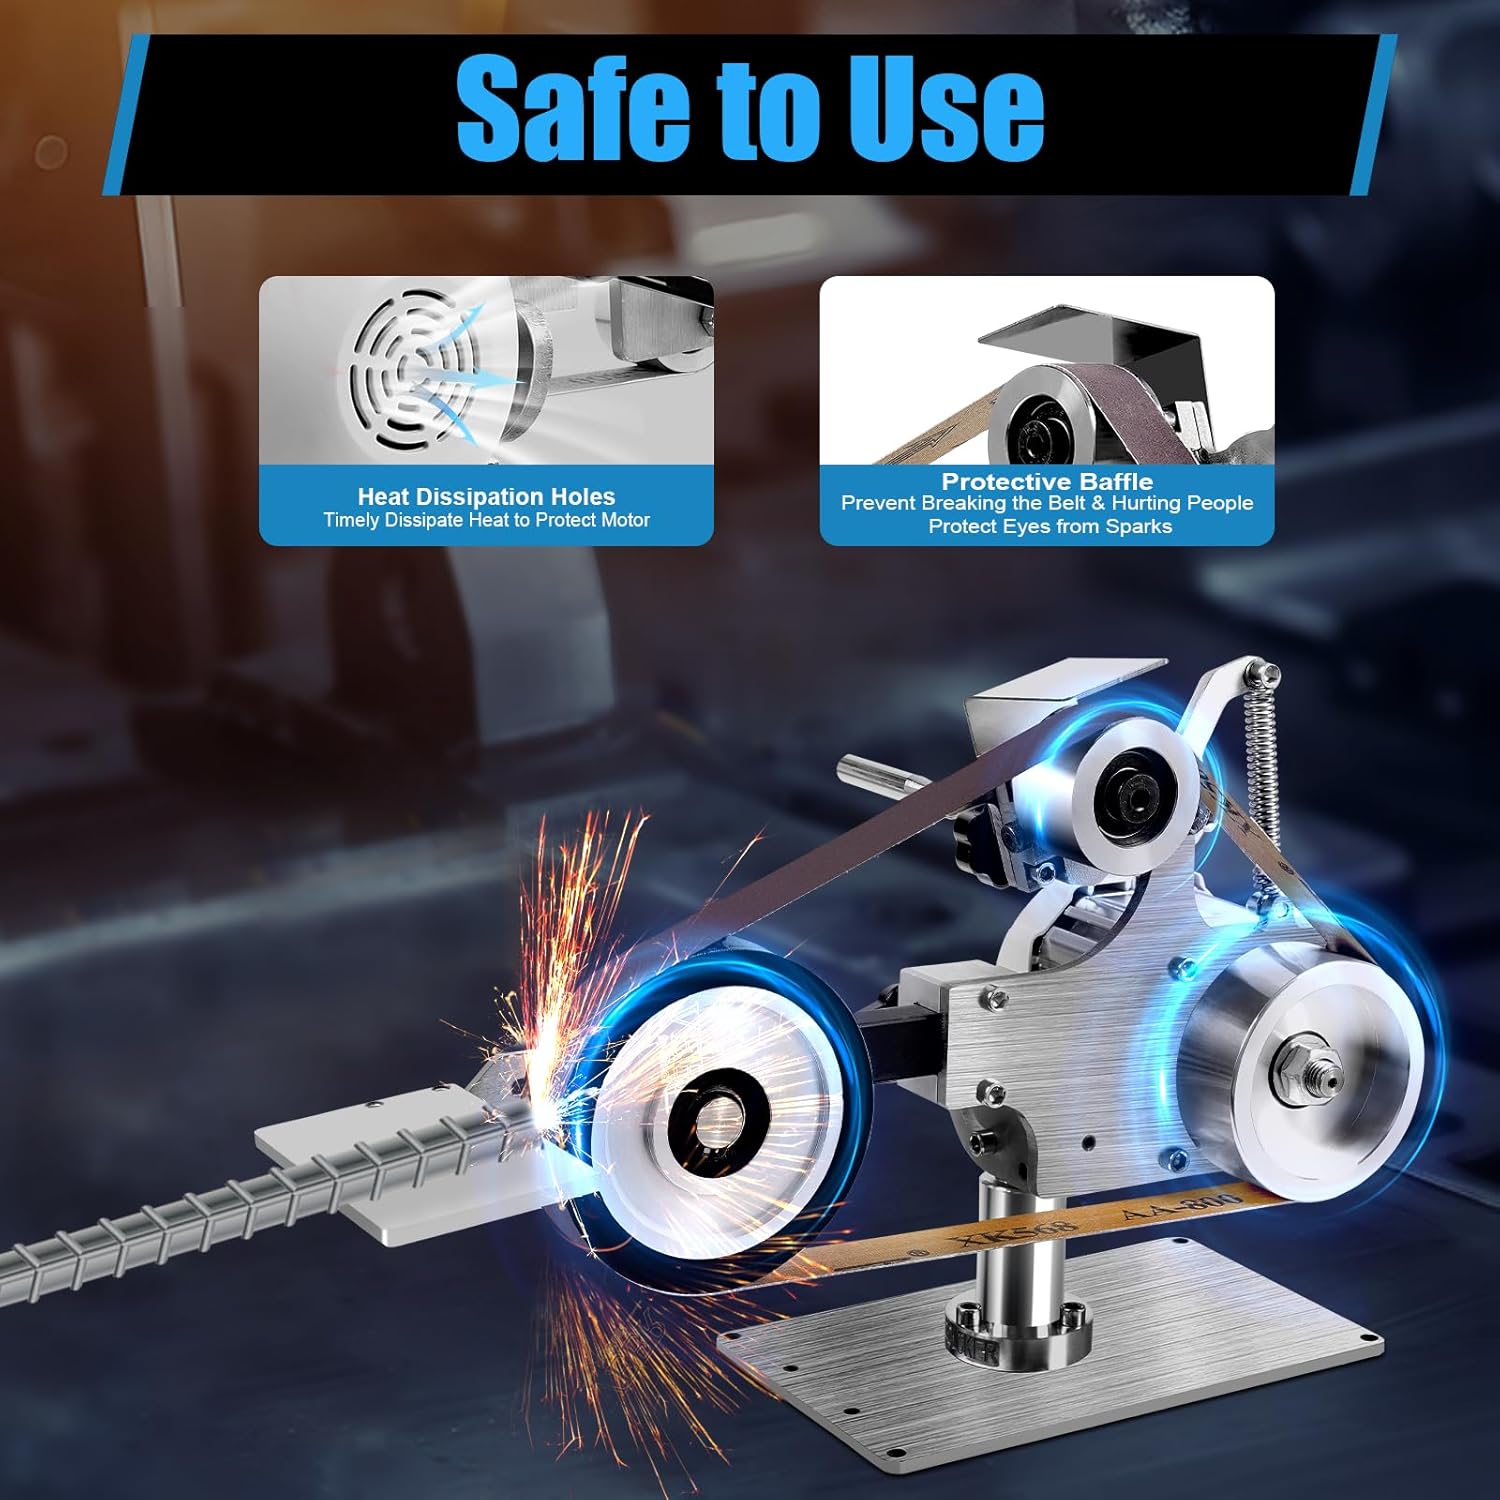
Figure 2.4: Safety features of the belt sander, including heat dissipation holes for motor protection and a protective baffle to prevent belt breakage and shield from sparks.

Figure 2.5: Visual representation of the belt sander's outstanding performance, emphasizing its 550W DC motor, 5000rpm high speed, and low noise operation.

Figure 2.6: Detailed view of the thoughtful design, including product dimensions and the stable, thickened base for enhanced stability.

Figure 2.7: Close-up of product details, showing the Al-alloy driving wheel, the 30x0.98 inch abrasive belt, and the motor driver for convenient control.

Figure 2.8: Examples of the wide application range of the belt sander, including jewelry making, plastic resin art, acrylic polishing, tool making, and metal processing.
3. Setup and Assembly
Before operating the belt sander, ensure all components are correctly assembled and secured. Refer to the included accessories for installation.
Assembly Steps:
- Unpack all components and verify against the packing list.
- Attach the main body of the sander to the base using the provided fasteners.
- Install the desired worktable (flat grinding frame or wheel) onto the machine. Ensure it is securely fastened and adjusted to the desired angle.
- Mount the protective baffle in place.
- Install the abrasive belt onto the rollers, ensuring it is properly tensioned and aligned.
- Connect the motor driver to the belt sander and plug it into a suitable 110V power outlet.
Video 3.1: This video demonstrates the assembly process of the belt sander, including attaching components and installing the abrasive belt. It provides a visual guide for initial setup.

Figure 3.1: All included components for the CNCEST 1x30 Inch Belt Sander, laid out for easy identification during assembly.
4. Operating Instructions
Follow these steps for safe and effective operation of your belt sander.
Basic Operation:
- Power On: Ensure the sander is properly assembled and connected to a power source. Turn on the motor driver.
- Adjust Speed: Use the variable speed control on the motor driver to set the desired RPM (up to 5000rpm) for your specific task and material. Start with a lower speed and gradually increase as needed.
- Select Configuration: Choose between vertical or horizontal sanding by rotating the machine body 90° if horizontal use is desired. Adjust the worktable angle as required for your workpiece.
- Sanding Technique: Gently bring the workpiece into contact with the moving abrasive belt. Apply even pressure and move the workpiece smoothly across the belt for consistent results. Avoid excessive pressure, which can cause overheating or damage to the belt and workpiece.
- Power Off: When finished, turn off the motor driver and disconnect the power cord from the outlet.
5. Maintenance
Regular maintenance ensures the longevity and optimal performance of your belt sander.
Abrasive Belt Replacement:
- Disconnect Power: Always unplug the sander from the power source before performing any maintenance.
- Release Tension: Locate the belt tensioning mechanism (typically a spring-loaded lever or knob) and release the tension on the abrasive belt.
- Remove Old Belt: Carefully slide the worn or damaged belt off the rollers.
- Install New Belt: Place the new 1x30 inch abrasive belt onto the rollers, ensuring the directional arrow on the belt (if present) matches the rotation direction of the sander.
- Apply Tension: Re-engage the tensioning mechanism to secure the new belt firmly. Check for proper alignment.
Cleaning and General Care:
- After each use, clean dust and debris from the sander using a brush or compressed air.
- Inspect the power cord for any damage.
- Check all fasteners and ensure they are tight. Tighten any loose screws.
- Store the sander in a dry, clean environment away from moisture.
Figure 5.1: Close-up view of the abrasive belt and its placement on the sander, illustrating the area for replacement.
6. Troubleshooting
This section addresses common issues you might encounter with your belt sander.
| Problem | Possible Cause | Solution |
|---|---|---|
| Sander does not turn on. | No power supply; Faulty power cord/switch. | Check power outlet and connections. Inspect power cord for damage. Contact support if switch is faulty. |
| Belt tracking issues (belt drifts). | Improper belt tension; Worn rollers; Misaligned components. | Adjust belt tension. Inspect rollers for wear and replace if necessary. Ensure all components are securely fastened and aligned. |
| Motor slows down or stops under load. | Overload; Insufficient power; Worn motor. | Reduce pressure on workpiece. Ensure adequate power supply. If motor is worn, contact support for repair or replacement. |
| Excessive noise or vibration. | Loose components; Worn bearings; Unbalanced belt. | Check and tighten all fasteners. Inspect bearings for wear. Replace the abrasive belt. |
7. Specifications
Detailed technical specifications for the CNCEST 1x30 Inch Belt Sander.
| Specification | Value |
|---|---|
| Brand | CNCEST |
| Product Dimensions | 15"L x 5.5"W x 9.8"H |
| Grit Type | Coarse |
| Voltage | 110 Volts |
| Power Source | Corded Electric |
| AC Adapter Current | 5 Amps |
| Grit Number (Included) | 60 |
| Maximum Rotational Speed | 5000 RPM |
| Item Weight | 16.8 Pounds |
| Manufacturer | CBDYQ_US |
| Item Model Number | ZTCYT-2224 |
| Included Components | 1* Electric Mini Belt-sander, 1* Motor Driver + 1* Flat Grinding Frame, 1* Wheel + 1* Protective Baffle + 2* Abrasive Belts, 2* Different Worktables +1* Instruction, Other Accessories for Installation |
8. Warranty and Support
For warranty information, technical support, or service inquiries, please contact the manufacturer or your point of purchase. Keep your purchase receipt as proof of purchase.
Manufacturer: CBDYQ_US
For further assistance, please visit the CNCEST Store on Amazon: CNCEST Amazon Store