WOAEIUOS B0CSY8PLXT
Instruction Manual: 2 in 1 ESC & Receiver with 3CH 2.4G RC Transmitter Combo
Brand: WOAEIUOS | Model: B0CSY8PLXT
1. Introduction
This manual provides comprehensive instructions for the WOAEIUOS 2 in 1 ESC (Electronic Speed Controller) & Receiver with 3CH 2.4G RC Transmitter Combo. This system is specifically designed to enhance the performance and control of your Axial SCX24 RC Car, offering an integrated solution for efficient and precise driving.
Please read this manual thoroughly before installation and operation to ensure proper use and to maximize the lifespan of your product.
Package Contents:
- 1 x 2 in 1 ESC & Receiver Unit
- 1 x 3CH 2.4G RC Transmitter
- Necessary connection cables (as supplied)

Figure 1.1: Overview of the WOAEIUOS 2 in 1 ESC & Receiver with 3CH 2.4G RC Transmitter Combo.
2. Key Features
- Integrated ESC and Receiver: This 2 in 1 unit combines the Electronic Speed Controller and Receiver for streamlined installation and improved driving performance. It includes car light support for enhanced visibility.
- Advanced Linear ESC: Designed for smoother and more precise control, enabling the RC car to navigate challenging terrains with ease.
- Superior 2.4 GHz Technology: Utilizes FHSS (Frequency Hopping Spread Spectrum) technology for excellent anti-interference capabilities, ensuring stable and highly sensitive control inputs up to approximately 100 meters.
- Comprehensive Package: Includes both the integrated ESC/Receiver and the Transmitter, providing a complete solution for upgrading your RC car's control system.
- Perfect Fit for Axial SCX24: Specifically engineered for 1/24 scale Axial SCX24 RC Cars, offering an optimal upgrade for mini RC adventures.
3. Setup and Installation
Follow these steps to properly set up and install your new ESC & Receiver combo and transmitter.
3.1 ESC & Receiver Unit Installation
- Mounting the Unit: Securely mount the 2 in 1 ESC & Receiver unit in your Axial SCX24 chassis using appropriate adhesive or mounting tape. Ensure it is placed in a location that allows for proper cable routing and ventilation.
- Connecting the Motor: Connect your RC car's motor to the "MOTOR" terminals on the ESC & Receiver unit. Ensure correct polarity (red to red, black to black) for proper operation.
- Connecting the Battery: Plug your RC car's battery into the "BAT PWR" connector on the ESC & Receiver unit.
- Connecting the Servo: Connect your steering servo to the "Servo(CH1)" port on the ESC & Receiver unit.
- Connecting Lights (Optional): If your RC car has lights, connect them to the designated LED ports (LS, HL, BL, RL) on the ESC & Receiver unit as per your car's wiring.

Figure 3.1: Detailed view of the ESC & Receiver unit with connection points for servo and optional lights.

Figure 3.2: Illustration of power switch, motor, battery, and antenna connections on the ESC/Receiver unit.

Figure 3.3: Example installation of the ESC & Receiver unit within an Axial SCX24 RC car chassis.
3.2 Transmitter Setup
- Battery Installation: Open the battery compartment on the bottom of the transmitter and insert 2 'AA' batteries, ensuring correct polarity. Close the compartment securely.
- Power On: Turn on the transmitter by sliding the "POWER" switch to the "ON" position. The LED indicator should illuminate.
- Binding (if necessary): The transmitter and receiver are typically pre-bound from the factory. If re-binding is required, consult the troubleshooting section or refer to the specific binding instructions provided with your product.

Figure 3.4: Detailed view of the transmitter's controls and battery compartment location.
4. Operation
This section details the basic operation of your RC car using the provided transmitter.
4.1 Basic Driving Controls
- Throttle (CH2): Pull the throttle trigger towards you to move the car forward. Push the trigger away from you to apply brakes or reverse.
- Steering (CH1): Rotate the steering wheel left or right to control the direction of the car.

Figure 4.1: Demonstrating steering control with the transmitter.
4.2 Transmitter Adjustments
The transmitter features several adjustment options to fine-tune your RC car's performance.
- ST.TRIM (Steering Trim): Adjusts the neutral position of the steering servo. If the car pulls to one side when the steering wheel is centered, use this dial to correct it.
- TH.TRIM (Throttle Trim): Adjusts the neutral position of the throttle. If the car moves slightly forward or backward when the throttle trigger is centered, use this dial to correct it.
- ST.D/R (Steering Dual Rate): Controls the maximum steering angle. Adjust this to limit or increase the steering throw.
- TH.D/R (Throttle Dual Rate / Speed D/R): This switch allows you to select between different speed modes (e.g., 3 levels for forward speed, 1 level for reverse speed). Adjust this to match your driving conditions or skill level.
- ST.REV (Steering Reverse Switch): Reverses the steering direction. Use if the car steers left when you turn the wheel right, and vice-versa.
- TH.REV (Throttle Reverse Switch): Reverses the throttle direction. Use if the car moves backward when you pull the trigger forward, and vice-versa.
- CH3 Switch: A three-position switch for controlling an auxiliary channel, typically used for lights or other accessories if connected.

Figure 4.2: Detailed view of the transmitter's control panel with adjustment dials and switches.
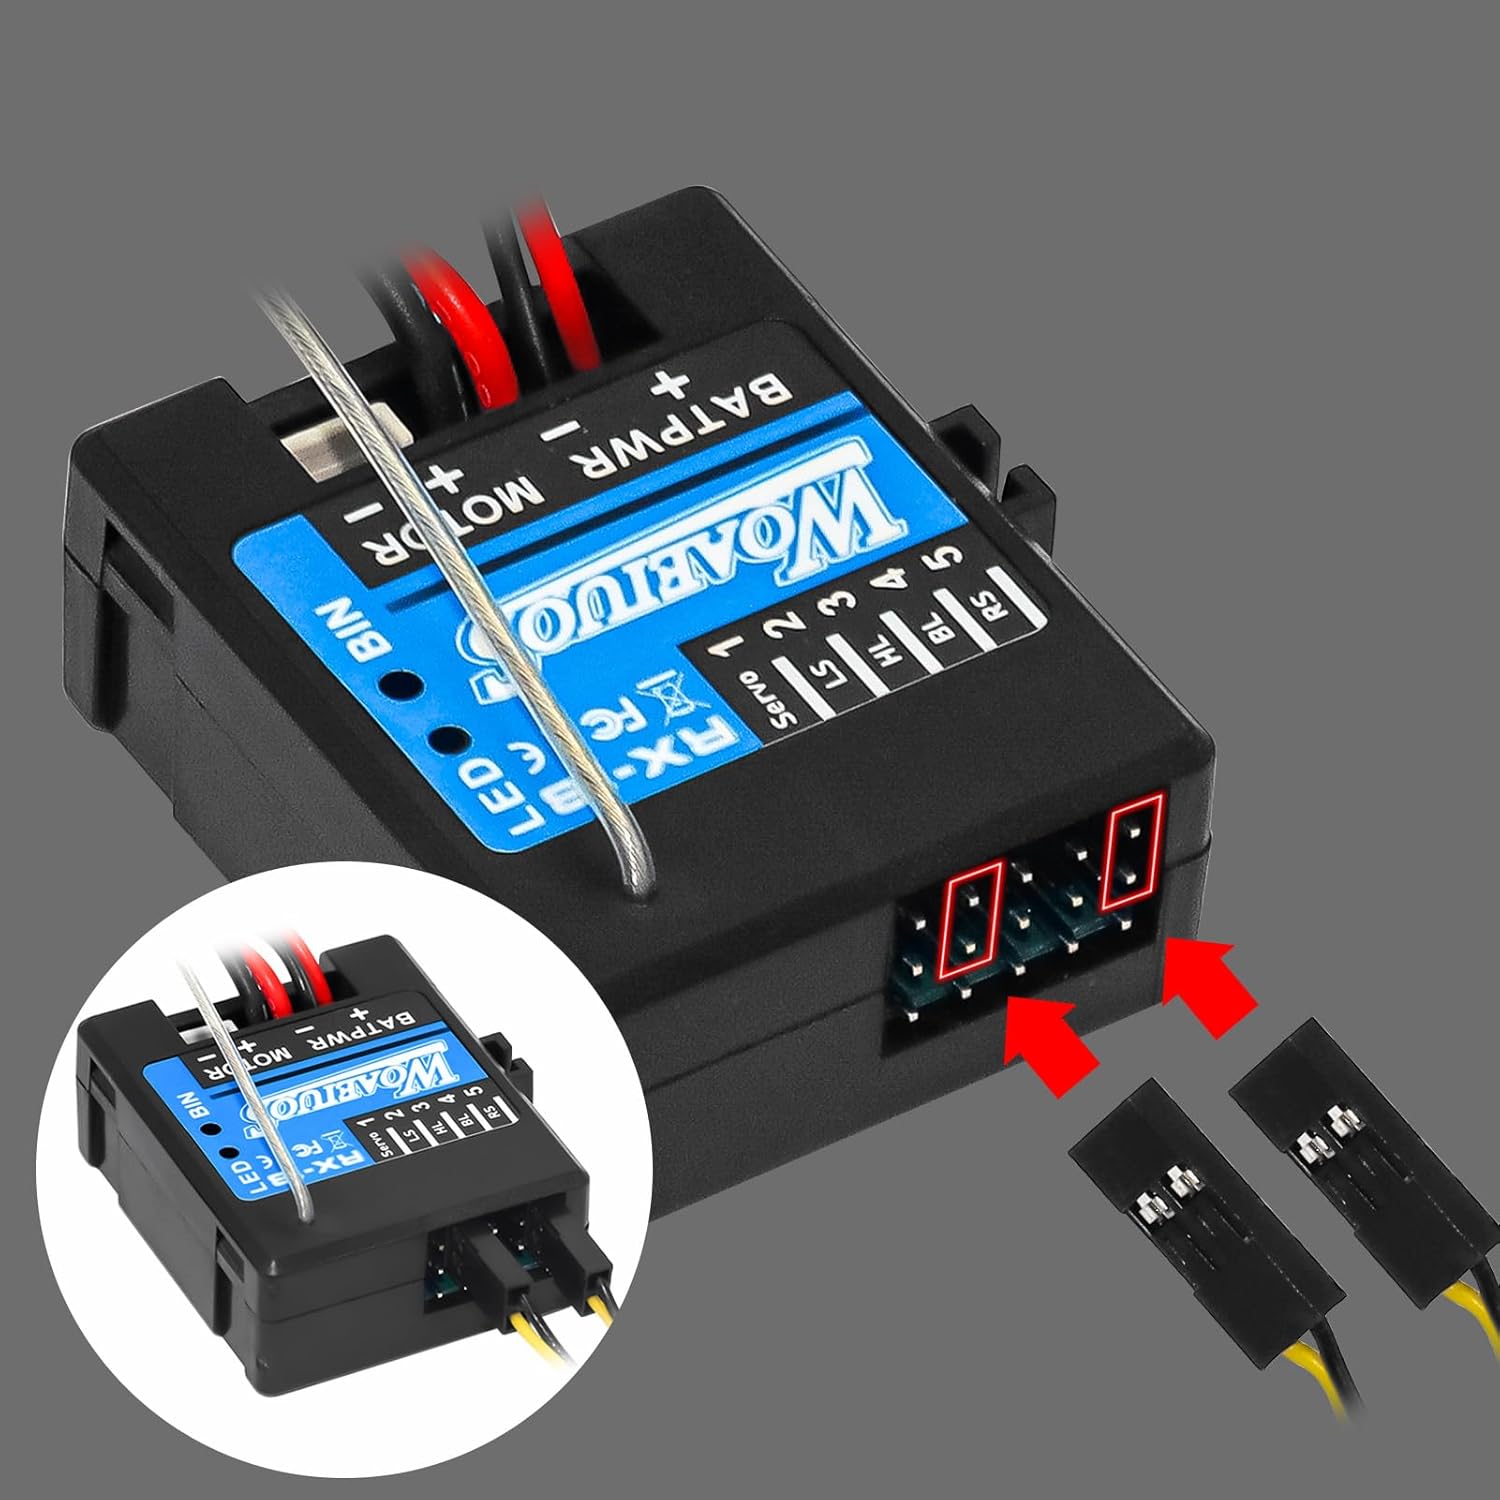
Figure 4.3: Illustration of adjustable speed settings for forward and reverse motion.
5. Maintenance
Proper maintenance ensures the longevity and optimal performance of your RC electronics.
- Cleaning: Regularly clean the ESC & Receiver unit and transmitter with a soft, dry cloth. Avoid using water or solvents, as they can damage electronic components.
- Storage: Store the product in a cool, dry place away from direct sunlight and extreme temperatures. Remove batteries from the transmitter if storing for extended periods.
- Connections: Periodically check all connections (motor, battery, servo, lights) to ensure they are secure and free from corrosion.
- Battery Care: Always use batteries appropriate for your RC car and follow battery manufacturer guidelines for charging and discharging.
6. Troubleshooting
This section addresses common issues you might encounter and provides potential solutions.
| Problem | Possible Cause | Solution |
|---|---|---|
| RC car does not respond to transmitter. |
|
|
| Loss of connection during operation (ESC flashes). |
|
|
| Steering or throttle is reversed. | Incorrect reverse switch setting. | Adjust the ST.REV or TH.REV switch on the transmitter. |
| Car pulls to one side or moves slowly when controls are centered. | Trim settings are off. | Adjust ST.TRIM or TH.TRIM dials on the transmitter until the car tracks straight and remains still. |
6.1 Binding Procedure (if needed)
If your transmitter and receiver lose connection or are not paired, follow these steps to re-bind them:
- Ensure both the transmitter and the RC car's battery are fully charged.
- Turn off both the transmitter and the ESC & Receiver unit.
- Locate the "BIN" (Bind) button or pin on the ESC & Receiver unit.
- While holding down the "BIN" button on the receiver, turn on the ESC & Receiver unit. The LED on the receiver should start flashing rapidly.
- Within 5 seconds, turn on the transmitter. The LED on the receiver should become solid, indicating a successful bind.
- Release the "BIN" button. Test the controls to ensure proper functionality.
7. Specifications
Technical specifications for the WOAEIUOS 2 in 1 ESC & Receiver with 3CH 2.4G RC Transmitter Combo.
| Feature | Detail |
|---|---|
| Product Type | 2 in 1 ESC & Receiver with 3CH 2.4G RC Transmitter Combo |
| Brand | WOAEIUOS |
| Model Compatibility | Axial SCX24 RC Cars (1/24 scale) |
| Radio Frequency | 2.4 GHz FHSS |
| Channels | 3 Channels |
| Control Distance | Approximately 100 meters |
| Transmitter Power | 2 x 'AA' Batteries (not included) |
| Product Dimensions | 7 x 5.5 x 3.3 inches (approximate package dimensions) |
| Item Weight | 10.5 ounces |
| Manufacturer Recommended Age | 36 months - 6 years (Note: RC products often have varying age recommendations; adult supervision is advised for all ages.) |
8. Warranty and Support
WOAEIUOS products are manufactured to high quality standards. For specific warranty information, please refer to the documentation included with your purchase or contact the seller directly.
If you encounter any issues or have questions not covered in this manual, please contact WOAEIUOS customer support through the retailer's platform or the official brand website for assistance.
Manufacturer: WOAEIUOS
Ask a question about this manual
Ask about setup, troubleshooting, compatibility, parts, safety, or missing instructions. Manuals+ will review the question and use this page’s manual context to help answer it.