Introduction
This manual provides comprehensive instructions for the installation, operation, and maintenance of your KXZCCTIE Smart Door Lock. This keyless entry system features multiple unlocking methods including fingerprint recognition, keypad codes, and traditional keys, designed for enhanced security and convenience for your front door.
Please read this manual thoroughly before installation and use to ensure proper function and to avoid any damage to the product or property.
Product Overview

Figure 1: KXZCCTIE Smart Door Lock (Oil Rubbed Bronze) with integrated handle set, showing the keypad, fingerprint sensor, and keyhole.

Figure 2: Overview of the smart lock's multi-function and security features, including auto-lock, one-time password, dummy password, USB charging, and low battery alert.
Setup and Installation
The KXZCCTIE Smart Door Lock is designed for easy installation, typically requiring only a screwdriver. It is compatible with standard American left and right-handed doors.
1. Pre-Installation Check
Before beginning installation, verify your door's dimensions and compatibility. Ensure the door thickness and bore holes match the lock's requirements.

Figure 3: Diagram illustrating door hole diameter, backset, minimum distance, and compatibility with left/right-handed doors, and single cylinder/mortise locks.
- Hole Diameter: 2-1/8 inches (54mm)
- Backset: 2-3/8 inches or 2-3/4 inches (60mm or 70mm)
- Door Thickness: 1-3/8 inches to 2 inches (35mm-55mm)
- Minimum Distance (from handle to deadbolt): ≥4 inches (101.6mm)
- Ensure your door is compatible with a single cylinder deadbolt.
2. Installation Steps
- Install the latch and strike plate into the door frame.
- Install the deadbolt assembly into the door.
- Attach the exterior keypad assembly, ensuring the spindle passes through the deadbolt.
- Connect the cable from the exterior assembly to the interior assembly.
- Secure the interior assembly to the door using the provided screws.
- Install the handle set according to the separate instructions provided with the handle.
- Insert 4 AA batteries (not included) into the battery compartment of the interior assembly.
- Perform a functional test to ensure all components operate smoothly.
Operating Instructions
1. Fingerprint Recognition
The lock identifies your fingerprint within 0.3 seconds and unlocks within 1 second, boasting a 99.99% recognition rate. Up to 100 unique fingerprints can be stored.

Figure 4: Visual representation of the lock's fast biometric identification (0.3s), high recognition rate (99.9%), and low error rate (0.01%).
2. Keypad Code Entry
The lock supports up to 100 user codes. It also features an anti-peeping password function, allowing you to enter random digits before or after your actual code to prevent others from guessing your entry.
3. Auto-Lock Function
You can configure the lock to automatically engage the deadbolt after a set period, ranging from 10 to 99 seconds. This ensures your door is always secured.

Figure 5: Demonstrates the one-click locking by pressing and holding the lock button, and the auto-locking feature that secures the door after a set time.
4. One-Time Code
Generate temporary access codes for guests or service providers. These codes expire after a single use, providing secure, limited access.

Figure 6: Illustrates the convenience of a one-time password for temporary access, such as for a delivery person.
5. Manual Locking
To instantly lock the door when going out, simply press and hold any button on the keypad for 2 seconds.
6. Adding Users (Fingerprints/Codes)
Refer to the detailed programming guide included in the packaging for steps on adding, modifying, or deleting user fingerprints and access codes. The lock supports up to 100 fingerprints and 100 user codes.

Figure 7: Shows the lock's capacity to store up to 100 fingerprints and 100 keypad codes, along with the provision of 2 spare physical keys.
Maintenance
1. Battery Replacement
The lock is powered by 4 AA batteries and can operate for over 1 year. A low battery indicator will alert you when batteries need replacement. Replace all four batteries simultaneously with new, high-quality alkaline AA batteries.
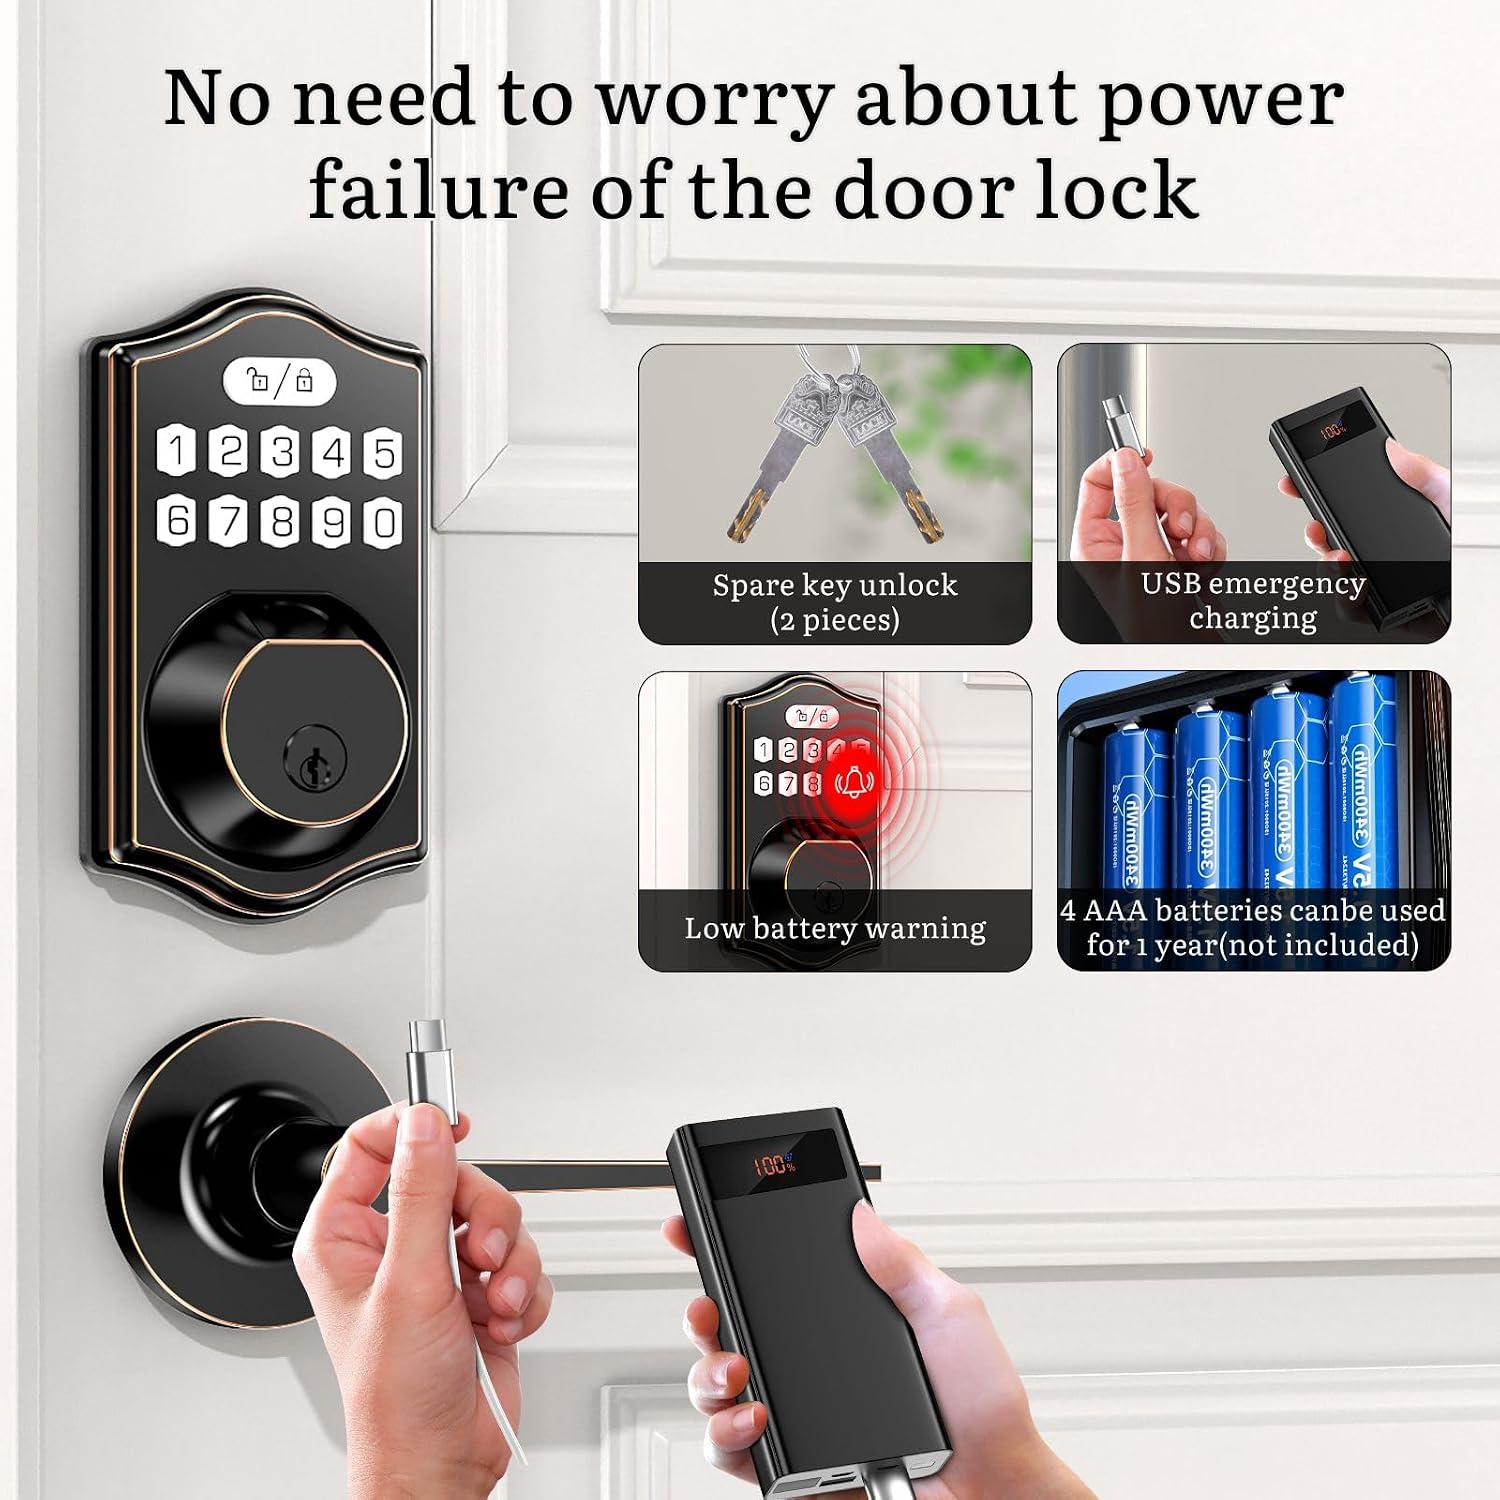
Figure 8: Details the power solutions: 2 spare physical keys, USB emergency charging port, low battery warning light, and the requirement for 4 AA batteries (not included) for over 1 year of use.
2. Emergency Power
In case of complete battery depletion, the lock can be temporarily powered via a USB emergency charging port using a power bank. Additionally, 2 backup physical keys are provided for manual unlocking.
3. Cleaning
Clean the lock's exterior with a soft, damp cloth. Avoid abrasive cleaners or solvents that could damage the finish or electronic components.
Troubleshooting
| Problem | Possible Cause | Solution |
|---|---|---|
| Lock does not respond. | Dead batteries. | Replace all 4 AA batteries. Use USB emergency power or physical key. |
| Fingerprint not recognized. | Finger dirty/wet, sensor dirty, or fingerprint not properly enrolled. | Clean finger and sensor. Re-enroll fingerprint if issue persists. |
| Keypad code not working. | Incorrect code entered, or code not properly programmed. | Verify the code. Re-program the code if necessary. Ensure anti-peeping function is used correctly. |
| Auto-lock not engaging. | Auto-lock feature disabled or setting incorrect. | Check auto-lock settings and enable if off. Adjust delay time. |
| Lock is loose after installation. | Mounting screws are not tightened. | Ensure all mounting screws are securely tightened. |
Specifications
- Model: K6
- Brand: KXZCCTIE
- Material: Zinc Alloy
- Color: Oil Rubbed Bronze
- Power Source: 4 x AA Batteries (not included)
- Battery Life: Approximately 1 year
- Emergency Power: USB-C Port
- Unlocking Methods: Fingerprint, Keypad Code, Physical Key
- Fingerprint Capacity: Up to 100
- User Code Capacity: Up to 100
- Recognition Speed: 0.3 seconds (fingerprint)
- Weather Resistance: IP65 rated
- Product Dimensions: 17.78 x 8.89 x 30.48 cm (7 x 3.5 x 12 inches)
- Item Weight: 1.59 kg (3.5 lbs)
- Included Components: Smart lock, Door handle, Instruction manual, Mounting accessories, 2 backup keys.
Warranty and Support
KXZCCTIE provides responsive customer service within 24 hours. For any questions regarding your door lock, please contact us. We offer a 30-day money-back guarantee, a 12-month warranty, and lifelong technical support.
For support, please refer to the contact information provided in your product packaging or visit the official KXZCCTIE website.


