1. Introduction
This manual provides comprehensive instructions for the MMUNNA XM-18 Digital Automatic Egg Incubator Thermostat Controller. This device is designed to manage and maintain optimal environmental conditions for egg incubation, ensuring precise control over temperature, humidity, and egg turning. Please read this manual thoroughly before operating the device to ensure proper setup, safe operation, and longevity of the product.
2. Key Features
- Digital display for temperature and humidity.
- Fully automatic temperature control.
- Fully automatic humidity control.
- Fully automatic egg turning mechanism.
- Automatic alarming for deviations.
- Integrated automatic ventilator control.
- Back-up emergency system for reliability.
- Microcomputer chip for strong anti-interference and stable performance.
- High-precision temperature and humidity sensors.
- User-friendly four-screen display interface.
3. Technical Specifications
| Parameter | Value |
|---|---|
| Temperature Display Range | 0 - 99.9 °C |
| Temperature Measurement Accuracy | ±0.1 °C |
| Humidity Display Range | 0 - 99% RH |
| Humidity Control Accuracy | ±3% RH |
| Output Paths | 7 Roads (Over-temperature, Temperature Control, Insufficient Temperature, Egg-left Turning, Egg Right-turning, Humidity Control, Alarm) |
| Output Current (Main) | ≤ 8A / AC 220V (Temperature Control) |
| Output Current (Auxiliary) | ≤ 1A / AC 220V (Over-temperature, Egg-left Turning, Egg Right-turning, Humidity Control, Alarm) |
| Max. Egg-Turning Records | 999 times |
| Egg-Turning Cycle | 0 - 999 minutes (Default: 90 minutes) |
| Egg-Turning Time | 0 - 999 seconds (Default: 180 seconds) |
| Ventilation Cycle | 0 - 999 minutes (Default: 120 minutes) |
| Ventilation Time | 0 - 999 seconds (Default: 30 seconds) |
| Measuring Line Length | 1.5 meters |
| Power Supply | AC 160V-240V, 50Hz or AC 110V (model dependent) |
| Relative Humidity (Operating) | Less than 85% |
| Ambient Temperature (Operating) | -10 °C to 60 °C |
| Dimensions (Approx.) | 160mm (W) x 80mm (H) x 89mm (D) |
4. Setup and Installation
4.1 Component Identification
Familiarize yourself with the main components and display interface of the XM-18 controller.
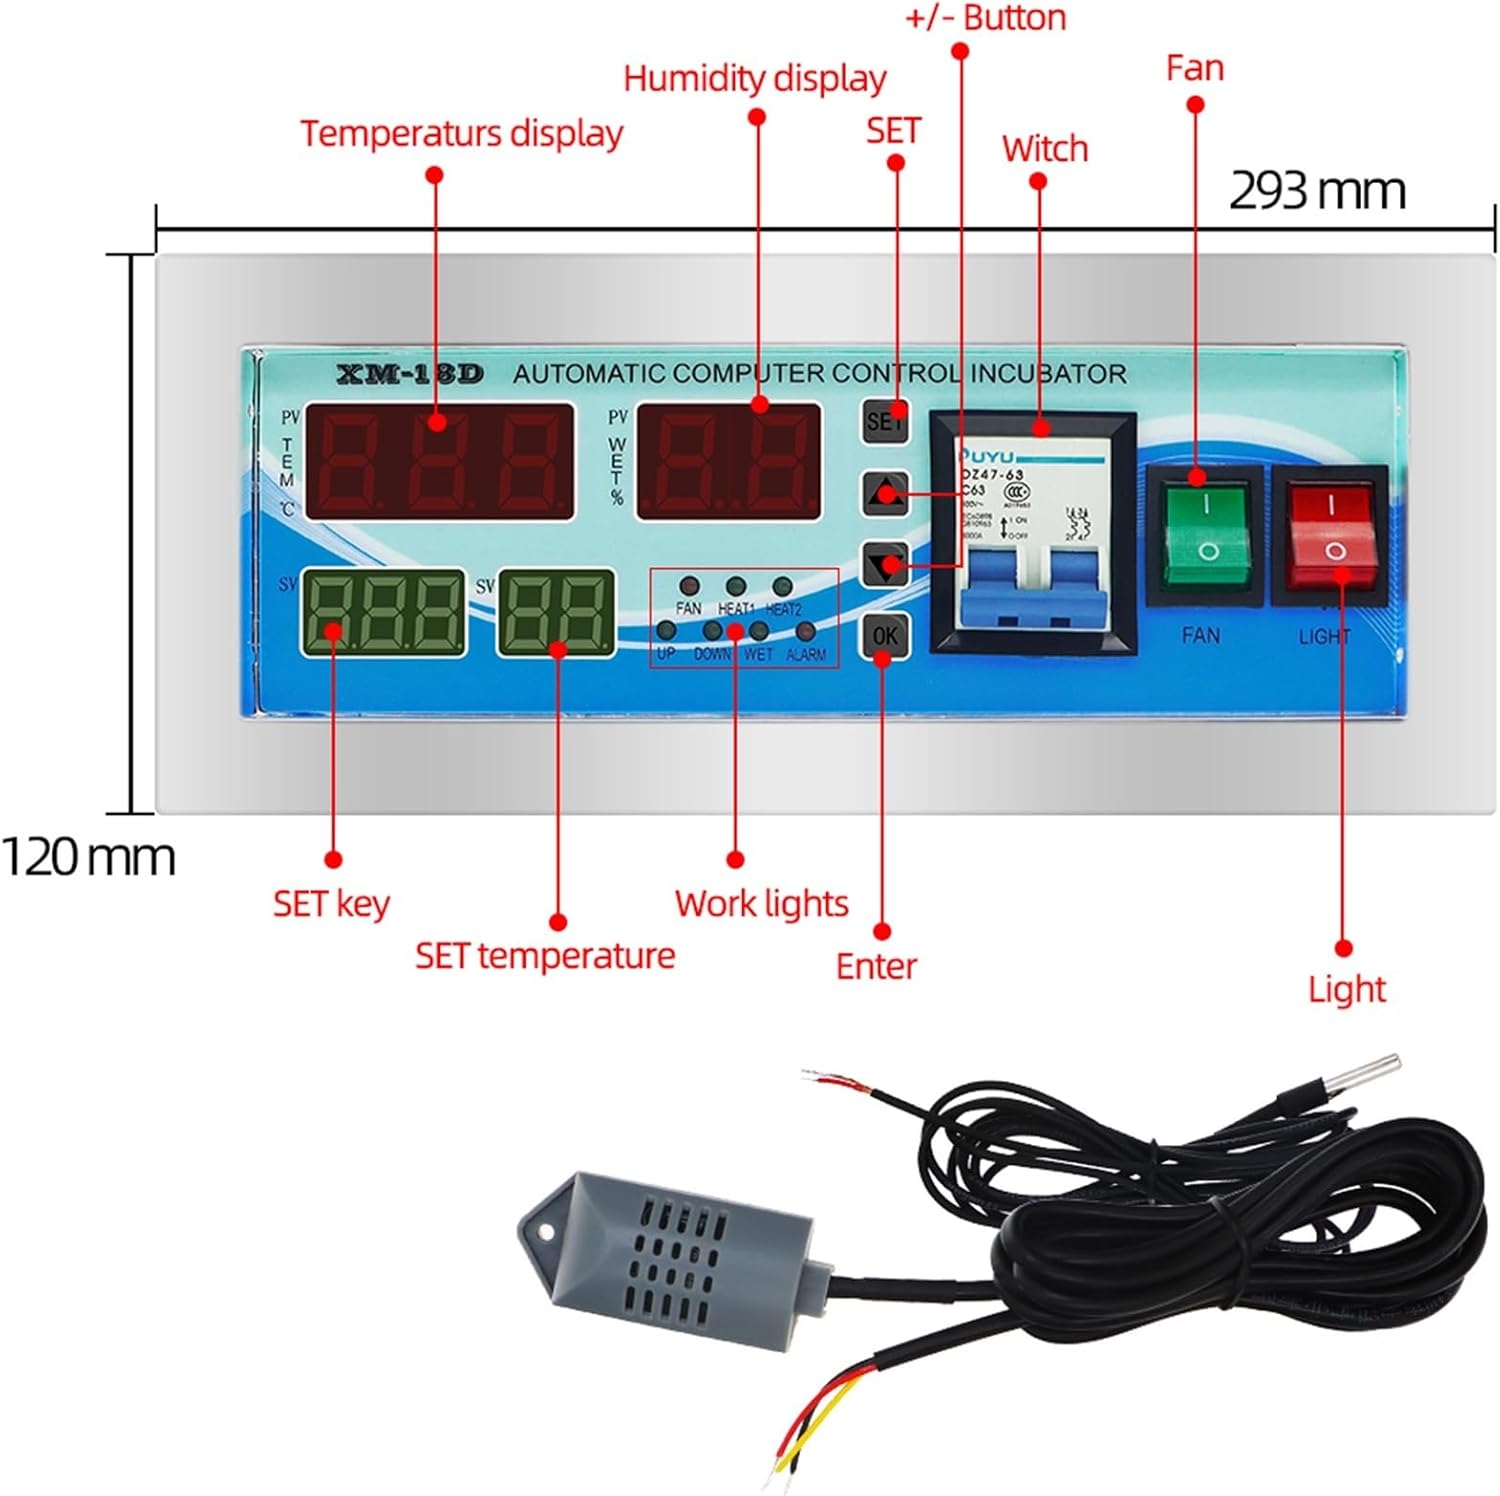
Image 1: Front panel view of the MMUNNA XM-18 controller with key components and dimensions labeled. This includes the temperature display, humidity display, SET button, +/- buttons, fan indicator, work lights, and enter button. The overall dimensions are approximately 293mm wide and 120mm high.

Image 2: Perspective view of the MMUNNA XM-18 controller showing its depth and the included temperature and humidity sensors. The controller measures approximately 160mm wide, 80mm high, and 89mm deep. Key interface elements like the temperature display, humidity display, SET button, +/- buttons, work lights, and enter button are also indicated.
4.2 Wiring Diagram
Proper wiring is crucial for the safe and correct operation of the incubator controller. Refer to the diagram below for connection points.

Image 3: Detailed wiring diagram for the MMUNNA XM-18 controller. This diagram illustrates connections for the lamp bulb, uniform temperature fan, Heater 1, Heater 2, Humidifier, Egg Turning Motor, and Ventilating Fan. It also shows the power input (L, N) and sensor connections (+5V, H, GND, T). Ensure all connections are secure and follow local electrical codes.
- Connect the power supply (AC 160V-240V or AC 110V, depending on your model) to the designated L and N terminals.
- Connect the temperature sensor to the 'T' and 'GND' terminals.
- Connect the humidity sensor to the 'H' and '+5V' terminals.
- Connect heating elements (Heater 1, Heater 2) to their respective output terminals.
- Connect the egg turning motor to the 'Turn Left' and 'Turn Right' terminals.
- Connect the humidifier to the 'Humidity Control' terminal.
- Connect the ventilating fan to its designated terminal.
- Connect the lamp bulb and uniform temperature fan as indicated.
- Ensure all connections are tight and insulated to prevent short circuits.
4.3 Initial Power-Up
After completing all wiring, connect the controller to a suitable power source. The digital displays will illuminate, showing the current temperature (PV TEM) and humidity (PV WET).
5. Operating Instructions
5.1 Display Overview

Image 4: Close-up of the MMUNNA XM-18 controller's front panel. The top left display shows the current temperature (PV TEM), top right shows current humidity (PV WET). The bottom left (SV) shows the set temperature, and bottom right (SV) shows the set humidity. Indicator lights for FAN, HEAT1, HEAT2, UP, DOWN, WET, and ALARM are also visible.
- PV TEM: Current measured temperature.
- PV WET: Current measured humidity.
- SV (left): Set temperature value.
- SV (right): Set humidity value.
- Indicator Lights: Indicate active functions (FAN, HEAT1, HEAT2, WET) or status (UP, DOWN, ALARM).
5.2 Setting Parameters
To adjust settings, use the SET button and the ▲ (Up) / ▼ (Down) buttons.
- Set Temperature:
- Press the SET button once. The SV (left) display will flash.
- Use the ▲ / ▼ buttons to adjust the desired temperature.
- Press OK to confirm and save the setting, or wait a few seconds for it to save automatically.
- Set Humidity:
- Press the SET button twice. The SV (right) display will flash.
- Use the ▲ / ▼ buttons to adjust the desired humidity.
- Press OK to confirm and save the setting, or wait a few seconds for it to save automatically.
- Advanced Settings (Egg Turning, Ventilation, Alarms):
- Press and hold the SET button for approximately 3 seconds to enter the advanced parameter settings menu.
- Use the SET button to cycle through different parameters (e.g., F1, F2, F3...).
- Use the ▲ / ▼ buttons to adjust the value of the selected parameter.
- Press OK to confirm and save each setting.
- Refer to the specific parameter codes (e.g., F1 for over-temperature alarm, F2 for egg turning cycle) in the detailed programming guide (not provided in this general manual, typically found in a more extensive manual).
5.3 Automatic Functions
- Temperature Control: The controller will automatically activate heaters (HEAT1, HEAT2) to maintain the set temperature.
- Humidity Control: The controller will activate the humidifier (WET indicator) to maintain the set humidity.
- Egg Turning: Based on the programmed cycle and duration, the egg turning motor will activate automatically.
- Ventilation: The ventilating fan will operate according to its programmed cycle and duration.
- Alarms: The ALARM indicator will illuminate and an audible alarm may sound if temperature or humidity deviates significantly from set points, or in case of other detected issues.
6. Maintenance
- Cleaning: Regularly wipe the controller's surface with a soft, dry cloth. Do not use abrasive cleaners or allow liquids to enter the device.
- Sensor Care: Keep temperature and humidity sensors clean and free from dust or debris to ensure accurate readings. Avoid bending or damaging the sensor cables.
- Connections: Periodically check all wiring connections to ensure they remain secure.
- Environment: Ensure the operating environment adheres to the specified temperature and humidity ranges to prevent damage to the controller.
7. Troubleshooting
| Problem | Possible Cause | Solution |
|---|---|---|
| Controller does not power on. | No power supply; loose wiring; faulty power source. | Check power connection and source. Verify wiring according to diagram. |
| Temperature/Humidity readings are inaccurate. | Sensor dirty or damaged; sensor not properly connected. | Clean sensors. Check sensor wiring. Replace sensor if damaged. |
| Heater/Humidifier/Fan not activating. | Incorrect settings; faulty component; wiring issue. | Verify set points. Check wiring to the component. Test component functionality. |
| Egg turning not working. | Incorrect turning cycle/time settings; motor wiring issue; faulty motor. | Check egg turning parameters. Verify motor wiring. Test motor. |
| Alarm constantly active. | Temperature/humidity outside set range; alarm threshold too narrow. | Adjust set points or alarm thresholds. Ensure incubator environment is stable. |
8. Warranty and Support
For warranty information, technical support, or service inquiries regarding your MMUNNA XM-18 Digital Automatic Egg Incubator Thermostat Controller, please refer to the seller or manufacturer's official contact channels. Keep your purchase receipt as proof of purchase.