1. Introduction
This manual provides essential information for the safe and efficient operation of your new Samsung MG23DG4524AGE1 Microwave with Grill. Please read these instructions thoroughly before using the appliance and retain them for future reference. Proper use and maintenance will ensure optimal performance and extend the lifespan of your microwave.
2. Safety Information
To prevent potential hazards and ensure safe operation, always adhere to the following safety precautions:
- Do not attempt to operate this oven with the door open, as this can result in harmful exposure to microwave energy.
- Do not place any object between the oven front face and the door, or allow soil or cleaner residue to accumulate on sealing surfaces.
- Do not heat liquids or other foods in sealed containers, as they are liable to explode.
- Never use metal utensils, foil, or metal-trimmed dishes in the microwave, as they can cause arcing or fire.
- Ensure proper ventilation around the appliance. Do not block any ventilation openings.
- Always supervise children when the microwave is in use.
- Do not use the microwave for drying clothes, newspapers, or other non-food items.
- If smoke is observed, switch off or unplug the appliance and keep the door closed to stifle any flames.
3. Product Overview
Familiarize yourself with the components of your Samsung Microwave with Grill.

Figure 3.1: Front view of the Samsung MG23DG4524AGE1 Microwave with Grill. This image displays the sleek black exterior, the digital display showing '12:00', and the intuitive control panel on the right side, featuring buttons for Grill, Microwave, Microwave+Grill, Auto Cook, Quick Defrost, Keep Warm, Deodorization, and Lock, along with a rotary dial and Start/Stop buttons.
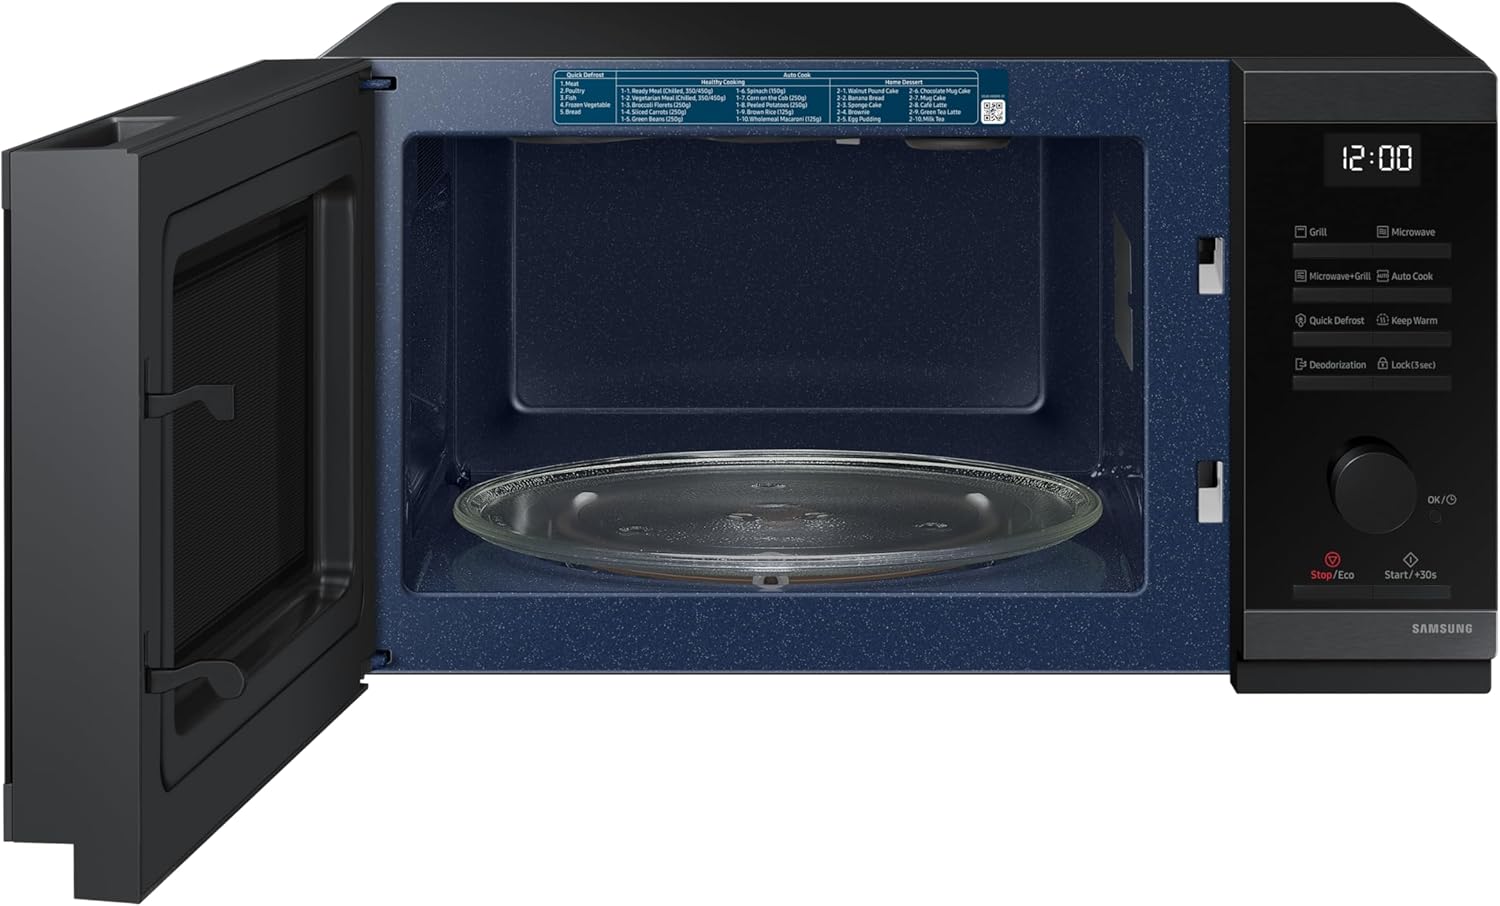
Figure 3.2: Interior view of the microwave with the door open. This image highlights the spacious 23-liter interior cavity, the glass turntable for even cooking, and the durable ceramic enamel coating, which is designed for easy cleaning and scratch resistance. A label with cooking instructions is visible on the top interior.

Figure 3.3: Detailed view of the microwave interior. This close-up shows the upper grill heating element, essential for the grill and combination cooking functions, and further emphasizes the smooth, dark blue ceramic enamel interior walls, known for their hygienic and easy-to-clean properties.
Control Panel Features:
- Display: Shows time, cooking settings, and indicators.
- Grill: Activates the grill function for browning and crisping.
- Microwave: Initiates standard microwave cooking.
- Microwave+Grill: Combines microwave and grill for faster, crispier results.
- Auto Cook: Accesses pre-programmed recipes.
- Quick Defrost: Defrosts food based on type and weight.
- Keep Warm: Maintains food temperature after cooking.
- Deodorization: Helps remove odors from the oven cavity.
- Lock (3 sec): Child lock function.
- Rotary Dial (OK/◯): Adjusts time, weight, and selects menu options. Press to confirm.
- Stop/Eco: Stops operation or activates Eco Mode.
- Start/+30s: Starts cooking or adds 30 seconds to cooking time.
4. Setup
4.1 Unpacking and Placement
- Remove all packaging materials and accessories. Inspect the oven for any damage such as dents or a broken door. Do not install if the oven is damaged.
- Place the microwave on a flat, stable surface that can support its weight and the heaviest food item likely to be cooked in it. This model is designed for countertop installation.
- Ensure adequate space for ventilation: at least 20 cm (8 inches) of space above the oven, 10 cm (4 inches) at the rear, and 5 cm (2 inches) on each side. Do not block any air vents.
- Keep the microwave away from heat sources, strong magnetic fields, and areas with high humidity.
4.2 Electrical Connection
- Plug the power cord into a properly grounded electrical outlet. Ensure the voltage matches the rating label on the back of the oven.
- Do not use extension cords or adapters.
5. Operating Instructions
5.1 Basic Microwave Cooking
- Place food in a microwave-safe container on the glass turntable.
- Close the door securely.
- Press the Microwave button.
- Use the Rotary Dial to set the desired cooking time.
- Press Start/+30s to begin cooking. To add 30 seconds during cooking, press Start/+30s again.
5.2 Grill Function
The grill function is ideal for browning and crisping food.
- Place food on the grill rack (if provided) or a heat-resistant dish.
- Press the Grill button.
- Use the Rotary Dial to set the desired grilling time.
- Press Start/+30s to begin.
5.3 Combination Cooking (Microwave + Grill)
This function combines microwave power with the grill for faster cooking and crispy results.
- Place food in a suitable dish.
- Press the Microwave+Grill button.
- Use the Rotary Dial to set the desired cooking time.
- Press Start/+30s to begin.
5.4 Quick Defrost
The Quick Defrost feature allows for efficient defrosting of various food types.
- Place the frozen food in a microwave-safe dish.
- Press the Quick Defrost button.
- Use the Rotary Dial to select the food type (e.g., meat, poultry, fish, vegetables, bread).
- Enter the weight of the food using the Rotary Dial.
- Press Start/+30s to begin defrosting. The microwave will automatically calculate the optimal time.
5.5 Auto Cook Programs
Access 50 pre-programmed recipes for simplified cooking.
- Press the Auto Cook button.
- Use the Rotary Dial to browse and select the desired recipe number.
- Press the Rotary Dial (OK/◯) to confirm the selection.
- Follow any on-screen prompts for weight or quantity.
- Press Start/+30s to begin cooking.
5.6 Homemade Dessert Function
Prepare desserts quickly without preheating, saving energy and time. Simply choose the dessert, gather ingredients, and select this function.
- Refer to the internal label or manual for specific dessert options.
- Select the Homemade Dessert function (often found within Auto Cook or as a dedicated button).
- Follow the instructions for ingredient preparation and placement.
- Press Start/+30s to begin.
5.7 Eco Mode
Activate Eco Mode to significantly reduce energy consumption in standby mode.
- Press the Stop/Eco button once to stop any current operation.
- Press and hold the Stop/Eco button for a few seconds to activate Eco Mode. The display will dim or turn off, indicating reduced power usage.
- To exit Eco Mode, press any button or open the door.
5.8 Deodorization
This function helps remove lingering odors from the oven cavity after cooking.
- Ensure the oven is empty.
- Press the Deodorization button.
- Press Start/+30s to begin the deodorization cycle.
6. Maintenance and Cleaning
Regular cleaning and maintenance will ensure the longevity and hygiene of your microwave.
6.1 Interior Cleaning (Ceramic Enamel)
- The ceramic enamel interior is highly durable and easy to clean. Wipe the interior with a damp cloth after each use.
- For stubborn food residue, use a mild detergent and a soft sponge. Avoid abrasive cleaners, scouring pads, or harsh chemicals, as they can damage the surface.
- To remove odors, place a bowl of water with lemon slices inside and microwave for a few minutes, then wipe clean.
6.2 Exterior Cleaning
- Wipe the exterior surfaces with a soft, damp cloth.
- Clean the control panel gently with a soft, damp cloth. Avoid excessive moisture.
6.3 Turntable and Roller Ring
- The glass turntable and roller ring can be removed for cleaning. Wash them in warm, soapy water or in the dishwasher.
- Ensure they are completely dry before placing them back in the oven.
7. Troubleshooting
If you encounter issues with your microwave, refer to the following common problems and solutions:
| Problem | Possible Cause | Solution |
|---|---|---|
| Oven does not start | Door not closed properly; Power cord unplugged; Fuse blown or circuit breaker tripped. | Ensure door is firmly closed; Check power cord connection; Check household fuse or reset circuit breaker. |
| Food not heating | Cooking time/power level set incorrectly; Door not closed properly. | Adjust cooking time and power; Ensure door is firmly closed. |
| Sparking or arcing inside oven | Metal in oven; Food residue on cavity walls. | Remove any metal objects; Clean oven interior thoroughly. |
| Turntable not rotating | Turntable or roller ring not correctly placed; Obstruction under turntable. | Re-position turntable and roller ring; Remove any obstructions. |
| Unusual noises | Food container touching oven walls; Turntable not properly seated. | Adjust food container position; Ensure turntable is correctly seated. |
If the problem persists after attempting these solutions, please contact Samsung customer support.
8. Specifications
Detailed technical specifications for the Samsung MG23DG4524AGE1 Microwave with Grill.
- Model Number: MG23DG4524AGE1
- Brand: Samsung
- Capacity: 23 Liters
- Wattage: 800 Watts
- Color: Black
- Material: Ceramic (Interior)
- Installation Type: Countertop
- Product Dimensions (D x W x H): 30 cm x 44 cm x 26 cm (approximately 11.8 x 17.3 x 10.2 inches)
- Weight: 12.52 kg (approximately 27.6 lbs)
- Special Features: Quick Defrost (5 modes), Deodorization, Easy-clean Ceramic Enamel Interior, Eco Mode, Triple Distribution System (TDS) for even heating.
- Included Components: Rotary ring (turntable support)

Figure 8.1: Product dimensions of the Samsung MG23DG4524AGE1 Microwave. The diagram illustrates the width (44 cm), depth (30 cm), and height (26 cm) of the appliance, providing clear measurements for placement and installation planning.
9. Warranty and Support
For warranty information, technical support, or service inquiries, please refer to the warranty card included with your product or visit the official Samsung website. You can also contact Samsung customer service directly for assistance.
Please have your model number (MG23DG4524AGE1) and purchase date available when contacting support.


