1. Introduction
Thank you for choosing the ANRAN 5MP Solar Powered Outdoor Security Camera. This manual provides detailed instructions for the setup, operation, and maintenance of your new security camera. Please read this manual thoroughly before use to ensure proper installation and functionality. Keep this manual for future reference.
2. Product Overview
2.1 Key Features
- Completely Wireless & Integrated Solar Panel: No power cables or complex wiring required. The integrated solar panel provides continuous power, with a 40% improved charging efficiency.
- 5MP Ultra-High Definition & 360° PTZ Control: Delivers clearer images than traditional 1536p cameras, with 4x digital zoom. Pan-Tilt-Zoom (PTZ) functionality allows for 360-degree omnidirectional monitoring via app control.
- Motion Detection & Night Light Deterrence: Records upon detecting motion/human figures and sends push notifications with images. Features sound and light alarms (4 high-brightness LEDs) to deter intruders, active day and night.
- Family Sharing & Two-Way Audio: Built-in microphone allows for audio monitoring. Two-way talk functionality enables communication with visitors or intruders via the mobile app. Multiple users can view and operate the camera simultaneously.
- Reliable Support & Safety Certification: Manufactured under strict quality control. PSE and Technical Conformity certified for safe use in Japan. Customer support available for inquiries and issues.
2.2 Package Contents
- ANRAN 5MP Solar Powered Outdoor Security Camera (Model: 5MP-Q04)
- Mounting Bracket and Screws
- USB Charging Cable
- User Manual
2.3 Product Diagram

Figure 2.3.1: Front view of the ANRAN 5MP Solar Powered Outdoor Security Camera, showing the integrated solar panel, dual antennas, camera lens, and LED lights. A smartphone displays a live feed from the camera.

Figure 2.3.2: Side view of the camera mounted on a wall, illustrating its wireless capabilities (2.4G WiFi, no LAN cable, no power wiring needed).
3. Setup
3.1 Initial Charging
Although the camera is solar-powered, it is recommended to fully charge the camera using the provided USB cable before the first use. Connect the USB cable to the charging port on the camera and a standard 5V USB power adapter (not included).
3.2 App Installation
- Scan the QR code in the manual or search for the designated app (e.g., 'CloudEdge' or 'Ubox' - check packaging for exact app name) in your smartphone's app store (App Store for iOS, Google Play Store for Android).
- Download and install the app.
- Register an account and log in.
3.3 Camera Pairing/Connection
- Power on the camera. Ensure your smartphone is connected to a 2.4GHz Wi-Fi network. (Note: The camera only supports 2.4GHz Wi-Fi).
- Open the app and follow the on-screen instructions to add a new device.
- Select your Wi-Fi network and enter the password. The app will generate a QR code.
- Hold your phone with the QR code in front of the camera lens (approx. 15-20 cm away) until you hear a confirmation sound from the camera.
- Once connected, you can name your camera and begin live viewing.
Important: For stable Wi-Fi connection, place the camera within 8 meters of your Wi-Fi router.
3.4 Mounting the Camera
- Choose a suitable outdoor location with good sunlight exposure for the solar panel and a strong Wi-Fi signal.
- Use the provided mounting bracket and screws to securely attach the camera to a wall or other stable surface.
- Adjust the angle of the camera to cover your desired monitoring area. The solar panel angle is fixed and cannot be adjusted independently from the camera body.
4. Operating Instructions
4.1 Live View and PTZ Control
Open the app to access the live view. Use the on-screen controls to pan (355°) and tilt (90°) the camera lens for a 360-degree omnidirectional view. You can also use the 4x digital zoom function to see details.

Figure 4.1.1: Illustration of the camera's 360-degree PTZ (Pan-Tilt-Zoom) capabilities, allowing remote adjustment of the viewing angle.
4.2 Motion Detection and Alerts
The camera features PIR human detection. When motion or a human figure is detected, the camera will start recording and send a push notification with an image to your smartphone. You can adjust the detection sensitivity in the app (10 levels available).
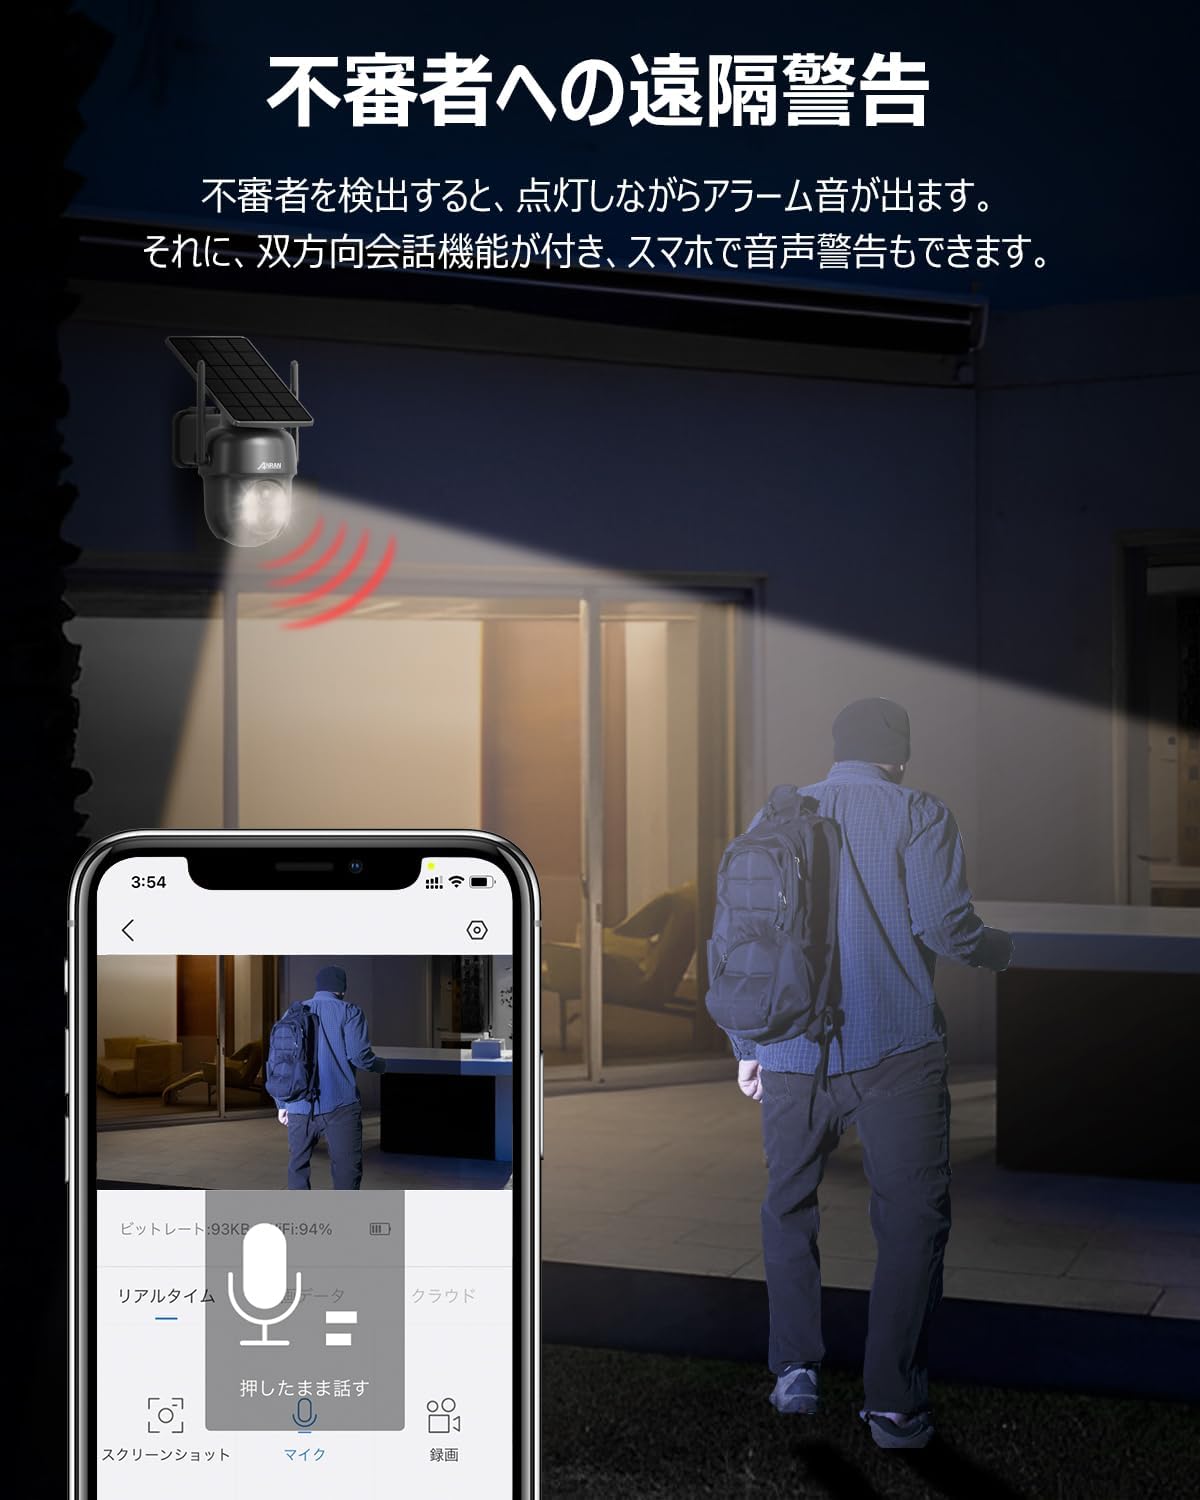
Figure 4.2.1: The camera detecting an intruder at night, triggering an alarm sound and light. The app shows a live view of the event.
4.3 Two-Way Audio
The built-in microphone and speaker allow for two-way communication. Tap the microphone icon in the app to speak through the camera, and hear audio from the camera's location.
4.4 Recording and Storage
The camera supports both SD card storage (up to 128GB, not included) and cloud recording. Motion-activated recordings help conserve storage space. You can view recorded footage directly from the app.

Figure 4.4.1: Close-up of the MicroSD card slot on the camera.
4.5 Night Vision Modes
The camera offers multiple night vision modes for clear surveillance in low-light conditions:
- Infrared Mode: Provides black and white video in complete darkness.
- Full Color Night Vision: Utilizes the built-in LEDs to provide color video at night when motion is detected.
- Light/Sound Alarm: When motion is detected, the camera can activate its bright lights and sound an alarm to deter intruders.

Figure 4.5.1: Visual representation of the camera's PIR human detection and different night vision modes (Full Color and Infrared).
4.6 Multi-User Sharing
You can share access to your camera with family and friends through the app. As the administrator, you can grant viewing and operation permissions to other users, allowing real-time monitoring by multiple people simultaneously.
5. Maintenance
5.1 Cleaning
Regularly clean the camera lens and solar panel with a soft, damp cloth to ensure optimal performance. Avoid using harsh chemicals or abrasive materials.
5.2 Battery Management
The app displays the battery level. When the battery level drops below 20%, you will receive a notification to ensure continuous operation. Ensure the solar panel receives adequate sunlight for charging.
5.3 Firmware Updates
Periodically check the app for available firmware updates. Keeping your camera's firmware updated ensures optimal performance, new features, and security enhancements.
6. Troubleshooting
| Problem | Possible Cause | Solution |
|---|---|---|
| Camera won't connect to Wi-Fi. | Incorrect Wi-Fi password, camera too far from router, 5GHz Wi-Fi network. | Ensure correct 2.4GHz Wi-Fi password. Move camera closer to router (within 8m). Confirm router is broadcasting 2.4GHz. |
| No motion detection alerts. | Motion detection disabled, low sensitivity, poor network connection. | Enable motion detection in app settings. Increase sensitivity. Check Wi-Fi signal strength. |
| Poor image quality. | Dirty lens, low light, network bandwidth issues. | Clean the camera lens. Ensure adequate lighting. Check network speed. |
| Battery drains quickly. | Insufficient sunlight for solar panel, frequent motion detection, extreme temperatures. | Relocate camera to an area with more direct sunlight. Adjust motion detection sensitivity. Ensure operating within specified temperature range (-10°C to 50°C). |
7. Specifications
| Feature | Detail |
|---|---|
| Model Number | AR-W606 (5MP-Q04) |
| Video Capture Resolution | 5MP |
| Connectivity Technology | Wireless (Wi-Fi 2.4GHz only) |
| Power Source | Solar Powered |
| Field of View | 360 degrees (PTZ) |
| Night Vision Range | 8 meters |
| Water Resistance Level | Waterproof (IP65) |
| Operating Temperature | -10°C to 50°C |
| Battery Type | Lithium Ion |
| Product Weight | 830 g |
| Dimensions | 21.6 x 15.9 x 13.6 cm |
| Included Components | Camera body, Solar panel |

Figure 7.1.1: The camera's IP65 waterproof rating and operational temperature range from -10°C to 50°C, indicating its suitability for various outdoor conditions.
8. Warranty and Support
ANRAN is committed to providing high-quality products. Our products undergo strict quality control during manufacturing and inspection.
This product has obtained Japanese PSE certification and Technical Conformity certification, ensuring its safety for use.
Should you have any questions during consideration or use of the surveillance camera, or encounter any malfunctions, please do not hesitate to contact us.
Customer Support:
- Phone Support Hours: Monday - Friday, 10:00 - 13:00 and 14:30 - 19:30 (Japan Time)
- Email Support: 24-hour response