1. Safety Information
Please read and understand all instructions before assembly and use. Keep this manual for future reference.
- Ensure all parts are present and undamaged before beginning assembly.
- Do not overtighten screws during assembly to avoid damaging components.
- Place the desk on a flat, stable surface to prevent tipping.
- Keep children and pets away from the assembly area.
- Do not exceed the maximum weight capacity of the desk.
- The built-in power strip is designed for standard electronic devices. Do not overload it.
- Avoid contact with water or excessive moisture to prevent electrical hazards and damage to the desk material.
2. Parts List
Verify that all components are included in your package. If any parts are missing or damaged, please contact customer service.
| Part | Description | Quantity |
|---|---|---|
| A | Desktop Panel | 1 |
| B | Left Leg Frame | 1 |
| C | Right Leg Frame | 1 |
| D | Crossbar | 1 |
| E | Power Outlet Unit | 1 |
| F | Storage Bag | 1 |
| G | Headphone Hook | 1 |
| H | Adjustable Leg Pads | 4 |
| I | Assembly Tool (Allen Wrench) | 1 |
| J | Screws (various sizes) | (as needed) |
Note: The exact number and type of screws may vary slightly. Refer to the included hardware pack.
3. Setup & Assembly
Assembly typically takes approximately 15 minutes with one person. No additional tools are required beyond what is provided.
Step-by-Step Instructions:
- Unpack Components: Carefully remove all parts from the packaging and lay them out on a soft, clean surface to prevent scratches.

Image: The fully assembled Lufeiya computer desk, showcasing its design and features in a home office setting.
- Attach Leg Frames: Connect the Left (B) and Right (C) Leg Frames to the Desktop Panel (A) using the appropriate screws (J) and the provided Allen wrench (I). Ensure the frames are securely fastened but do not overtighten.

Image: A diagram illustrating the overall dimensions of the desk, including length, width, and height.
- Install Crossbar: Attach the Crossbar (D) between the two leg frames for added stability. Secure with screws (J).
- Insert Power Outlet Unit: Carefully place the Power Outlet Unit (E) into the designated cutout on the Desktop Panel (A). Ensure it sits flush and is secure.

Image: A close-up view of the integrated power strip with two AC outlets and two USB ports on the desktop.
- Attach Adjustable Leg Pads: Screw the Adjustable Leg Pads (H) into the bottom of each leg frame. Adjust them to ensure the desk is level on uneven surfaces.

Image: An illustration highlighting the desk's waterproof surface, heavy-duty metal design, and adjustable leg pads for stability.
- Install Storage Bag and Headphone Hook: Attach the Storage Bag (F) and Headphone Hook (G) to the desired side of the desk using the provided hardware. These accessories are removable and can be placed on either side.

Image: A removable headphone hook is shown attached to the side of the desk, providing convenient storage.

Image: A removable fabric storage bag is attached to the side of the desk, ideal for holding books or documents.
- Final Tightening: Once the entire desk is assembled, firmly tighten all screws for maximum stability.
4. Operating Instructions
The Lufeiya Computer Desk is designed for versatile use in home offices, study areas, or gaming setups.
- Power Outlet Usage: Plug the desk's power cord into a standard wall outlet. Use the two AC outlets and two USB charging ports on the desktop to power and charge your electronic devices.
- Storage Bag: Utilize the removable storage bag for documents, magazines, or other small items to keep your desktop clutter-free.
- Headphone Hook: Hang headphones, bags, or other accessories on the removable hook for easy access and organization.
- Adjustable Leg Pads: Periodically check and adjust the leg pads to maintain desk stability, especially if moving the desk or if the floor surface is uneven.
5. Maintenance
Regular maintenance will prolong the life and appearance of your desk.
- Cleaning: Wipe the desktop and metal frame with a soft, damp cloth. Avoid harsh chemicals or abrasive cleaners that could damage the finish.
- Spills: Immediately wipe up any spills to prevent water damage to the particle board. The desktop is designed to be waterproof, but prolonged exposure to liquids should be avoided.
- Tighten Fasteners: Periodically check all screws and bolts and tighten them as needed to ensure the desk remains stable.
- Avoid Excessive Weight: Do not place excessively heavy items on the desk to prevent structural damage.

Image: Close-up showing water droplets on the desk surface, highlighting its waterproof properties.
6. Troubleshooting
If you encounter any issues, refer to the following common problems and solutions.
| Problem | Possible Cause | Solution |
|---|---|---|
| Desk is wobbly | Loose screws or uneven floor. | Tighten all assembly screws. Adjust the leg pads until the desk is stable. |
| Power outlets not working | Desk power cord not plugged in, or wall outlet issue. | Ensure the desk's power cord is securely plugged into a functional wall outlet. Check the wall outlet with another device. |
| Parts do not align during assembly | Screws overtightened prematurely or incorrect orientation. | Loosen all screws slightly, realign parts, then tighten. Refer to the assembly diagrams for correct orientation. |
7. Specifications
- Brand: Lufeiya
- Model Number: LFY-PO-Black-39
- Product Dimensions: 19.5"D x 39.4"W x 29.5"H
- Color: Black
- Style: Modern
- Top Material Type: FSC-Certified Wood (Particle board with scratch-resistant, anti-collision, and waterproof finish)
- Base Material: Metal
- Special Feature: Built-In Power Strip (2 AC outlets, 2 USB charging ports)
- Included Components: Built-in Outlet, Built-in USB Port, Headphone Hook, Storage Bag
- Recommended Number of People for Assembly: 1
8. Warranty & Support
Lufeiya provides professional customer service and a limited warranty for this product.
- Warranty Type: Limited
- Customer Service: For any quality problems, missing parts, or assembly assistance, please contact Lufeiya customer service. Easy and fast replacement is guaranteed for quality issues.
- Contact Information: Refer to your purchase documentation or the official Lufeiya website for the most current customer support contact details.
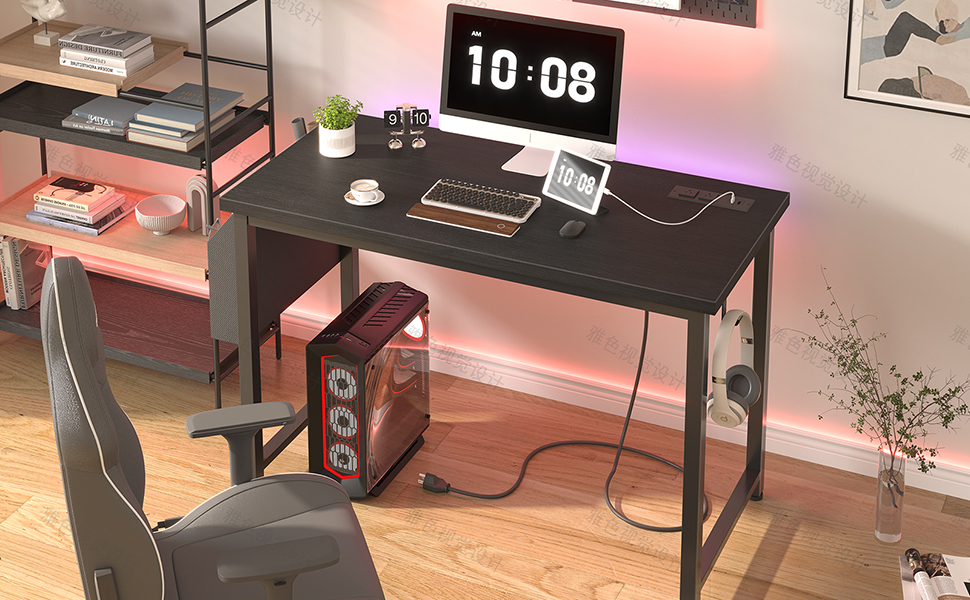
Image: A visual guide on how to contact Lufeiya seller customer service for support.