1. Important Safety Instructions
Please read and understand all instructions before beginning installation. Failure to follow these instructions could result in electric shock, fire, or personal injury.
- Ensure the power is turned off at the circuit breaker before installation or maintenance.
- All wiring must be in accordance with national and local electrical codes. If you are unfamiliar with wiring, consult a qualified electrician.
- The mounting structure must be capable of supporting the weight of the fan (approximately 4 kg / 8.8 lbs).
- Do not bend the blade holders during installation, balancing, or cleaning.
- Keep hands clear of the fan blades when the fan is operating.
- This fan is designed for indoor use only.
- Use only the remote control provided with the fan.
2. Product Overview
The AUTODAY 52-inch DC Motor Ceiling Fan with Light combines efficient air circulation with adjustable lighting, designed for comfort and convenience in various indoor spaces. It features a silent DC motor, natural wood blades, and a versatile LED light.
Key Features:
- Silent DC Motor: High-performance 30W DC motor for quiet operation and up to 70% energy savings. Ideal for bedrooms, children's rooms, or offices.
- Multifunction Remote Control: Offers 6 fan speeds, 1/3/6-hour timer settings, and a memory function that restores previous light and fan settings.
- Summer/Winter Reversible Function: Allows for downward airflow in summer for cooling and upward airflow in winter to redistribute warm air.
- 3-Color Dimmable LED Light: Integrated LED panel with adjustable color temperature (3000K warm, 4000K natural, 6500K cool) and infinite dimming.
- Natural Wood Blades: Three natural wood blades provide a comfortable and natural airflow.
- Sloped Ceiling Compatible: Can be installed on ceilings with an incline of up to 15 degrees.

Image: High-quality components of the AUTODAY ceiling fan, highlighting the quiet reversible motor, soft illuminated lampshade, 24W energy-saving LED, and environmentally friendly wooden blades.
3. Package Contents
Verify that all components are present before beginning installation:
- Fan Motor Housing
- Fan Blades (3)
- Light Kit with LED Panel
- Remote Control (requires 2 AAA batteries, not included)
- Downrod (250mm for 52-inch model)
- Mounting Bracket
- Canopy
- Hardware Pack (screws, washers, wire nuts)
- Instruction Manual
4. Specifications
| Specification | Value |
|---|---|
| Model Number | 52-DY1233BKM |
| Dimensions (L x W x H) | 132 x 132 x 32.4 cm (52 x 52 x 12.7 inches) |
| Weight | 3.99 kg (8.8 lbs) |
| Power Consumption (Fan) | 30W (DC Motor) |
| Power Consumption (Light) | 24W (LED) |
| Number of Speeds | 6 |
| Light Type | Integrated LED |
| Color Temperature | 3000K (Warm), 4000K (Natural), 6500K (Cool) |
| Control Method | Remote Control |
| Blade Material | Wood |
| Mounting Type | Semi-flush mount / Flush mount |
| Recommended Room Size | 15 to 25 square meters (160 to 270 sq ft) |
| Sloped Ceiling Angle | Up to 15 degrees |
| GTIN / UPC | 769016747186 |
For detailed energy information, scan the QR code on the energy label or visit https://eprel.ec.europa.eu/qr/2424943.

Image: EU Energy Label for the fan's light component, indicating efficiency class E.
5. Setup & Installation
Installation typically takes around 60 minutes. It is recommended to have two people for installation.
5.1 Pre-Installation Checklist:
- Turn off power at the circuit breaker.
- Ensure you have all necessary tools (screwdriver, wire strippers, ladder, etc.).
- Confirm the ceiling junction box is securely mounted and capable of supporting the fan's weight.
5.2 Mounting the Bracket:
- Attach the mounting bracket to the ceiling junction box using the screws provided. Ensure it is firmly secured.
5.3 Assembling the Fan:
- Insert the downrod through the canopy and motor housing.
- Feed the electrical wires from the fan motor through the downrod.
- Secure the downrod to the motor housing with the provided pin and screws.
- Carefully lift the fan assembly and hang it on the mounting bracket.
5.4 Wiring:
- Connect the fan's electrical wires to the household wiring according to the wiring diagram in the full manual (typically black to black, white to white, ground to ground). Use wire nuts to secure connections.
- Tuck all wires neatly into the junction box.
5.5 Attaching Blades and Light Kit:
- Attach each wooden blade to the motor housing using the screws provided. Ensure they are securely fastened.
- Connect the light kit wires to the fan motor wires.
- Attach the light kit to the bottom of the fan motor housing.
- Secure the canopy to the mounting bracket with the screws.

Image: Easy and fast installation guide, showing the fan being installed and a table detailing downrod lengths for flat and sloped ceilings. For model 52-DY1233, a 250mm downrod is used, resulting in a total fixture length of 1320mm.

Image: Guide for choosing the appropriate fan size for your room. The 52-inch fan (132cm diameter) is recommended for rooms larger than 12ft x 12ft, suitable for living rooms, dining rooms, bedrooms, and studies.
6. Operating Instructions
The fan is operated using the included remote control. Ensure 2 AAA batteries are installed correctly in the remote.
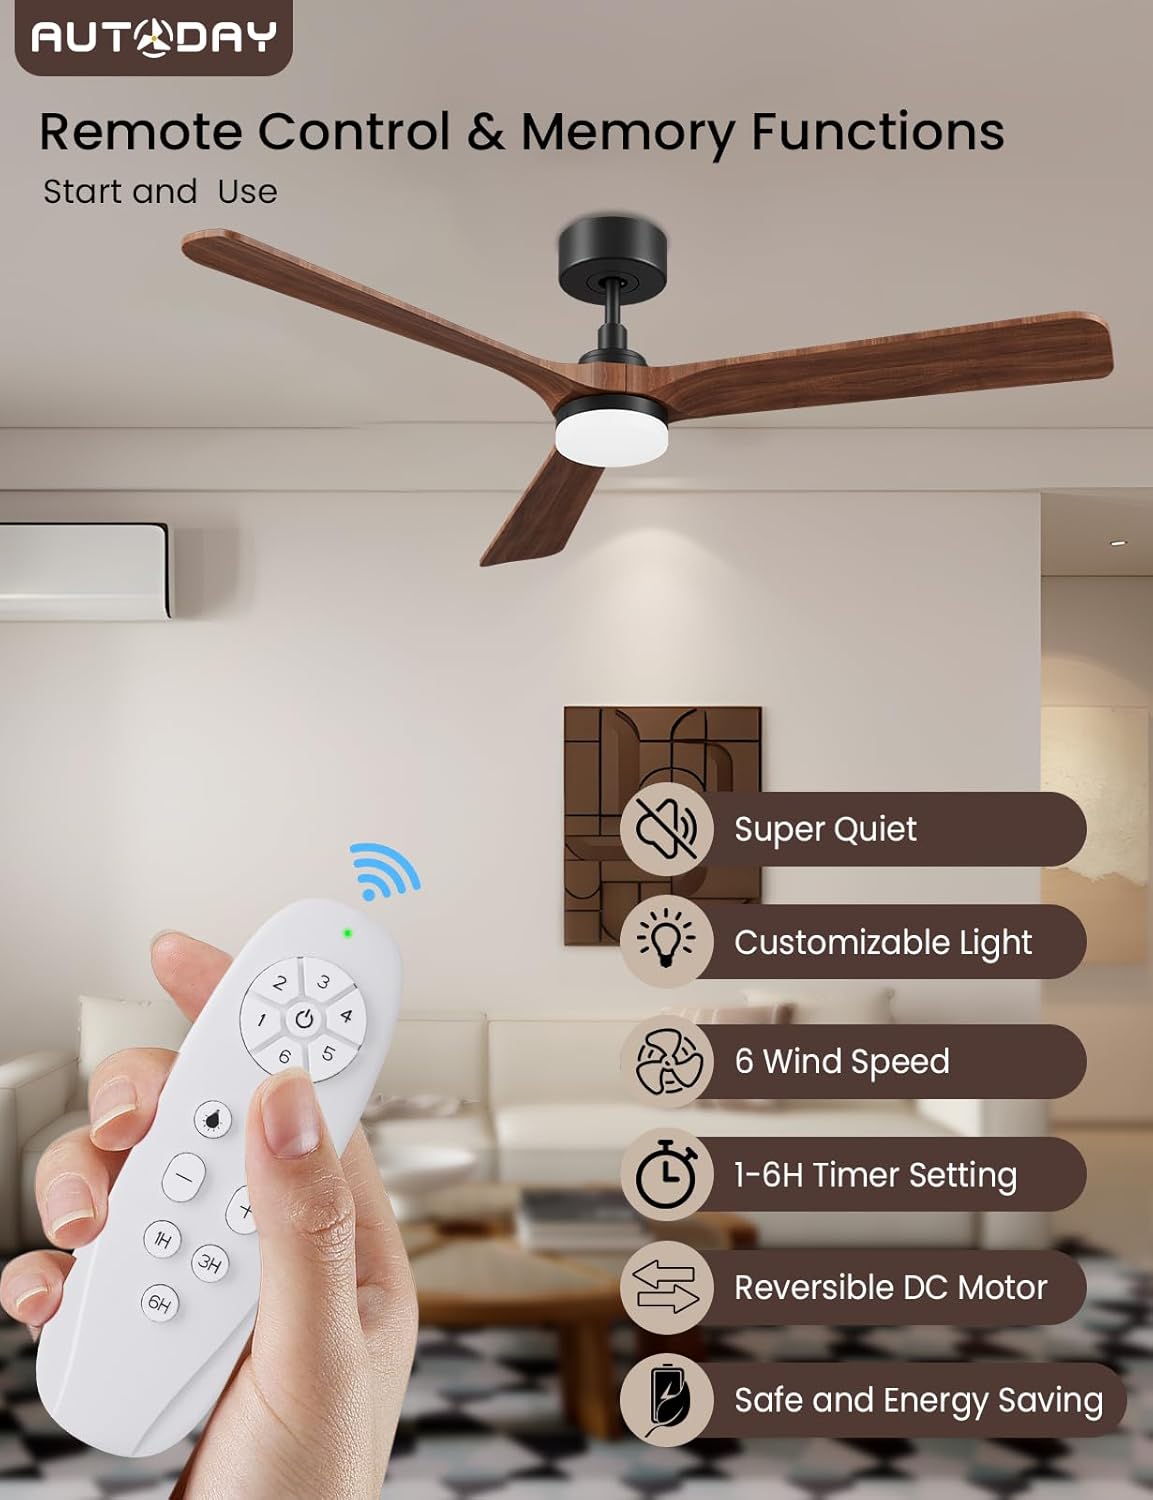
Image: The remote control for the AUTODAY ceiling fan, illustrating its various functions including fan speed, timer, light control, and reversible motor.
6.1 Remote Control Functions:
- Power Button: Turns the fan and light ON/OFF.
- Fan Speed Buttons (1-6): Adjusts the fan speed from 1 (lowest) to 6 (highest).
- Light ON/OFF Button: Toggles the light on or off independently of the fan.
- Light Color Temperature Button: Cycles through 3000K (warm white), 4000K (natural white), and 6500K (cool white).
- Dimming Buttons (+/-): Adjusts the brightness of the LED light.
- Timer Buttons (1H/3H/6H): Sets the fan to turn off automatically after 1, 3, or 6 hours.
- Reversible Function Button: Changes the direction of blade rotation for summer (downward airflow) or winter (upward airflow) mode.
The remote control features a memory function, which will recall your last fan speed and light settings when the fan is turned back on.
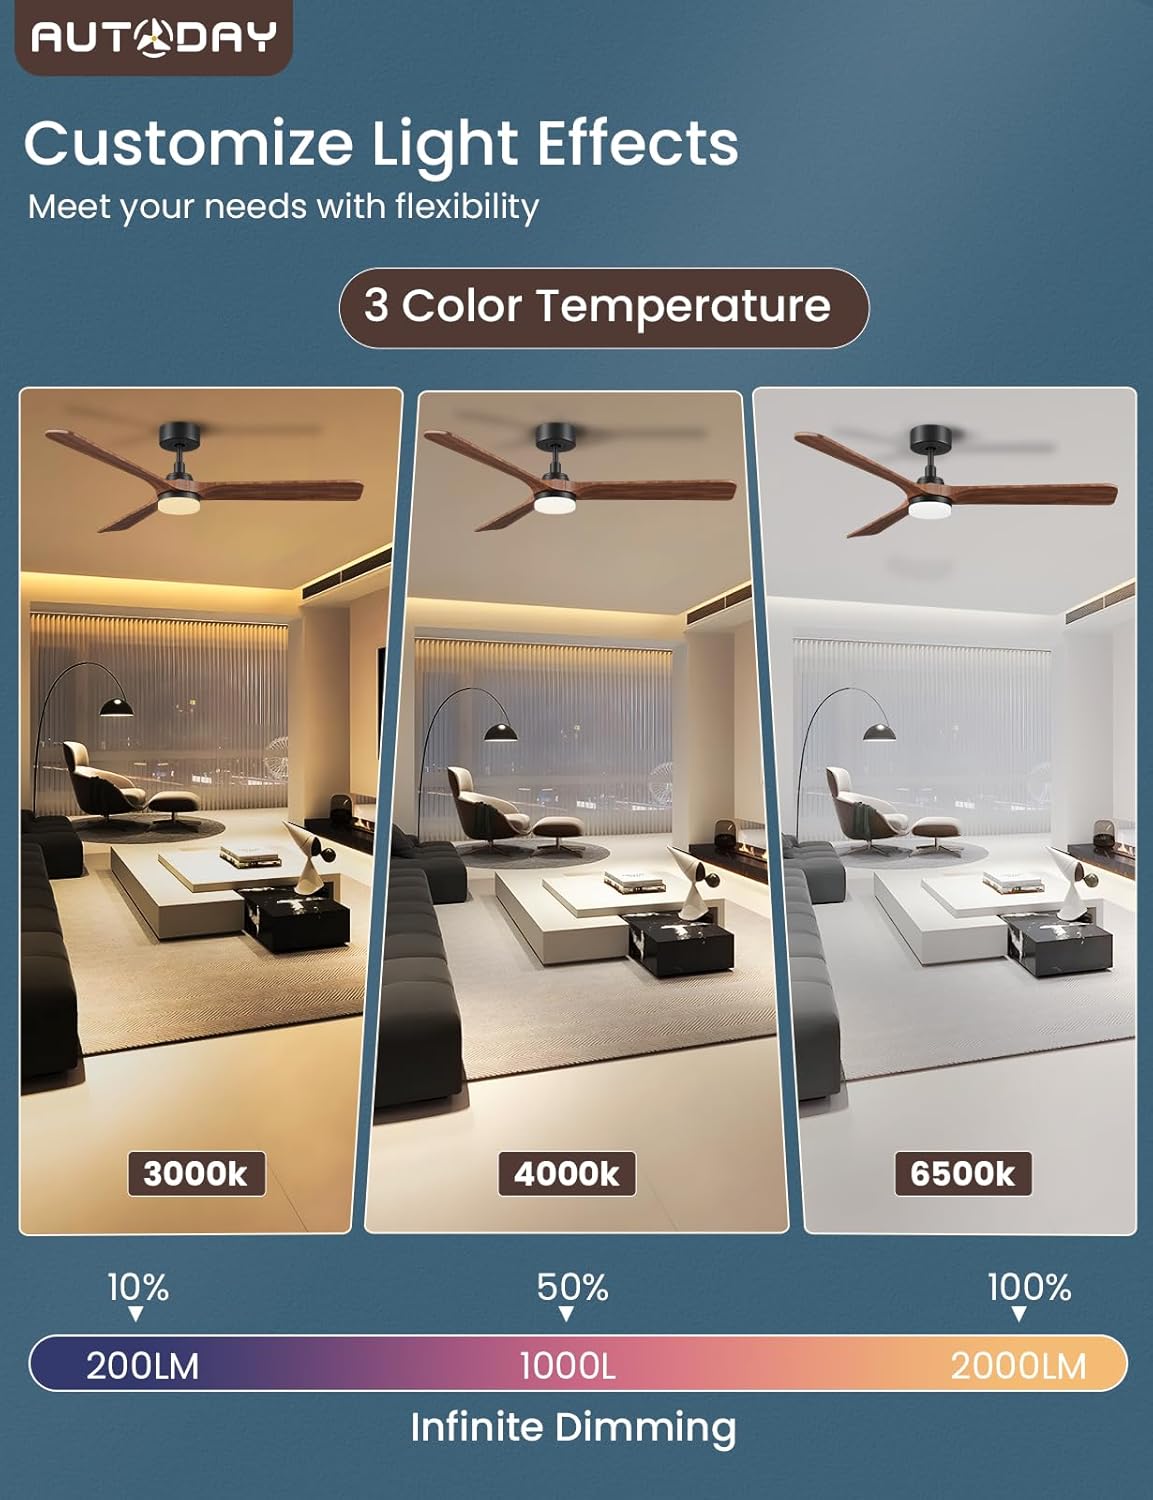
Image: Customizable light effects of the fan, demonstrating 3 color temperatures (3000K, 4000K, 6500K) and infinite dimming capabilities.
6.2 Summer and Winter Modes:
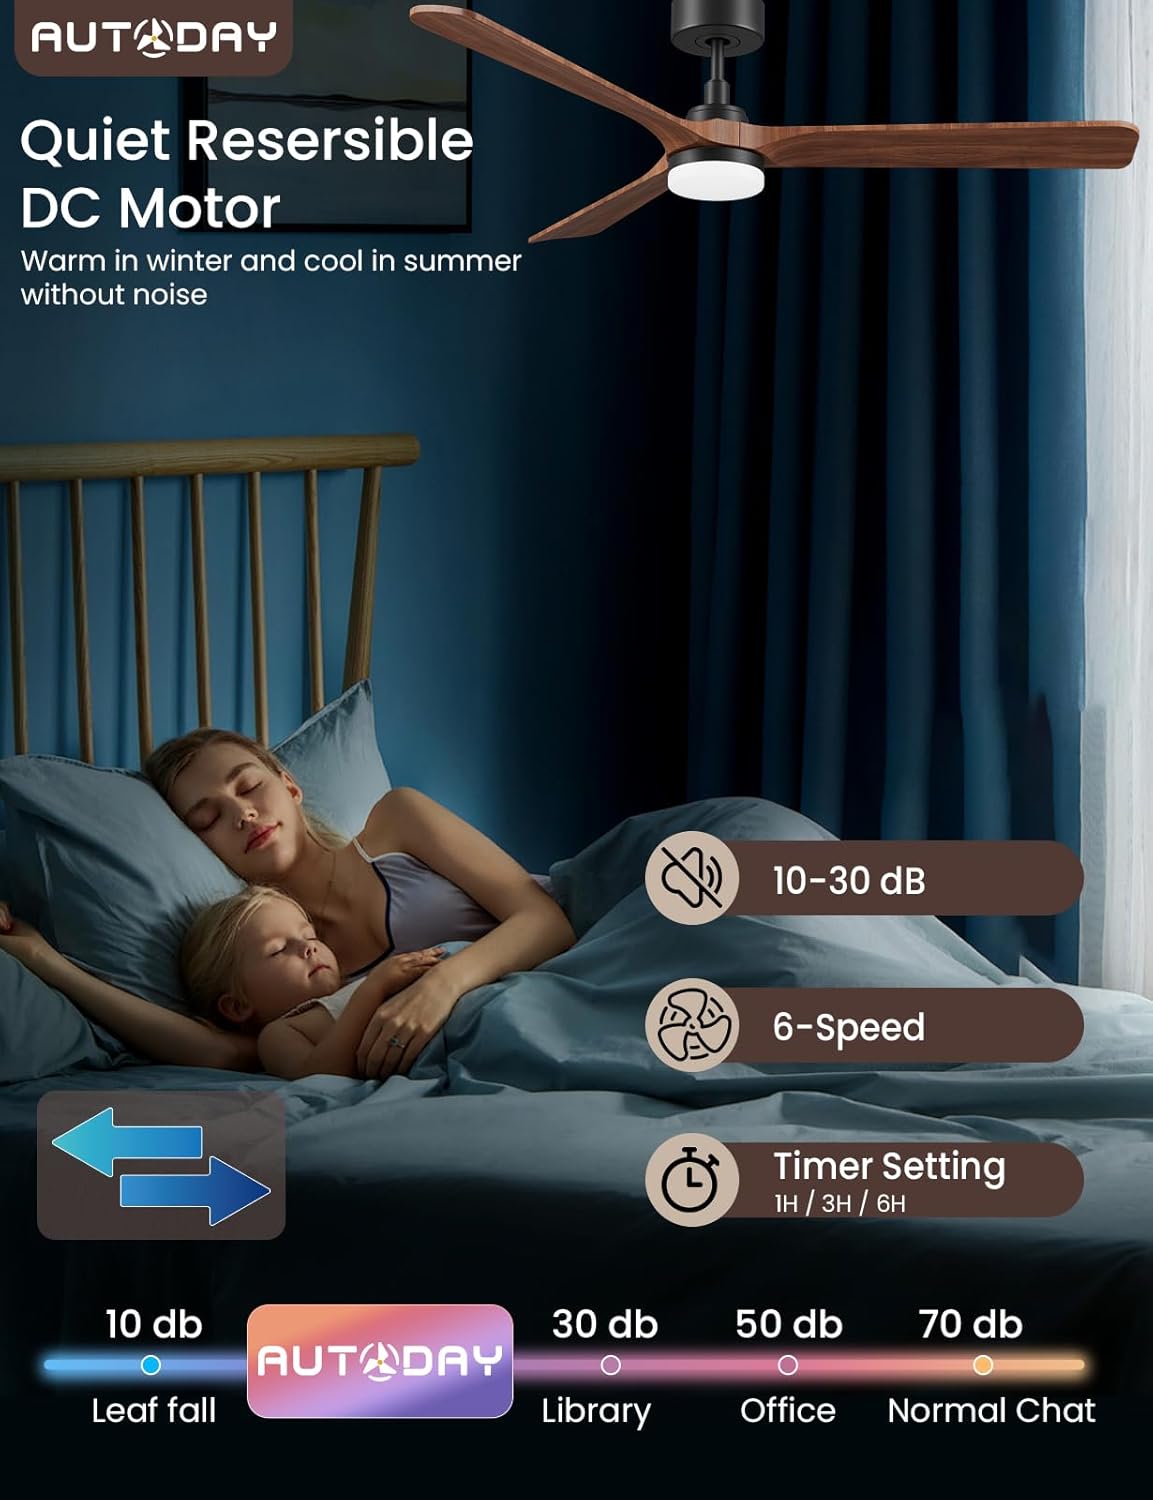
Image: The quiet operation of the fan (10-30 dB) and its reversible DC motor, which provides cooling in summer and helps circulate warm air in winter.
- Summer Mode (Counter-clockwise rotation): Creates a downward airflow, producing a cooling effect.
- Winter Mode (Clockwise rotation): Creates an upward airflow, pushing warm air from the ceiling down into the room, helping to distribute heat more evenly.
7. Maintenance
Regular maintenance ensures optimal performance and longevity of your ceiling fan.
- Cleaning: Periodically clean the fan blades and motor housing with a soft, damp cloth. Do not use abrasive cleaners or solvents.
- Light Cover: The light cover can be removed for cleaning if necessary. Ensure the power is off before removing.
- Blade Screws: Check all blade screws for tightness at least twice a year. Loose screws can cause wobbling and noise.
- No Lubrication Needed: The DC motor is permanently lubricated and does not require oiling.
WARNING: Always turn off the power at the circuit breaker before cleaning or performing any maintenance on your fan.
8. Troubleshooting
If you experience issues with your fan, refer to the following common problems and solutions:
| Problem | Possible Cause | Solution |
|---|---|---|
| Fan does not start | No power to the fan; Loose wire connections; Remote control batteries dead. | Check circuit breaker; Verify all wire connections are secure; Replace remote control batteries. |
| Light does not work | Loose wire connection to light kit; LED panel faulty; Remote control issue. | Check light kit wiring; Contact customer support for replacement LED panel; Ensure remote batteries are good. |
| Fan wobbles | Loose blade screws; Unbalanced blades; Loose mounting bracket. | Tighten all blade screws; Ensure blades are installed correctly; Check mounting bracket for secure attachment. |
| Remote control not responding | Dead batteries; Remote not paired (if applicable); Obstruction between remote and receiver. | Replace batteries; Refer to full manual for pairing instructions; Ensure clear line of sight. |
| Excessive noise | Loose screws; Fan not properly secured; Blades rubbing. | Check and tighten all screws; Ensure fan is securely mounted; Inspect blades for any obstruction. |
9. Warranty and Support
AUTODAY products are manufactured to high-quality standards. For warranty information, technical support, or replacement parts, please contact AUTODAY customer service. Keep your purchase receipt as proof of purchase.
Contact information can typically be found on the product packaging or the official AUTODAY website.