1. Introduction
Thank you for choosing the JANOEL JN26 Egg Incubator. This automatic incubator is designed for hatching various types of poultry eggs, including chicken, duck, goose, pigeon, and quail eggs. It features automatic temperature control, automatic egg turning, and a built-in egg candler for convenient observation of embryo development. Please read this manual thoroughly before operating the incubator to ensure proper use and optimal hatching results.

Image: The JANOEL JN26 Egg Incubator, shown with a newly hatched chick and several eggs, highlighting its purpose for poultry hatching.
2. Safety Instructions
- Always ensure the incubator is placed on a stable, level surface away from direct sunlight, drafts, or extreme temperature fluctuations.
- Do not immerse the incubator's electrical components in water or any other liquid.
- Keep the incubator out of reach of children and pets.
- Disconnect the power supply before cleaning or performing any maintenance.
- Use only the provided power adapter. Ensure the voltage matches your local power supply (100-120V, 50-60Hz).
- Do not block the ventilation openings on the incubator.
- If any damage is observed on the power cord or the unit itself, discontinue use immediately and contact customer support.
3. Product Overview
Familiarize yourself with the main components of your JANOEL JN26 Egg Incubator:
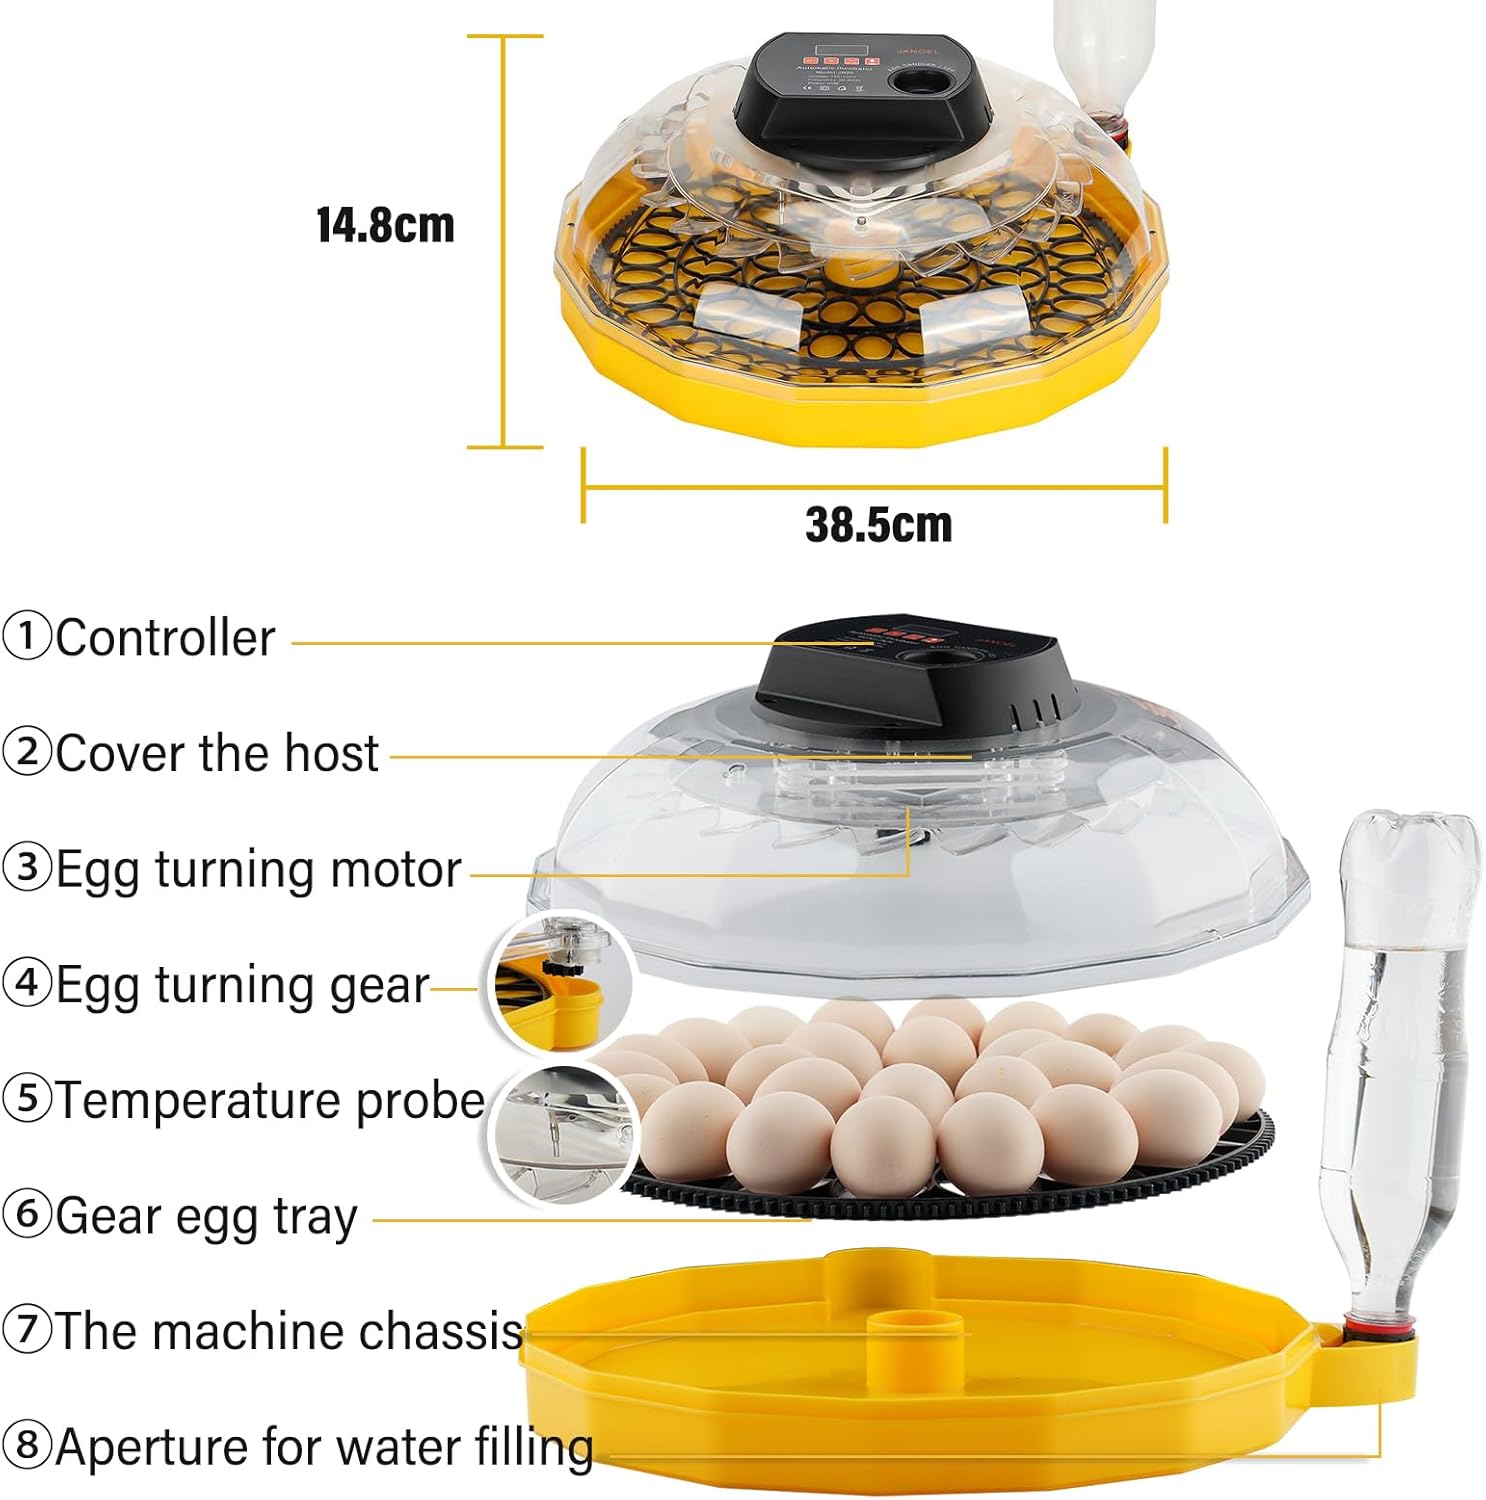
Image: An exploded view diagram of the JANOEL JN26 Egg Incubator, labeling its key components: (1) Controller, (2) Cover the host, (3) Egg turning motor, (4) Egg turning gear, (5) Temperature probe, (6) Gear egg tray, (7) The machine chassis, (8) Aperture for water filling. Dimensions are also indicated as 14.8cm height and 38.5cm width.
- Controller: Digital display and control buttons for temperature settings and egg candler.
- Cover: Transparent top cover for observation.
- Egg Turning Motor: Mechanism responsible for automatic egg rotation.
- Egg Turning Gear: Connects the motor to the egg tray for turning.
- Temperature Probe: Sensor for accurate temperature measurement inside the incubator.
- Gear Egg Tray: Holds the eggs and facilitates automatic turning.
- Machine Chassis: The base of the incubator.
- Aperture for Water Filling: Port for adding water to maintain humidity without opening the incubator.
4. Setup
4.1 Unpacking and Assembly
- Carefully remove all components from the packaging.
- Place the machine chassis (7) on a stable, level surface.
- Insert the egg turning gear (4) into the designated slot in the chassis.
- Place the gear egg tray (6) onto the turning gear. Ensure it sits correctly.
- Attach the egg turning motor (3) to the cover (2) and ensure the link rod is inserted into the shifting slot of the movable egg tray.
- Place the cover (2) onto the chassis (7), ensuring it is securely closed.
4.2 Power Connection
- Connect the power adapter to the incubator's power input port.
- Plug the adapter into a suitable electrical outlet (100-120V, 50-60Hz).
- The digital display on the controller (1) will illuminate, indicating the incubator is powered on.
4.3 Initial Test Run
It is recommended to perform a test run for 24 hours before placing eggs to ensure stable operation and temperature calibration.
- Add approximately 150 ml of water into the water channels at the bottom of the chassis through the water filling aperture (8). Do not exceed 100 ml per refill during incubation.
- Allow the incubator to run for several hours to stabilize the internal temperature and humidity.
- Verify that the temperature displayed is stable and within the desired range for your specific eggs.
5. Operation
5.1 Control Panel Functions

Image: A close-up of the JANOEL JN26 Egg Incubator's control panel, showing buttons for increasing temperature, reducing temperature, setup, and the egg candler On/Off button. It also indicates Celsius/Fahrenheit conversion.
- Incubator Temperature Display: Shows the current internal temperature.
- Increase Temperature Key (+): Press to increase the target temperature.
- Reduce Temperature Key (-): Press to decrease the target temperature.
- Setup Key (SET): Used to enter temperature setting mode and confirm changes.
- Egg Candler On/Off Button: Activates or deactivates the built-in LED egg candler.
- Celsius/Fahrenheit Conversion: Allows switching between temperature units. Refer to the specific instructions for your model on how to toggle this setting, usually by holding the 'SET' button or a combination of buttons.
5.2 Setting the Temperature
- Press the SET button once. The temperature display will start flashing.
- Use the + or - buttons to adjust the desired temperature. Typical incubation temperatures for chicken eggs are around 99.5°F (37.5°C). Consult specific guidelines for other poultry types.
- Press the SET button again to confirm the new temperature. The display will stop flashing and return to showing the current temperature.
Note: The incubator uses an industrial-grade temperature probe. Do not place additional thermometers inside, as they may show slight deviations. Trust the incubator's display.
5.3 Humidity Control
Humidity is crucial for successful hatching. The incubator maintains humidity by evaporating water from the channels in the chassis.
- Inject 150 ml of water into the machine base through the water filling aperture (8) at the start of incubation.
- Check the water level every 2-3 days and refill as needed. Each refill should not exceed 100 ml to avoid overfilling.
- Maintain consistent humidity levels. Higher humidity is generally required during the last few days before hatching (lockdown).
5.4 Automatic Egg Turning
The incubator automatically turns the eggs to prevent the embryo from sticking to the shell and to ensure even heat distribution.
- Ensure the egg turning gear is properly engaged with the egg tray and the motor's link rod is in the shifting slot.
- The incubator will rotate the eggs automatically every 2 hours.
- To verify turning, you can mark an egg with a pencil and observe if its position changes after a few hours.
- Stop automatic turning 3 days before the expected hatch date (lockdown period). This is typically done by removing the egg tray or disconnecting the turning mechanism, allowing the chicks to position themselves for hatching.
5.5 Egg Capacity and Tray Configuration
The incubator features a versatile egg tray design to accommodate different egg sizes.

Image: Two configurations of the egg tray are shown. One configuration holds 26 chicken eggs, while the other, with smaller compartments, holds 52 bird eggs (e.g., quail eggs).
- The standard configuration holds up to 26 chicken eggs.
- For smaller eggs, such as quail or pigeon eggs, the tray can be adjusted or a different insert used to accommodate up to 52 eggs. Refer to the specific instructions for changing the tray configuration if applicable.
5.6 Using the Egg Candler
The built-in LED egg candler allows you to observe the embryo's development without disturbing the incubation process.
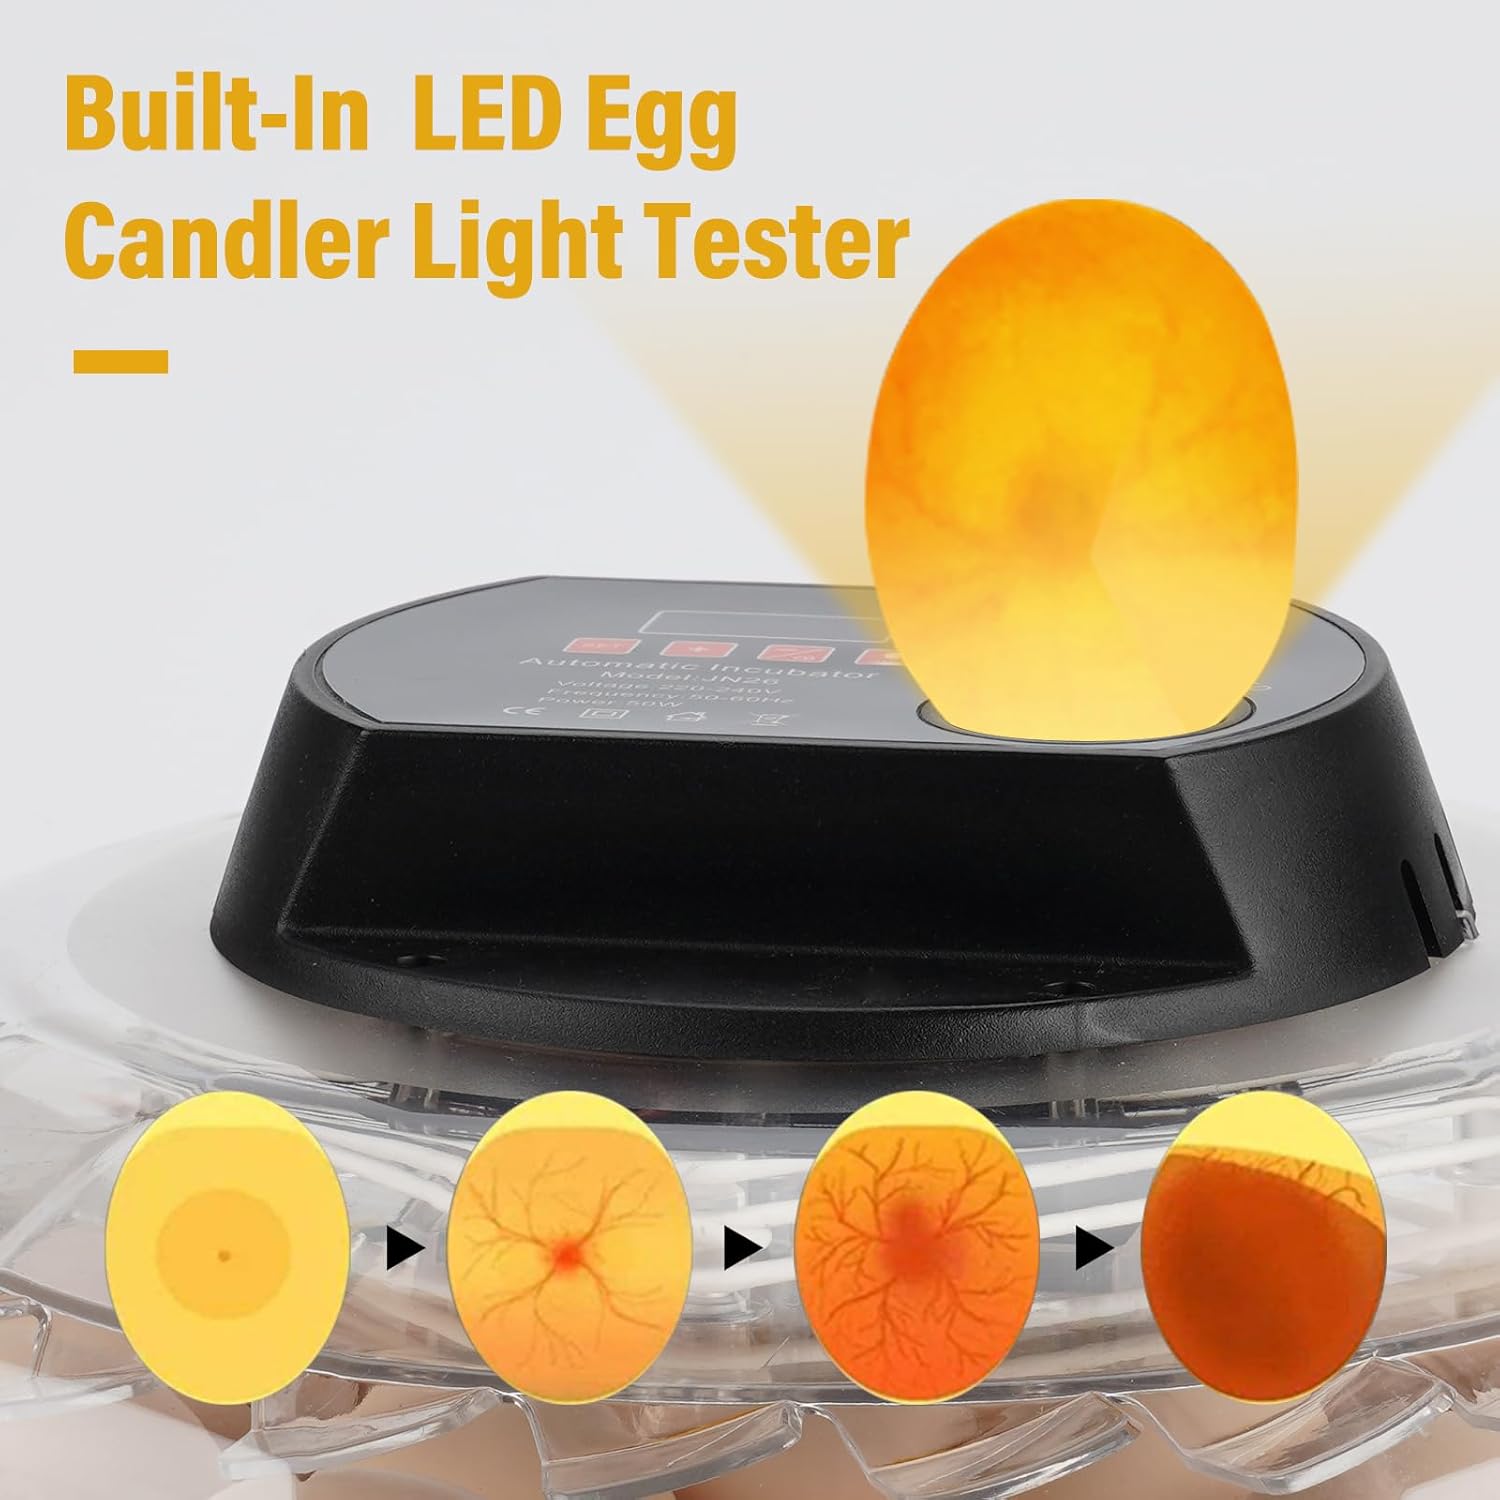
Image: The JANOEL JN26 Egg Incubator demonstrating the built-in LED egg candler. An egg is illuminated from below, showing the developing embryo and blood vessels, with a sequence of images illustrating different stages of embryo development.
- Press the Egg Candler On/Off Button on the control panel to activate the LED light.
- Carefully place an egg over the candler light.
- Observe the internal contents of the egg. You should be able to see blood vessels and the developing embryo after a few days of incubation.
- Turn off the candler when finished to conserve power.
Note: Candling is typically performed on day 7 and day 14 for chicken eggs to check fertility and embryo viability.
5.7 Incubation Guidelines for Various Poultry
The JANOEL JN26 incubator is suitable for a wide range of poultry eggs. Optimal conditions vary by species.

Image: The JANOEL JN26 Egg Incubator with images of chicks, ducklings, quail, and pigeons, illustrating its versatility for hatching different types of bird eggs.
| Egg Type | Incubation Period | Temperature (Fahrenheit) | Humidity (Days 1-18) | Humidity (Days 19-21/Lockdown) |
|---|---|---|---|---|
| Chicken | 21 days | 99.5°F - 100°F | 50-55% | 65-70% |
| Duck | 28 days | 99.5°F - 100°F | 55-60% | 70-80% |
| Goose | 28-32 days | 99.5°F - 100°F | 55-60% | 70-80% |
| Quail | 17-18 days | 99.5°F - 100°F | 45-50% | 60-65% |
| Pigeon | 17-18 days | 99.5°F - 100°F | 50-55% | 65-70% |
Always research specific requirements for the species you are hatching, as these are general guidelines.
6. Maintenance
6.1 Cleaning
- After each hatch, disconnect the incubator from power and allow it to cool down.
- Remove the egg tray and chassis. Wash them with warm, soapy water. Rinse thoroughly and allow to air dry completely.
- Wipe down the interior and exterior of the cover and controller with a damp cloth. Avoid getting water into electrical components.
- For disinfection, a mild disinfectant solution can be used, followed by a thorough rinse and drying.
- Ensure all parts are completely dry before reassembling and storing or using again.
6.2 Storage
- Store the incubator in a clean, dry place, away from direct sunlight and extreme temperatures.
- Keep it in its original packaging if possible to protect it from dust and damage.
7. Troubleshooting
| Problem | Possible Cause | Solution |
|---|---|---|
| Incubator not powering on | No power supply; loose connection; faulty adapter. | Check power outlet and connections. Ensure adapter is securely plugged in. |
| Temperature unstable or incorrect | Incubator not pre-heated; ambient temperature too low/high; ventilation blocked; faulty sensor. | Allow 24 hours for stabilization. Place incubator in a stable environment. Ensure vents are clear. If problem persists, contact support. |
| Eggs not turning automatically | Egg turning gear not engaged; motor link rod disconnected; motor malfunction. | Verify egg tray and motor link rod are correctly assembled. Check for obstructions. |
| Humidity too low | Insufficient water in channels; dry ambient air. | Add more water to the channels. Consider placing a damp sponge in the incubator (away from electrical parts) during lockdown if needed. |
| Humidity too high | Too much water in channels; humid ambient air. | Reduce water in channels. Ensure proper ventilation. |
| Poor hatch rate | Incorrect temperature/humidity; infertile eggs; poor egg quality; improper egg turning. | Review temperature and humidity settings. Candle eggs to check fertility. Ensure eggs are fresh and stored correctly. Verify egg turning function. |
8. Specifications
| Feature | Detail |
|---|---|
| Model Number | JN26 |
| Brand | JANOEL |
| Egg Capacity (Chicken) | 26 Eggs |
| Egg Capacity (Small Birds) | 52 Eggs |
| Power Supply | 100-120V, 50-60Hz |
| Power Consumption | 50W |
| Item Dimensions (LxWxH) | 14.37 x 14.37 x 6.5 inches (36.5 x 36.5 x 16.5 cm) |
| Item Weight | 5.28 pounds (2.4 kg) |
| Features | Automatic Temperature Control, Automatic Egg Turning, Built-in LED Egg Candler, Dual Egg Plate |