
1. Introduction
Thank you for choosing the Haam Electric HMCFL13D8SM 13kg Front Load Washing Machine. This manual provides essential information for the safe and efficient use of your appliance. Please read these instructions carefully before installation and operation, and keep them for future reference.
This washing machine is designed for household use, offering 14 diverse washing programs and high energy efficiency to ensure optimal laundry care with reduced energy consumption and noise.
2. Safety Information
To prevent personal injury or property damage, please observe the following safety precautions:
- Ensure the washing machine is properly grounded to avoid electrical shock.
- Do not allow children to play with or operate the appliance.
- Keep flammable materials away from the machine.
- Do not wash items that have been cleaned, washed, soaked, or spotted with combustible or explosive substances.
- Always unplug the machine before cleaning, maintenance, or if it will be unused for an extended period.
- Do not open the detergent dispenser or door during a wash cycle, especially when the water temperature is high.
- If the power cord is damaged, it must be replaced by the manufacturer, its service agent, or similarly qualified persons to avoid a hazard.
3. Setup and Installation
3.1 Unpacking
Carefully remove all packaging materials. Ensure all transit bolts are removed from the rear of the machine before use. Failure to do so may cause severe vibration and damage.
3.2 Location Requirements
Place the washing machine on a firm, level surface. Avoid direct sunlight or extreme temperatures. Ensure there is adequate space for ventilation and access to water supply and drainage.
3.3 Connecting Water Hoses
Connect the inlet hose to the cold water tap and the corresponding inlet valve on the back of the machine. Ensure all connections are tight to prevent leaks.
3.4 Connecting Drain Hose
Securely attach the drain hose to a standpipe or laundry tub, ensuring it is not kinked or blocked. The end of the drain hose should be positioned at a height between 60 cm and 100 cm from the floor.
3.5 Power Connection
Plug the power cord into a grounded electrical outlet. Do not use extension cords or adapters.
3.6 Leveling the Machine
Adjust the leveling feet at the bottom of the machine until it is perfectly stable and level. Use a spirit level to verify. Proper leveling reduces vibration and noise during operation.
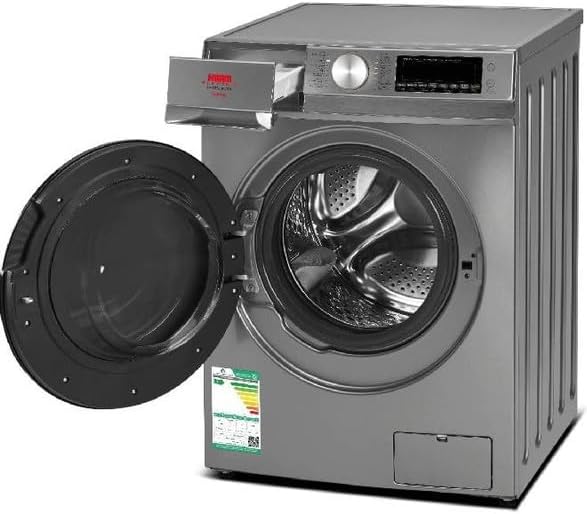
Image: Front-load washing machine with the door open, illustrating the drum and control panel for setup reference.
4. Operating Instructions
4.1 Control Panel Overview
The washing machine features an LED display and push-button controls for easy program selection and setting adjustments. The display shows cycle status, time remaining, and selected options.

Image: Front-load washing machine with the door closed, highlighting the control panel and LED display for user interaction.
4.2 Loading Laundry
Open the door and load laundry into the drum. Do not overload the machine; ensure there is enough space for clothes to tumble freely. Close the door firmly.
4.3 Adding Detergent and Softener
Pull out the detergent dispenser drawer. Add the appropriate amount of detergent to the main wash compartment and fabric softener to its designated compartment. Close the drawer gently.
4.4 Selecting a Wash Program
Turn the program selector knob or press the program buttons to choose one of the 14 available wash programs suitable for your laundry type (e.g., Cotton, Synthetics, Delicates, Quick Wash).
4.5 Adjusting Settings
After selecting a program, you can adjust additional settings such as water temperature, spin speed, or add an extra rinse cycle using the corresponding buttons on the control panel.
4.6 Starting a Cycle
Press the 'Start/Pause' button to begin the selected wash cycle. The machine will automatically fill with water and start washing.
4.7 Pausing/Canceling a Cycle
To pause a cycle, press the 'Start/Pause' button. To cancel a cycle, press and hold the 'Start/Pause' button for a few seconds, or turn the machine off and then on again to select a new program.
4.8 End of Cycle
The machine will signal the end of the cycle. Wait for the door lock to release before opening the door and removing your laundry.

Image: A user interacting with the washing machine, illustrating the practical application of the appliance in a home setting.
5. Maintenance
5.1 Cleaning the Detergent Dispenser
Regularly remove and clean the detergent dispenser drawer to prevent residue buildup. Rinse it under running water and reinsert it.
5.2 Cleaning the Drum
Run a 'Drum Clean' or 'Hot Wash' cycle with no laundry and a descaling agent or white vinegar periodically to remove detergent residue and odors.
5.3 Cleaning the Door Seal
Wipe the rubber door seal after each wash to remove lint, hair, and moisture, preventing mold and mildew growth.
5.4 Cleaning the Drain Pump Filter
Locate the drain pump filter (usually at the bottom front of the machine). Open the cover, drain any residual water, and carefully remove and clean the filter of any debris. Reinstall securely.
5.5 Exterior Cleaning
Wipe the exterior of the machine with a soft, damp cloth. Do not use abrasive cleaners or solvents.
6. Troubleshooting
If you encounter issues, refer to the following table before contacting service.
| Problem | Possible Cause | Solution |
|---|---|---|
| Machine does not start | Power cord unplugged; Door not closed properly; Program not selected; 'Start/Pause' not pressed. | Check power connection; Ensure door is latched; Select a program; Press 'Start/Pause'. |
| No water filling | Water tap closed; Water inlet hose kinked or blocked; Water pressure too low. | Open water tap; Straighten hose; Check household water pressure. |
| Excessive vibration/noise | Transit bolts not removed; Machine not level; Uneven load. | Remove transit bolts; Adjust leveling feet; Redistribute laundry evenly. |
| Water leaks | Inlet/drain hose loose; Detergent dispenser clogged; Drain pump filter loose. | Tighten hose connections; Clean dispenser; Secure drain pump filter. |
| Clothes not clean | Too much/too little detergent; Incorrect program selected; Overloading. | Use correct detergent amount; Select appropriate program; Reduce load size. |
7. Specifications
| Feature | Specification |
|---|---|
| Brand | Haam Electric |
| Model Number | HMCFL13D8SM |
| Capacity | 13 kg |
| Product Dimensions (D x W x H) | 56.5 cm x 59.5 cm x 85 cm |
| Product Weight | 50 kg |
| Color | Silver |
| Finish Type | Metallic Silver |
| Access Location | Front Loading |
| Number of Wash Programs | 14 |
| Control Type | Push Button |
| Special Feature | High Efficiency, Energy Saving, Less Vibration, Less Noise |
| Drum Material | Stainless Steel |
| Energy Efficiency Level | A (Energy Star Compliant) |

Image: Energy Efficiency Label for the washing machine, detailing its energy consumption and performance ratings. For verification, visit sls.gov.sa.
8. Warranty and Support
Your Haam Electric washing machine comes with a standard manufacturer's warranty. Please refer to the separate warranty card included with your purchase for specific terms and conditions, including warranty period and coverage details.
For technical support, service requests, or to inquire about spare parts, please contact Haam Electric customer service. Contact information can typically be found on the warranty card or the official Haam Electric website.
When contacting support, please have your model number (HMCFL13D8SM) and purchase date ready.