
1. Product Overview
This manual provides essential information for the ZTHY 6500mAh Li-ion replacement battery, designed for various Neato Botvac D-series robot vacuum cleaners. Please read these instructions carefully before installation and use to ensure optimal performance and safety.
1.1 Key Features
- Battery Type: Li-ion
- Voltage: 14.4V
- Capacity: 6500mAh (93.6Wh)
- Safety Protections: Built-in over-charge, over-discharge, over-voltage, over-current, and over-heating protection.
1.2 Compatible Models
This battery is compatible with the following Neato Botvac D-series robot vacuum cleaners:
- Neato Botvac D3 Connected (945-0287, 945-0211)
- Neato Botvac D4 Connected (945-0307, 945-0315, 905-0499)
- Neato Botvac D5 Connected (945-0228)
- Neato Botvac D6 Connected (945-0308, 945-0316, 905-0496)
- Neato Botvac D7 Connected (945-0270)
- Neato Botvac D301, D303
- Neato Botvac D502, D503
- Neato Botvac D603
- Neato Botvac D701 (945-0296), D702, D703 (945-0284), D705
Note: This battery is NOT compatible with Neato D8, D9, D10 Series, or Neato Botvac D Series 905-0285 Robot Vacuums.
1.3 Compatible Part Numbers
- 0810841012076
- 205-0011, 205-0013, 205-0028
- 4INR19/65-2
- 945-0225, 945-0266
- 905-0496, 905-0249, 905-0499
2. Setup and Installation
Before installing the new battery, ensure your Neato robot vacuum is powered off and disconnected from its charging base.
- Access Battery Compartment: Locate the battery compartment on your Neato robot vacuum. This is typically on the underside of the unit. Refer to your robot vacuum's original manual for specific instructions on opening the compartment.
- Remove Old Battery: Carefully disconnect the old battery's connector and remove it from the compartment.
- Insert New Battery: Place the ZTHY replacement battery into the compartment, ensuring it fits securely. Connect the battery's plug to the corresponding port in the robot vacuum.
- Close Compartment: Securely close the battery compartment cover.
- Initial Charge: Place the robot vacuum on its charging base. For the first use, the battery may require several charging iterations to reach full capacity. It is normal for the robot vacuum to stop charging and restart during this initial process. Allow it to charge fully before its first cleaning cycle.

The ZTHY 6500mAh replacement battery for Neato D-series robot vacuums, shown with an included screwdriver for installation.
3. Operating Instructions
To maximize the lifespan and performance of your ZTHY replacement battery, follow these operating guidelines:
- Regular Use: Operate your robot vacuum frequently, ideally 2 to 3 times per week, to keep the battery active.
- Charging Base: When not in use, keep the robot vacuum on its charging base. This ensures the battery remains charged and ready for operation. If a charging base is unavailable, ensure the robot vacuum remains powered on.
- Avoid Deep Discharge: Do not allow the battery to completely drain to 0%. If the battery level drops to 5-10%, recharge or shut down the robot vacuum to prevent damage and extend battery life.
- Optimal Charging Environment: Charge the battery in a well-ventilated, dry environment with a temperature between 5°C and 35°C (41°F and 95°F). Avoid charging in high-temperature, humid, or direct sunlight conditions.
- Use Original Charger: Always use the original charger provided with your Neato robot vacuum to ensure compatible voltage and current for safe and efficient charging.
4. Maintenance and Storage
Proper maintenance and storage are crucial for extending the battery's lifespan.
4.1 Battery Maintenance Tips
- Regular Charging: Even if the vacuum cleaner is not in use, charge the battery periodically to prevent performance loss from excessive self-discharge.
- Deep Charge and Discharge Cycle: Every 2-3 months, perform a deep charge-discharge cycle. Fully charge the battery, then use the vacuum until the battery is low (but not completely drained) before recharging. This helps maintain battery activity.
- Clean Contacts: Regularly clean the battery and charger interface to remove dust and debris. This ensures good electrical contact and prevents charging issues or overheating.
- Keep Brushes Clean: Ensure the robot vacuum's brushes are free from excessive hair and debris. A clogged brush can increase power consumption and strain the battery.
4.2 Storage Methods
- Long-Term Storage: If the robot vacuum will not be used for an extended period (e.g., more than 2 weeks), remove the battery after it has been fully charged.
- Storage Environment: Store the battery in a dry, cool place, away from direct sunlight, heat sources, and corrosive gases.
- Periodic Recharging (Storage): If stored for a long time, recharge the battery fully once every 3 months to maintain its performance and prevent degradation.
5. Troubleshooting
This section addresses common issues you might encounter with your replacement battery.
5.1 Battery Not Charging or "batt_deep_discharge" Error
- Initial Charging: As mentioned in Setup, a new battery may require several charging cycles to stabilize. Allow it to charge fully, even if it appears to stop and restart.
- Software Reset: If you encounter a "batt_deep_discharge" error or persistent charging issues, some users have reported success using the Neato Toolio program to issue a "NewBattery" command, followed by hard reboots of the robot vacuum. Consult online forums or Neato support for detailed instructions on using such tools.
- Deeply Discharged Battery (Advanced User Method): If the battery has been completely drained and will not charge (e.g., showing 1% and 0:00 charging time), some users have attempted a 'jumpstart' method. This involves briefly connecting the terminals of the deeply discharged battery to a known working battery using short wires (red to red, black to black) for about one minute. WARNING: This method carries risks and should only be attempted by experienced users with caution. Incorrect handling can cause damage or injury. Proceed at your own risk. After this, reinstall the battery and attempt to charge it normally.
5.2 Reduced Run Time
- Cleaning: Ensure the robot vacuum's brushes and filters are clean. Excessive debris can increase motor strain and reduce battery efficiency.
- Battery Age: Battery performance naturally degrades over time. If the battery is several years old, reduced run time may indicate it's nearing the end of its service life.
- Charging Habits: Review the operating and maintenance sections to ensure proper charging and usage habits are being followed.
6. Specifications
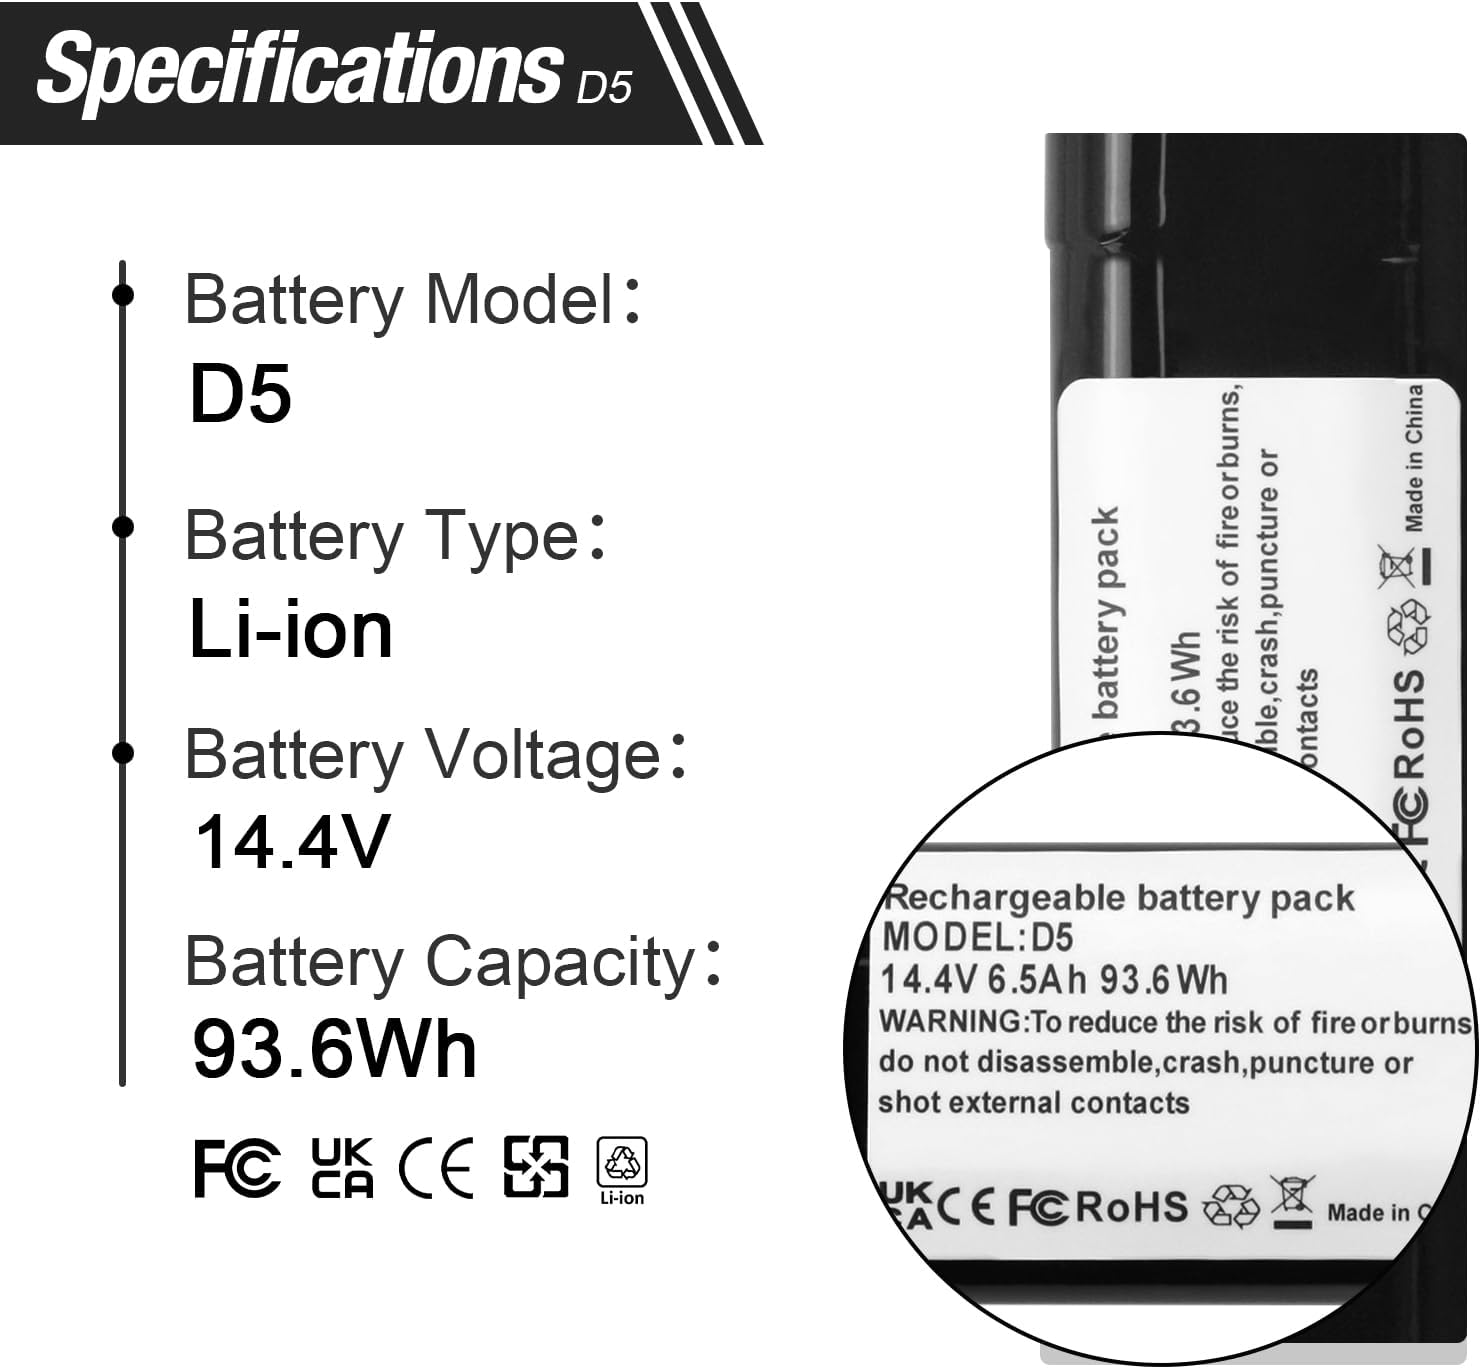
This image provides a close-up of the battery label, detailing its model (D5), type (Li-ion), voltage (14.4V), and capacity (93.6Wh).
| Specification | Value |
|---|---|
| Battery Type | Lithium Ion (Li-ion) |
| Voltage | 14.4V |
| Capacity | 6500mAh (93.6 Wh) |
| Package Dimensions | 8.74 x 2.09 x 2.05 inches |
| Item Weight | 15.8 ounces |
| Manufacturer | Dongguan jiataiyuan electronics Co., Ltd |
| Safety Features | Over-charge, Over-discharge, Over-voltage, Over-current, Over-heating protection |

This image provides a diagram showing the physical dimensions of the ZTHY D5 replacement battery, with measurements of 7.87 inches in length, 1.81 inches in width, and 1.29 inches in height.
7. Warranty and Support
ZTHY provides the following warranty and support for this product:
- Refund Policy: 30 days refund period from the date of purchase.
- Warranty: 6 months warranty against manufacturing defects.
7.1 Contact Support
For any questions, issues, or warranty claims, please contact ZTHY customer support. You can typically find a "Ask a question" link on the product page under the seller's name, "ZTHY TECH".