General Safety Information
Always read and understand all safety warnings, instructions, illustrations, and specifications provided with this power tool. Failure to follow all instructions listed below may result in electric shock, fire, and/or serious injury.
- Work Area Safety: Keep work area clean and well lit. Cluttered or dark areas invite accidents. Do not operate power tools in explosive atmospheres, such as in the presence of flammable liquids, gases, or dust. Power tools create sparks which may ignite the dust or fumes. Keep children and bystanders away while operating a power tool. Distractions can cause you to lose control.
- Electrical Safety: Power tool plugs must match the outlet. Never modify the plug in any way. Do not use any adapter plugs with earthed (grounded) power tools. Unmodified plugs and matching outlets will reduce risk of electric shock. Avoid body contact with earthed or grounded surfaces, such as pipes, radiators, ranges and refrigerators. There is an increased risk of electric shock if your body is earthed or grounded. Do not expose power tools to rain or wet conditions. Water entering a power tool will increase the risk of electric shock.
- Personal Safety: Stay alert, watch what you are doing and use common sense when operating a power tool. Do not use a power tool while you are tired or under the influence of drugs, alcohol or medication. A moment inattention while operating power tools may result in serious personal injury. Use personal protective equipment. Always wear eye protection. Protective equipment such as dust mask, non-skid safety shoes, hard hat, or hearing protection used for appropriate conditions will reduce personal injuries.
- Tool Use and Care: Do not force the power tool. Use the correct power tool for your application. The correct power tool will do the job better and safer at the rate for which it was designed. Disconnect the plug from the power source and/or remove the battery pack, if detachable, from the power tool before making any adjustments, changing accessories, or storing power tools. Such preventive safety measures reduce the risk of starting the power tool accidentally. Store idle power tools out of the reach of children and do not allow persons unfamiliar with the power tool or these instructions to operate the power tool. Power tools are dangerous in the hands of untrained users.
Product Overview

The DEWINNER 1.25HP 800W Compact Wood Router is designed for various woodworking tasks, including slotting, trimming, and carving. It features a powerful motor and a durable construction for reliable performance.
Key Components

This diagram highlights the main parts of the DEWINNER Wood Router for easy identification.
- Power Switch: For turning the tool on and off.
- Cooling Outlet: Ensures proper heat dissipation during operation.
- External Carbon Brush Ports: Allows for easy replacement of carbon brushes.
- Height Adjustment Button: Used to precisely adjust the routing depth.
- Scale: Provides visual indication for depth adjustments.
- Lock Nut: Secures the base in place after depth adjustment.
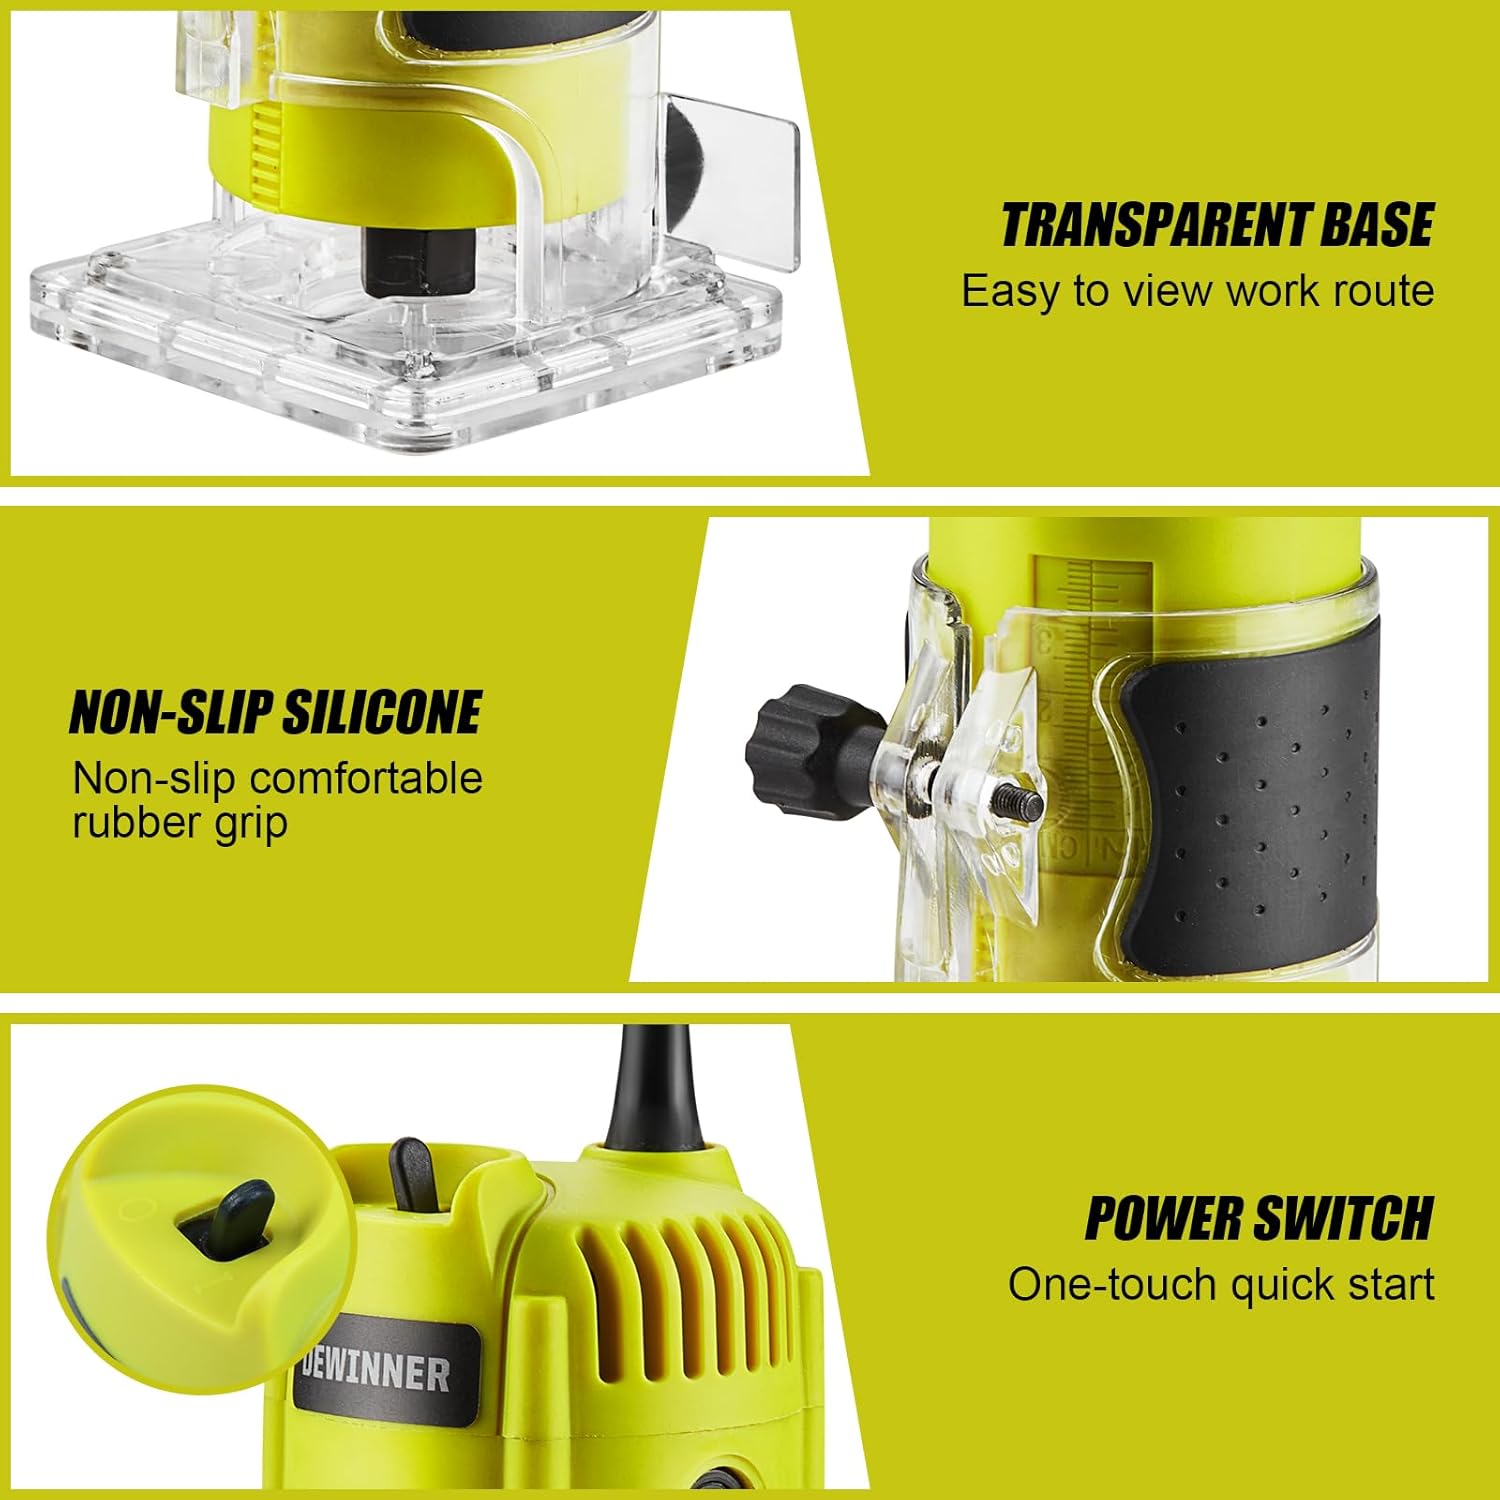
- Transparent Base: Offers clear visibility of the workpiece during operation.
Product Features
- Powerful Motor: 800W pure copper motor with a maximum speed of 35000 RPM for efficient woodworking.
- Stable and Precise Cutting: Features a visible scale and lift knob for easy depth adjustment. Linear guide mode roller ensures stable and straight processing.
- Easy to Operate: Rubberized handles for comfortable grip and replaceable carbon brushes for convenience. Transparent plastic dust cover on the base provides clear visibility.
- Versatile Bit Set: Includes a 15-piece set of precisely machined tungsten carbide blades for various applications like edging, trimming, texturing, and grooving.
- Wide Application: Suitable for wood processing, cabinet processing, plastic sheeting, wood veneer, chamfering, grooving, surface finishing, curve cutting, pattern processing, and DIY projects.
Package Contents

The DEWINNER Wood Router comes with a comprehensive set of accessories to support various woodworking tasks.
- DEWINNER Wood Router Unit
- 15-piece Milling Cutter Set in Wooden Box
- Straight Guide
- Trimming Guide
- Wrenches (2 pcs)
- Transparent Baffle
- Carbon Brush (spare)
Setup and Assembly
1. Installing Router Bits

Proper installation of the router bit is crucial for safe and effective operation.
- Loosen the Chuck: Use the provided wrench to loosen the chuck nut at the base of the router.
- Install the Router Bit: Insert the desired router bit into the collet. Ensure it is fully seated but not bottomed out.
- Tighten the Chuck: Use both wrenches to securely tighten the chuck nut, ensuring the bit is firmly held in place.
Video: This video demonstrates the process of installing a router bit (0:06 - 0:17) and attaching the base to the router.
2. Attaching the Straight Guide

The straight guide helps maintain a consistent distance from the edge of the workpiece for straight cuts.
- Align the straight guide with the slots on the router base.
- Secure the guide using the provided screws or knobs, ensuring it is parallel to the router bit.
- Adjust the guide's position to achieve the desired cutting width.
Video: This video demonstrates the assembly and use of the straight guide (0:44 - 1:06).
3. Attaching the Trimming Guide

The trimming guide is used for precise edge trimming and following curved patterns.
- Attach the trimming guide to the router base, ensuring it can pivot freely.
- Adjust the guide's roller or bearing to follow the edge of your workpiece or template.
- Secure all fasteners to prevent movement during operation.
Video: This video demonstrates the assembly and use of the trimming guide (0:34 - 0:44).
Operating Instructions
Basic Operation
Familiarize yourself with the router's controls for optimal performance and safety.
- Power On/Off: Use the power switch for quick and easy activation.
- Depth Adjustment: Rotate the height adjustment knob to set the desired routing depth, using the visible scale for precision. Secure with the lock nut.
- Grip: Hold the router firmly by its rubberized handles for comfortable and secure operation.
- Visibility: The transparent base allows you to clearly see the cutting area, ensuring accuracy.
Using the Straight Guide

The straight guide is ideal for creating precise linear grooves and edges.
Attach the straight guide as described in the Setup section. Position the router on the workpiece with the guide against the edge. Turn on the router and slowly move it along the desired path, keeping the guide firmly against the edge for a straight and steady cut.
Video: This video demonstrates the use of the straight guide for linear routing (0:31 - 0:34).
Using the Trimming Guide

The trimming guide is excellent for following existing edges or templates, ensuring accurate and smooth finishes.
Attach the trimming guide as described in the Setup section. Place the router on the workpiece with the guide's roller or bearing against the edge to be trimmed. Turn on the router and carefully guide it along the edge, allowing the roller to follow the contour. This method is ideal for chamfering, rounding over, or creating decorative edges.
Video: This video demonstrates the use of the trimming guide for edge routing (0:34 - 0:44).
Circular Cutting

The router can be used with an appropriate attachment (often part of the straight guide assembly) to create perfect circles.
To perform circular cuts, attach the circular cutting accessory to the router base. Determine the radius of your desired circle and adjust the pivot point accordingly. Secure the pivot point to the center of your intended circle on the workpiece. Turn on the router and slowly rotate it around the pivot point, maintaining steady pressure to create a smooth, circular groove or cut-out.
Video: This video demonstrates the setup and execution of circular cutting (1:25 - 1:35).
Typical Applications

The DEWINNER Wood Router is versatile and can be used for a wide range of woodworking projects.
- Wood slotting and grooving
- Arc trimming and edge profiling
- DIY projects and craft carving
- Window and furniture processing
- General trimming and craft production
Maintenance
Regular maintenance ensures the longevity and optimal performance of your DEWINNER Wood Router.
- Cleaning: After each use, disconnect the router from the power source and clean off any sawdust or debris from the tool, especially around the collet and base. Use a soft brush or compressed air.
- Carbon Brushes: Periodically check the carbon brushes for wear. Replace them when they are worn down to approximately 1/4 inch (6mm) or if the motor performance decreases. Refer to the "External Carbon Brush Ports" for easy access.
- Lubrication: The internal components are factory-lubricated and generally do not require additional lubrication.
- Cord Inspection: Regularly inspect the power cord for any signs of damage, cuts, or fraying. Replace damaged cords immediately to prevent electrical hazards.
- Storage: Store the router in a clean, dry place, away from moisture and direct sunlight. Keep it out of reach of children.
Troubleshooting
This section addresses common issues you might encounter with your DEWINNER Wood Router.
| Problem | Possible Cause | Solution |
|---|---|---|
| Router does not start. | No power supply; Faulty power switch; Worn carbon brushes. | Check power outlet and cord. Ensure switch is fully engaged. Replace carbon brushes if worn. |
| Router bit not securing. | Chuck nut not tightened sufficiently; Incorrect bit shank size; Damaged collet. | Ensure chuck nut is fully tightened with wrenches. Use correct 1/4'' shank bits. Inspect and replace collet if damaged. |
| Excessive vibration or poor cut quality. | Dull or damaged router bit; Loose bit; Improper feed rate; Unbalanced workpiece. | Replace or sharpen bit. Ensure bit is securely tightened. Adjust feed rate. Secure workpiece properly. |
| Motor overheating. | Blocked cooling vents; Overloading the tool; Continuous heavy use. | Clean cooling vents. Reduce load on the tool. Allow tool to cool down during prolonged use. |
Specifications
| Feature | Detail |
|---|---|
| Brand | DEWINNER |
| Model Number | DE-T320 |
| Power Source | Corded Electric |
| Voltage | 120 Volts |
| Wattage | 800 Watts (1.25HP) |
| Maximum Rotational Speed | 35000 RPM |
| Collet Size | 1/4 inch |
| Material | Aluminum, Plastic, Metal |
| Item Weight | 5.39 pounds |
| Product Dimensions | 5.7"W x 10"H |
Warranty and Support
DEWINNER products are manufactured to high-quality standards and are warranted against defects in materials and workmanship. For specific warranty details, including duration and coverage, please refer to the warranty card included with your product or visit the official DEWINNER website.
For technical support, troubleshooting assistance, or to inquire about replacement parts, please contact DEWINNER customer service through the following channels:
- Online Support: Visit the DEWINNER Store on Amazon for FAQs and contact information.
- Email: Refer to your product packaging or the DEWINNER website for the most current customer service email address.
Please have your product model number (DE-T320) and purchase date ready when contacting support.


