1. Introduction
Thank you for choosing the ARIEL Stafford 30-inch Bathroom Vanity. This manual provides essential information for the safe and correct installation, operation, and maintenance of your new vanity. Please read all instructions carefully before beginning installation and retain this manual for future reference.

Image 1.1: The ARIEL Stafford 30-inch Bathroom Vanity with Sink.
2. Safety Information
Important Safety Instructions:
- Always use caution when lifting heavy objects. It is recommended to have at least two people assist with the installation of this vanity due to its weight and size.
- Be sure to use appropriate safety gear, such as gloves and safety glasses, when using sharp tools during assembly.
- Keep children and pets away from the installation area to prevent injuries.
- Ensure all electrical and plumbing connections are performed by qualified professionals and comply with local codes.
- This product contains materials known to the State of California to cause cancer and birth defects or other reproductive harm (Proposition 65 warning).
3. Product Components and Dimensions
The ARIEL Stafford 30-inch Bathroom Vanity is constructed from premium solid hardwood and plywood, featuring a 1.5-inch Carrara White Quartz countertop and a single rectangular porcelain sink. It includes two soft-closing doors and one full-extension dovetail drawer.
3.1. What's Included
- Vanity base cabinet (30"W)
- 1.5-inch Carrara White Quartz countertop (30"W)
- Single rectangular porcelain sink (UPC certified)
- Hardware (Brushed Nickel pulls)
- 4-inch backsplash
3.2. What's Not Included
- Faucets
- Mirror
- Drain
- Lights

Image 3.1: Product dimensions and a list of included and not included items.
3.3. Product Dimensions
- Overall Dimensions: 22"D x 30"W x 36"H (height does not include 4" backsplash)
- Item Weight: 219 Pounds
4. Installation Instructions
The vanity arrives fully assembled with an open back for easy plumbing access. Please note that the countertop is not attached to the vanity upon delivery. You will need to attach the sink to the countertop and then the countertop to the vanity cabinet.
4.1. Tools and Materials Needed (Not Included)
- Silicone gun and silicone sealant
- Pencil
- Towel or cloth for cleanup
- Adjustable wrench (for faucet/drain installation)
- Safety glasses and gloves
4.2. Step-by-Step Installation Guide
- Prepare the Sink and Countertop: Place the basin on the bottom of the countertop. Use a pencil to mark the exact position of the basin. Apply a bead of silicone sealant around the top edge of the basin. Carefully flip the basin and place it onto the marked position on the underside of the countertop. Allow 12 to 24 hours for the silicone to dry and cure.
- Secure the Sink: Attach the provided undermount clips to secure the basin firmly to the countertop. Tighten the clips evenly.
- Prepare the Vanity Base: Apply a continuous bead of silicone sealant around the top perimeter of the vanity base cabinet where the countertop will rest.
- Install the Countertop: With assistance, carefully lift the countertop (with the attached sink) and set it in place on top of the vanity base cabinet. Ensure it is properly aligned.
- Install the Backsplash: Apply silicone sealant to the back edge of the countertop and to the back of the backsplash piece. Carefully set the backsplash in place against the wall and countertop.
- Clean Up: Wipe away any excess silicone sealant immediately with a damp cloth.
- Plumbing Connections: Install your chosen faucet and drain according to their respective manufacturer's instructions. Connect the water supply lines and drain pipes. Ensure all connections are watertight.
Video 4.1: Official ARIEL installation guide for a bathroom vanity. This video demonstrates the steps for attaching the sink to the countertop, applying silicone, and setting the countertop and backsplash in place.

Image 4.2: Detail of the solid wood dovetail drawer box, highlighting quality construction.

Image 4.3: The open back design of the vanity cabinet, facilitating plumbing connections.
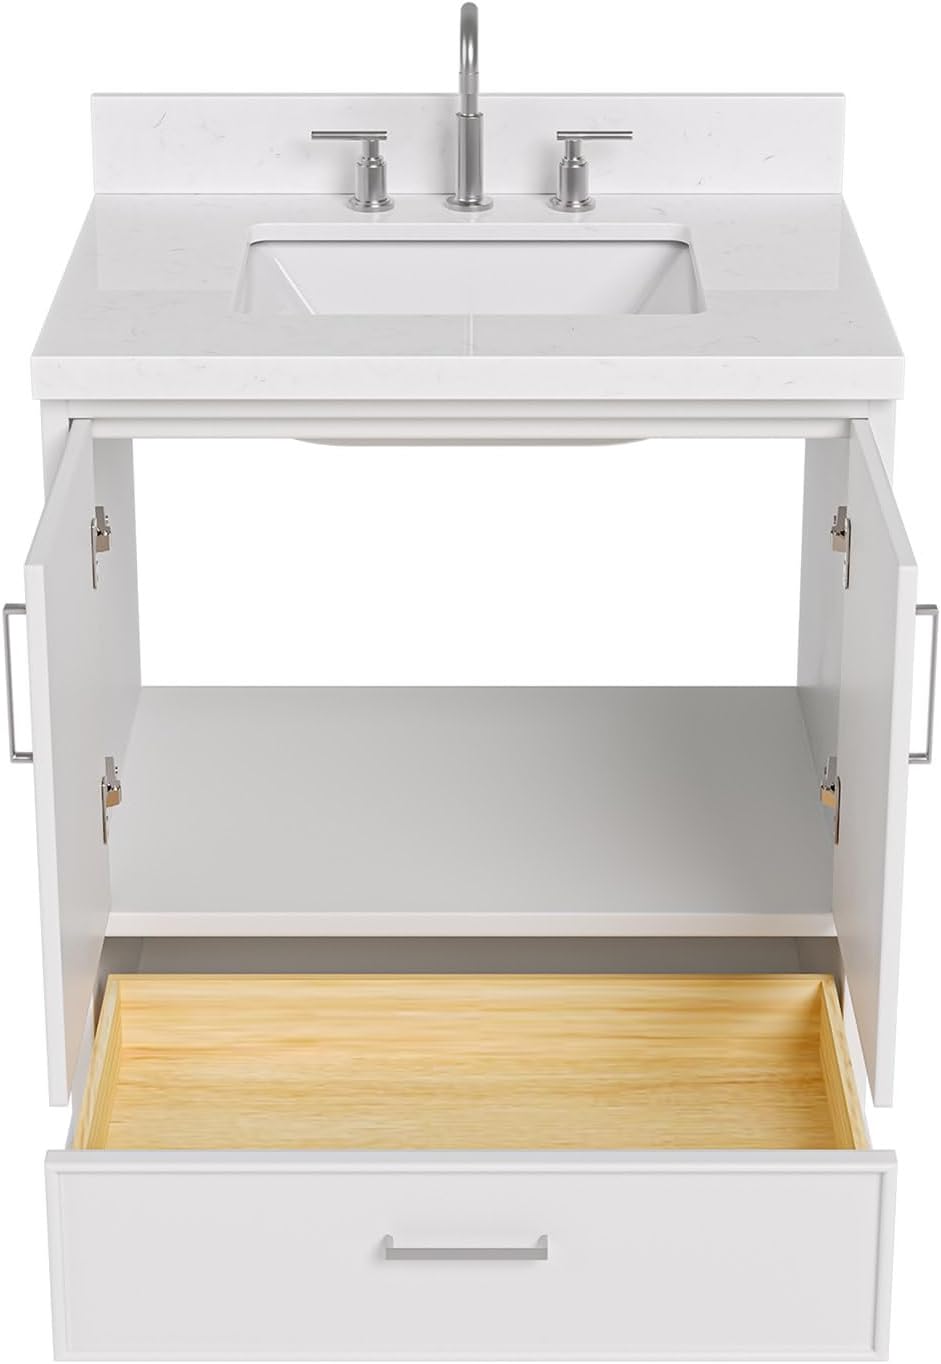
Image 4.4: The vanity with its soft-closing doors open and the full-extension drawer pulled out, showcasing storage capacity.
5. Operation
The ARIEL Stafford vanity is designed for ease of use. The doors and drawer feature soft-closing mechanisms to prevent slamming and ensure quiet operation. Simply push the doors or drawer gently to close them, and the soft-close hinges will engage.

Image 5.1: Brushed Nickel pulls on the soft-closing doors.

Image 5.2: Brushed Nickel pull on the soft-closing drawer.
6. Maintenance and Care
Proper care will ensure the longevity and appearance of your ARIEL Stafford vanity.
- Cleaning the Vanity: Wipe the wood surfaces with a damp cloth. Avoid using abrasive cleaners or harsh chemicals, as these can damage the finish.
- Cleaning the Countertop: The Carrara White Quartz countertop is non-porous and engineered to resist stains and moisture. Clean with a mild soap and water solution. No sealing is required.
- Cleaning the Sink: Clean the porcelain sink with non-abrasive bathroom cleaners. Rinse thoroughly after cleaning.
- Hardware: Periodically check and tighten any loose hardware. Clean Brushed Nickel pulls with a soft, dry cloth.
- Spills: Wipe up spills immediately to prevent water damage, especially on wood surfaces.
7. Troubleshooting
If you encounter any issues with your ARIEL Stafford vanity, please refer to the following common troubleshooting tips:
- Leaking Faucet/Drain: Check all plumbing connections for tightness. Ensure thread seal tape or plumber's putty was used correctly during installation. If leaks persist, consult a professional plumber.
- Drawer/Door Not Closing Softly: Inspect the soft-closing hinges and drawer slides for any obstructions. Ensure they are clean and free of debris. If necessary, adjust the hinges according to their specific instructions (not provided in this manual, refer to hinge manufacturer's guide).
- Wobbling Vanity: The vanity includes hidden leveling feet. Adjust these feet to ensure a stable, wobble-free fit on uneven floors.
- Scratches/Chips on Countertop: While the quartz countertop is durable, extreme impact can cause damage. For minor scratches, specialized quartz repair kits may be available. For significant damage, professional repair or replacement may be necessary.
8. Specifications
| Feature | Detail |
|---|---|
| Brand | ARIEL |
| Model Number | ARL-M030SCQRVOGRY |
| Dimensions (D x W x H) | 22" x 30" x 36" |
| Material | Solid Hardwood and Plywood |
| Countertop Material | 1.5-inch Carrara White Quartz |
| Sink Type | Single Rectangular Porcelain (Undermount, UPC Certified) |
| Faucet Holes | Pre-drilled for 3-hole, 8" widespread faucet |
| Doors | 2 Soft Closing Doors |
| Drawers | 1 Full-Extension Dovetail Drawer |
| Hardware Finish | Brushed Nickel |
| Finish Type | Sherwin-Williams PU coating (Grey) |
| Mounting Type | Floor Mount (Freestanding) |
| Assembly Required | Yes (Countertop and sink attachment) |
9. Warranty and Support
The ARIEL Stafford 30-inch Bathroom Vanity is covered by a 3-year limited warranty. This warranty covers manufacturing defects and ensures the product meets quality standards under normal use and service.
For warranty claims, technical assistance, or any questions regarding your product, please contact ARIEL customer service. Our dedicated support team is available 24/7 to assist you.
Contact Information: Please refer to the contact details provided with your purchase documentation or visit the official ARIEL website for support.