1. Product Overview
The Pissente DDM75S is a single-phase, two-wire active energy meter designed for measuring electricity consumption. It features a compact design, high reliability, and easy installation on a standard 35mm DIN-rail. This meter is suitable for various applications requiring accurate power consumption monitoring.

Figure 1: Front view of the DDM75S Electric Meter.
Key Features:
- Digital Display: Standard 5+1 (99999.1KWh) digital display for clear energy readings.
- Compact Design: Small size and lightweight for easy installation and integration.
- DIN-Rail Mounting: 35mm standard DIN-rail mounting (DIN EN50022 compliant).
- Pulse Output: Standard passive (polar) pulse output, with an option for passive (non-polar) remote pulse output, compatible with AMR systems (IEC 62053-31 and DIN43864 compliant).
- LED Indicators: Dual-color LEDs indicate power status (green) and energy pulse (red).
- Measurement: Accurate measurement of single-phase two-wire active energy consumption, independent of load current direction (IEC 62053-21 compliant).
- Wiring: Direct connection with two wiring methods: standard S-type and optional U-type.
2. Safety Information
Please read and understand all safety instructions before installing or operating the DDM75S Electric Meter. Failure to follow these instructions may result in electric shock, fire, or personal injury.
- Qualified Personnel: Installation and maintenance should only be performed by qualified electricians or personnel with appropriate electrical training.
- Power Disconnection: Always disconnect power to the circuit before installing, wiring, or performing any maintenance on the meter. Verify that the power is off using a voltage tester.
- Proper Wiring: Ensure all wiring connections are secure and comply with local electrical codes and standards. Incorrect wiring can lead to malfunction or hazards.
- Environmental Conditions: Do not install the meter in environments with excessive moisture, dust, corrosive gases, or extreme temperatures outside its specified operating range.
- Damage Inspection: Before installation, inspect the meter for any signs of damage. Do not install a damaged meter.
- Terminal Covers: Always ensure the terminal covers are securely in place after wiring to prevent accidental contact with live parts.
3. Installation
3.1 DIN-Rail Mounting
The DDM75S Electric Meter is designed for easy installation on a standard 35mm DIN-rail, conforming to DIN EN50022. To mount the meter:
- Ensure the DIN-rail is securely fastened within the electrical enclosure.
- Align the meter's DIN-rail clip (located on the back) with the top edge of the DIN-rail.
- Press the meter firmly downwards until it clicks into place on the rail.
- Verify that the meter is securely attached and does not wobble.

Figure 2: Back view showing the DIN-rail mounting clip.
3.2 Wiring Instructions
The meter supports direct connection with two wiring methods: standard S-type and optional U-type. Always ensure power is disconnected before wiring.
- Identify the Live (L) and Neutral (N) input and output terminals on the meter.
- Connect the incoming Live (L) wire to the L input terminal.
- Connect the incoming Neutral (N) wire to the N input terminal.
- Connect the outgoing Live (L) wire to the L output terminal.
- Connect the outgoing Neutral (N) wire to the N output terminal.
- Ensure all connections are tight and secure to prevent loose contacts and overheating.
- After wiring, replace the terminal covers to ensure safety.

Figure 3: Wiring diagram with L and N input/output.
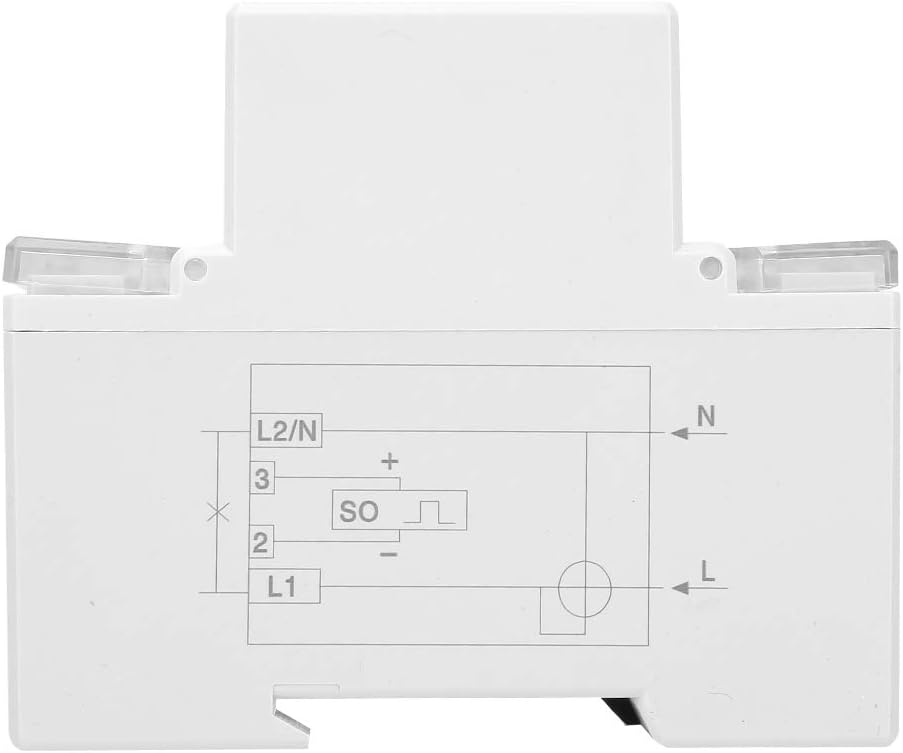
Figure 4: Side view showing integrated wiring diagram.
4. Operation
4.1 Reading the Display
The DDM75S meter features a 5+1 digit mechanical display, indicating energy consumption in kilowatt-hours (KWh). The first five digits represent whole kilowatt-hours, and the last digit (after the decimal point) represents tenths of a kilowatt-hour.
- Example: A display showing 00000.1 KWh indicates 0.1 kilowatt-hours of consumption.
- The display automatically rolls over after reaching its maximum value (99999.9 KWh).
4.2 LED Indicators
The meter is equipped with two LED indicators on the front panel:
- POWER (Green LED): This LED illuminates when the meter is receiving power, indicating normal operation.
- PULSE (Red LED): This LED flashes to indicate energy consumption. Each flash corresponds to a specific amount of energy (e.g., 1600 imp/KWh), as specified on the meter's faceplate. A faster flash rate indicates higher power consumption.
4.3 Pulse Output
The DDM75S provides a pulse output for remote monitoring and integration with AMR (Automatic Meter Reading) systems. The standard configuration is a passive (polar) pulse output. A passive (non-polar) remote pulse output can also be selected, offering flexibility for various system requirements. Refer to the meter's specifications for pulse constant (e.g., 1600 imp/KWh).
5. Maintenance
The DDM75S Electric Meter is designed for long-term, maintenance-free operation. However, periodic checks can help ensure its continued accuracy and safety.
- Cleaning: Gently wipe the meter's exterior with a soft, dry cloth. Do not use abrasive cleaners, solvents, or liquids that could damage the casing or internal components.
- Connection Check: Periodically inspect wiring connections for tightness and signs of corrosion or overheating. Ensure terminal covers are secure.
- Environmental Check: Ensure the installation environment remains free from excessive moisture, dust, and extreme temperatures.
- Damage Inspection: If the meter appears damaged or is not functioning correctly, disconnect power immediately and contact a qualified electrician or the manufacturer for assistance. Do not attempt to repair the meter yourself.
6. Troubleshooting
If you encounter issues with your DDM75S Electric Meter, refer to the following troubleshooting guide:
- No Display/No Power LED:
- Check if the main power supply to the circuit is active.
- Verify all wiring connections (L and N inputs) are correct and secure.
- Ensure the voltage supply is within the meter's specified operating range (220V/230V).
- Pulse LED Not Flashing (but Power LED is on):
- Check if there is any electrical load connected and drawing power through the meter. The pulse LED will only flash when energy is being consumed.
- Ensure the load is functioning correctly.
- Incorrect Readings:
- Verify that the wiring connections are correct according to the diagram (L and N inputs/outputs). Incorrect wiring can lead to inaccurate measurements.
- Ensure the meter is installed in a stable environment, free from strong electromagnetic interference.
- Physical Damage:
- If the meter shows signs of physical damage, discontinue use immediately.
- Contact the seller or a qualified technician for inspection and replacement.
For issues not resolved by the above steps, please contact the manufacturer or your supplier for further assistance.
7. Specifications
| Parameter | Value |
|---|---|
| Model | DDM75S |
| Voltage Specification | 220V/230V 50/60Hz |
| Current Specifications | 10(40)A |
| Insulation Performance | AC voltage 4KV, 1 minute; 1.2/50us waveform impulse voltage 6KV |
| Display Mode | (5+1) Digital Display |
| Installation Method | 35mm DIN-rail installation |
| Pulse Constant | 1600 imp/KWh |
| Weight | 246 g / 8.7 oz (approx.) |
| Dimensions (Package) | 4.33 x 3.15 x 3.15 inches |
| Standards Compliance | IEC 62053-21, IEC 62053-31, DIN43864, DIN EN50022, DIN43880 |
8. Warranty and Support
For warranty information, technical support, or service inquiries regarding your Pissente DDM75S Electric Meter, please contact the retailer or the manufacturer directly. Keep your purchase receipt as proof of purchase for any warranty claims.
Please refer to the official Pissente website or your product packaging for the most up-to-date contact information and warranty terms.