1. Introduction
This manual provides detailed instructions for the installation, operation, and maintenance of your TORAKIND Dual Dash Cam. Please read this manual thoroughly before using the product to ensure proper functionality and safety. Keep this manual for future reference.
2. Safety Information
- Do not operate the dash cam while driving. Adjust settings only when the vehicle is safely parked.
- Ensure the dash cam is securely mounted and does not obstruct the driver's view or interfere with vehicle controls.
- Avoid exposing the device to extreme temperatures, direct sunlight for prolonged periods, or excessive moisture.
- Use only the provided power cable and accessories to prevent damage or fire.
- Keep the device away from children.
- Regularly check the mounting to ensure it remains firm.
3. Package Contents
Verify that all items are present in the package:
- TORAKIND Dash Cam Main Unit
- Rear Camera
- Suction Cup Mount
- 32GB SD Card
- Power Cable (Car Charger)
- Rear Camera Cable
- User Manual (Japanese)

Image: Main dash cam unit, rear camera, suction mount, and 32GB SD card.
4. Product Overview
The TORAKIND Dash Cam features a compact design with a 3-inch LCD screen and intuitive controls. It includes a front camera with a Sony sensor and a rear camera for comprehensive coverage.

Image: Front view of the dash cam, showing the lens and screen.
Key Features:
- High Resolution: 1296P Full HD video recording.
- Dual Cameras: Front and rear cameras for complete vehicle surveillance.
- Wide Angle: 170-degree ultra-wide-angle lens for broad coverage.
- Sony Sensor: Equipped with a Sony image sensor for enhanced image quality.
- HDR/WDR Technology: Improves image clarity in varying light conditions, such as bright sunlight or low-light environments.
- 3-inch LCD Screen: Allows for easy setup, live view, and playback directly on the device.
- Included SD Card: Comes with a 32GB high-durability SD card.
- Safety Features: Overcharge, overvoltage, overcurrent, short circuit, and high-temperature protection.

Image: Overview of the 2025 improved model's features.
5. Setup
5.1. Mounting the Front Camera
- Clean the windshield area where you intend to mount the dash cam.
- Attach the suction cup mount to the windshield, ensuring it does not obstruct your view.
- Secure the dash cam main unit to the mount.
5.2. Connecting the Rear Camera
- Mount the rear camera on the rear windshield or license plate area.
- Route the rear camera cable from the rear of the vehicle to the front dash cam unit. Conceal the cable along the vehicle's trim for a neat installation.
- Connect the rear camera cable to the designated port on the main dash cam unit.
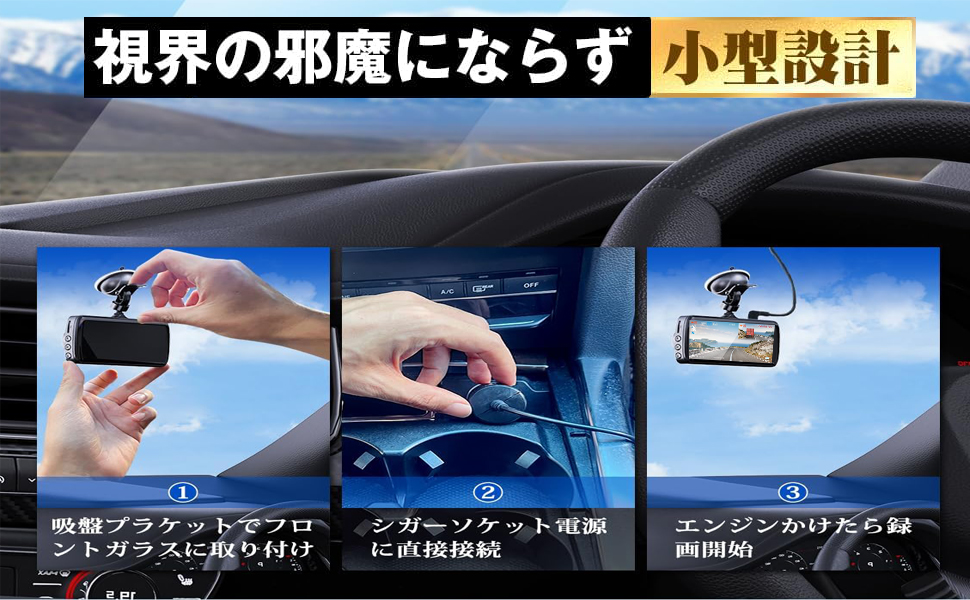
Image: Installation steps for the dash cam.
5.3. Power Connection
- Connect the provided car charger to the dash cam's power input port.
- Plug the other end of the car charger into your vehicle's cigarette lighter socket.
- The dash cam will automatically power on and begin recording when the vehicle's engine starts.
5.4. SD Card Insertion
- Ensure the dash cam is powered off.
- Insert the provided 32GB SD card into the SD card slot until it clicks into place.
- To remove, gently push the SD card until it pops out.
6. Operating Instructions
6.1. Basic Recording
The dash cam automatically starts recording when powered on. Video files are saved in segments to the SD card. When the SD card is full, the oldest files will be overwritten by new recordings (Loop Recording).
6.2. Emergency Recording (G-Sensor)
The built-in G-sensor detects sudden impacts or collisions. When triggered, the current video segment will be locked and protected from being overwritten, ensuring critical footage is saved.
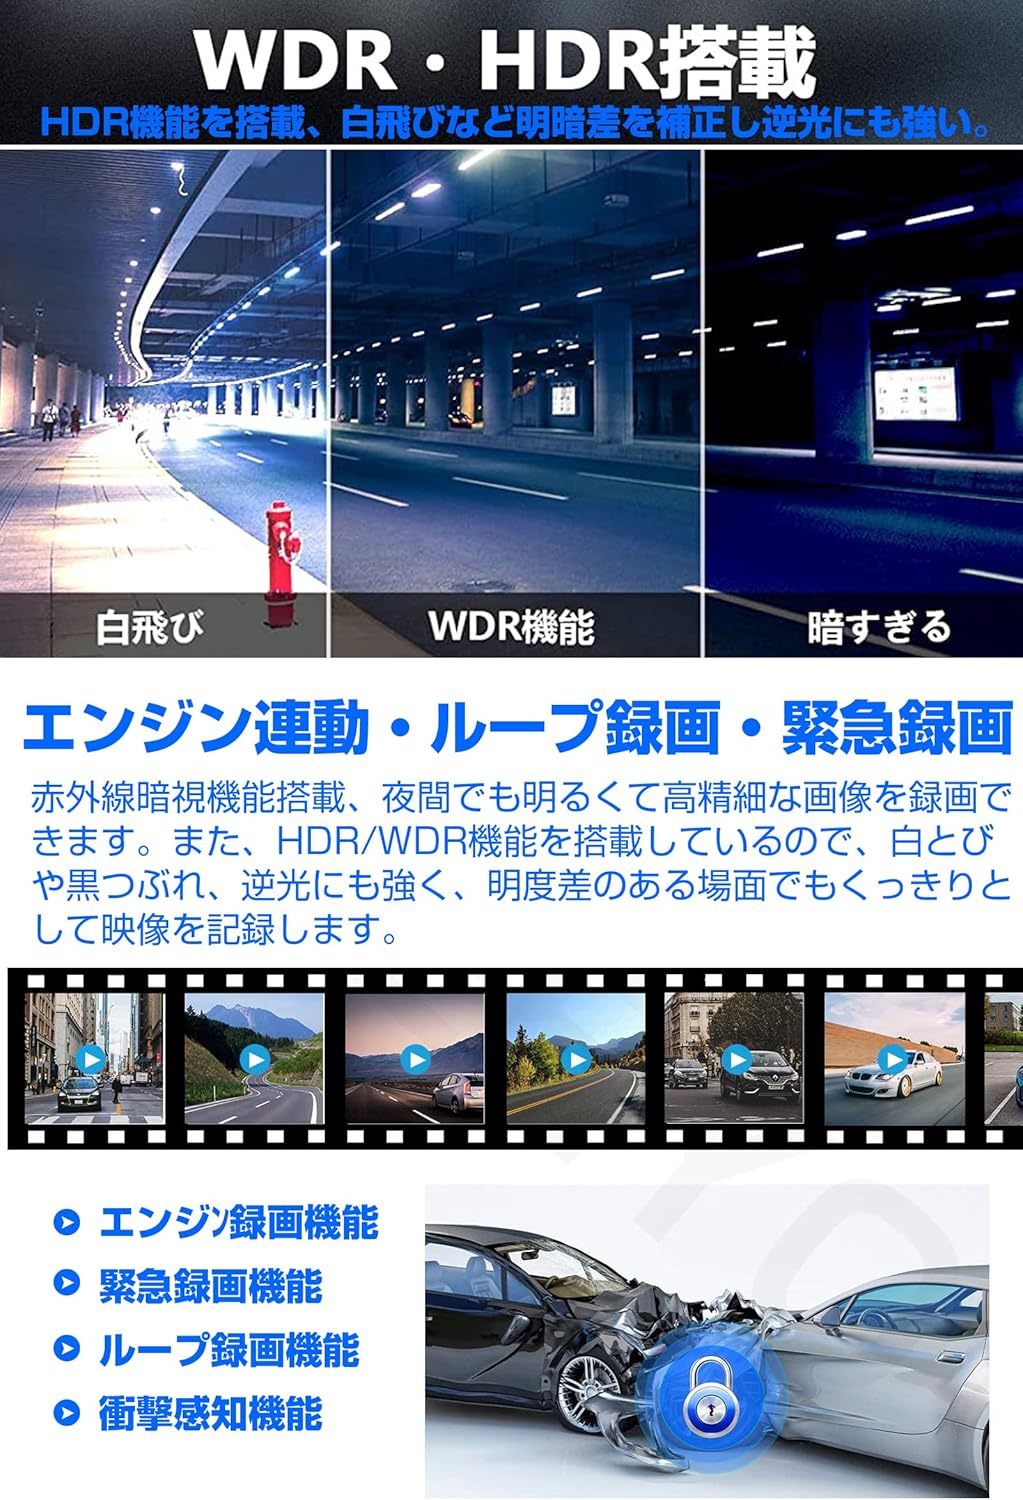
Image: Recording functions including emergency recording.
6.3. Parking Monitoring
When the vehicle is parked, the dash cam can monitor for impacts or motion. This feature requires a continuous power supply (e.g., hardwire kit, not included) to function for extended periods.
6.4. Night Vision and HDR/WDR
The dash cam utilizes HDR (High Dynamic Range) and WDR (Wide Dynamic Range) technology, along with a Sony sensor and F1.8 lens, to provide clear video footage in low-light conditions and to balance exposure in scenes with high contrast.

Image: HDR function improving video clarity in challenging light conditions.
6.5. Smartphone App Connectivity (Wi-Fi)
The dash cam supports Wi-Fi connectivity, allowing you to connect your smartphone via a dedicated app. This enables real-time viewing, video playback, and downloading of recorded footage to your phone.
Video: Demonstrates how to connect the dash cam to a smartphone via Wi-Fi using the app.
6.6. GPS Functionality
When an external GPS module (not included) is connected, the dash cam can record location and speed data. This information can be viewed during video playback on a compatible player, providing crucial evidence for insurance claims or incident reconstruction.
Video: Illustrates how location and speed data are displayed when an external GPS module is connected.
7. Maintenance
7.1. SD Card Formatting
It is recommended to format the SD card regularly (e.g., once a month) to ensure optimal performance and prevent data corruption. Formatting can be done through the dash cam's menu settings.
7.2. Cleaning
Use a soft, dry cloth to clean the dash cam lens and screen. Do not use abrasive cleaners or solvents. Keep the lens free from dust and smudges for clear recordings.
7.3. Firmware Updates
Periodically check the manufacturer's website for available firmware updates. Updates can improve performance, add new features, or fix bugs. Follow the instructions provided with the firmware update carefully.
8. Troubleshooting
| Problem | Possible Cause | Solution |
|---|---|---|
| Dash cam does not power on. | No power supply; faulty cable. | Check power connection to the cigarette lighter. Ensure the vehicle's ignition is on. Try a different power source or cable. |
| Recording stops unexpectedly. | SD card full or corrupted; faulty SD card. | Format the SD card. Replace the SD card if the issue persists. Use a high-speed (Class 10 or U3) SD card. |
| Poor video quality. | Dirty lens; protective film on lens; incorrect resolution settings. | Clean the lens. Remove any protective film. Check video resolution settings in the menu. |
| Rear camera not working. | Loose cable connection; faulty rear camera. | Ensure the rear camera cable is securely connected to both the main unit and the rear camera. |
| Wi-Fi connection issues. | Incorrect Wi-Fi password; app permissions. | Verify the Wi-Fi password (default is usually 12345678). Check app permissions on your smartphone. |
9. Specifications
| Feature | Detail |
|---|---|
| Brand | TORAKIND |
| Model Number | SKU TORAKINDB0CSKT6DRR |
| Video Resolution | 1296P (Front), 1080P (Rear) |
| Image Sensor | Sony Sensor (IMX307) |
| Display Screen | 3.0-inch LCD |
| Field of View | 170 degrees (Front) |
| Lens Aperture | F1.8 |
| Video Features | HDR/WDR, Loop Recording, Emergency Recording (G-Sensor), Motion Detection, Night Vision |
| Storage | Supports up to 32GB SD Card (included) |
| Connectivity | Wi-Fi (for app connection), Optional External GPS Module |
| Power Source | Car Charger (12V/24V compatible) |
| Dimensions | 9 x 8.3 x 3.5 cm |
| Weight | 340 g |
| Operating Temperature | -10°C to 60°C (14°F to 140°F) |

Image: Dash cam operating in extreme temperatures.
10. Warranty and Support
For warranty information and customer support, please refer to the contact details provided on the product packaging or the official TORAKIND website. Keep your purchase receipt as proof of purchase for warranty claims.