Sailnovo *ONLD005370_US_BL
Sailnovo 24 Eggs Incubator User Manual
Model: *ONLD005370_US_BL
Product Overview
The Sailnovo 24 Eggs Incubator is designed for efficient and controlled hatching of various poultry eggs. It features automatic temperature control, humidity display, automatic egg turning, and a built-in egg candler to support a successful incubation process.

Image: The Sailnovo 24 Eggs Incubator, showcasing its transparent lid and egg tray filled with eggs. The control panel is visible at the top.
Package Contents
Before beginning, please ensure all components are present and undamaged.
- Sailnovo 24 Eggs Incubator Unit
- Power Adapter
- Instruction Manual
- Water Bottle/Sprayer
- Incubation Progress Chart

Image: All components of the Sailnovo 24 Eggs Incubator package, including the main unit, power adapter, instruction manual, water bottle, and incubation chart.
Setup Instructions
- Unpacking: Carefully remove all components from the packaging. Retain the original packaging for future storage or transport.
- Placement: Place the incubator on a stable, level surface away from direct sunlight, drafts, or extreme temperature fluctuations. Ensure adequate ventilation around the unit.
- Power Connection: Connect the power adapter to the incubator and then plug it into a suitable electrical outlet. The display should illuminate.
- Pre-heating: Allow the incubator to pre-heat for at least 2-4 hours before placing eggs inside. This stabilizes the internal temperature and humidity.
Operating the Incubator
Temperature Control
The incubator features a smart airflow system to maintain stable internal temperatures. The LED display shows the current temperature. You can adjust settings in Manual Mode.

Image: Illustration of the incubator's internal airflow system, demonstrating how warm and cold air are circulated to maintain a stable temperature.
Hatching Modes
The Sailnovo incubator offers three automatic modes for common poultry and a manual mode for custom settings.
- Chicken Mode: Preset for chicken eggs (approx. 21 days incubation).
- Duck Mode: Preset for duck eggs (approx. 28 days incubation).
- Quail Mode: Preset for quail eggs (approx. 18 days incubation).
- Manual Mode: Allows for custom temperature and humidity settings for other egg types or specific requirements.

Image: The incubator's control panel displaying options for Chicken, Duck, Quail, and Manual incubation modes, along with quick menu buttons.
Humidity Management
Real-time humidity data is displayed on the LED screen. Humidity can be adjusted by adding water via the external water pot and by using the grey air vent.
- Adding Water: Use the provided external water pot to add water to the designated channels (A and B) without disturbing the eggs.
- Grey Air Vent: During incubation, if the humidity displayed is too low or too high, adjust by opening or closing the grey air vent. It is recommended to keep the grey air vent closed from Day 1 until the last 3 days before hatch day.

Image: A close-up of the incubator's side, illustrating the external water inlet and recommended humidity ranges for different incubation stages (55-60% for first 18 days, 70-80% for last 3 days).
Video: A short demonstration on how to adjust humidity using the grey air vent on the Sailnovo incubator. This shows the physical action of opening and closing the vent.
Automatic Egg Turning
The incubator automatically rotates eggs every 2 hours to prevent embryo sticking and promote healthy development. This function automatically stops 3 days before the expected hatch date.
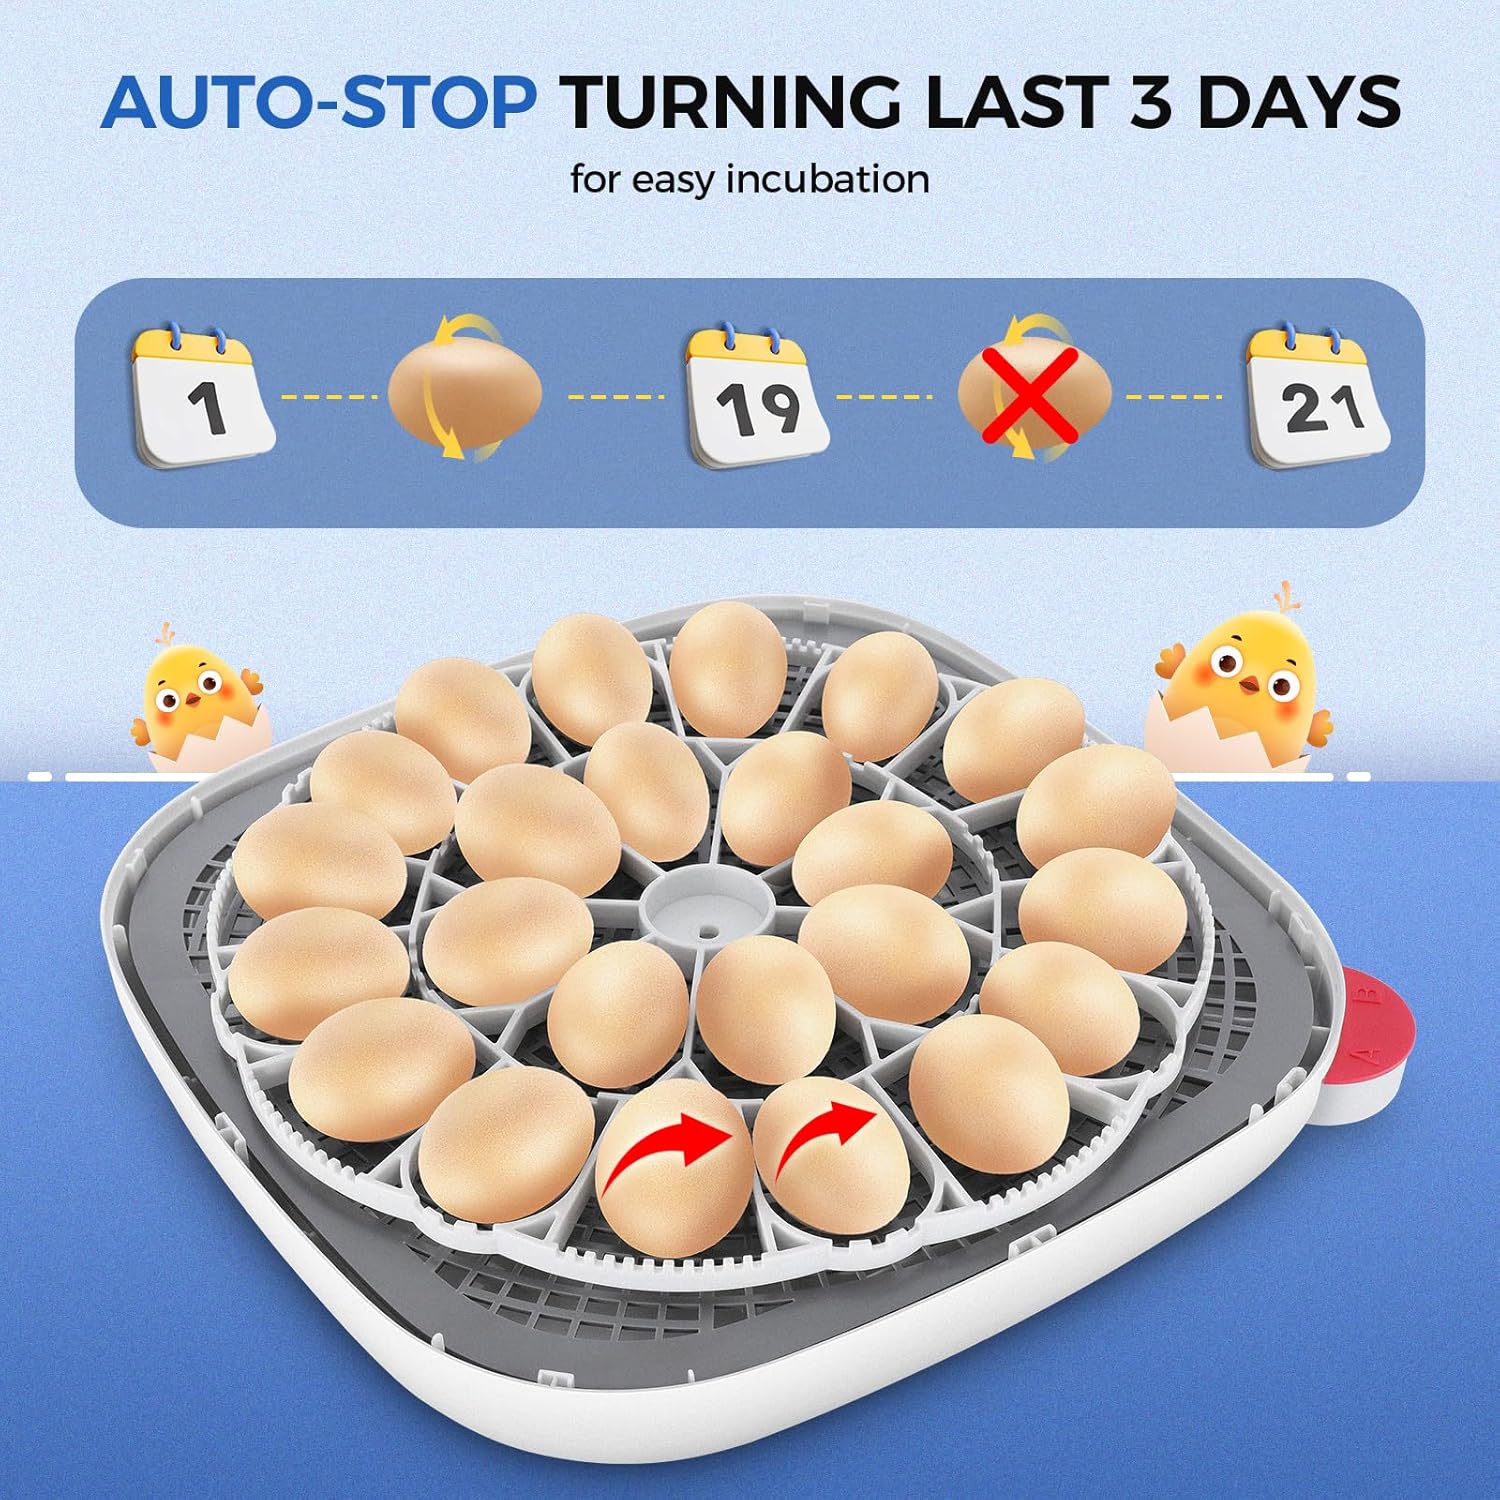
Image: An illustration depicting the automatic egg turning mechanism and the auto-stop feature that activates 3 days prior to hatching, indicated by calendar icons.
Built-in Egg Candler
The integrated egg candler allows you to observe the development of the embryo without needing an external device. This feature is crucial for monitoring progress and identifying infertile eggs.

Image: The built-in egg candler in action, showing an egg illuminated from below to reveal the developing embryo at different stages (Day 1, Day 7, Day 14, Day 19).
Maintenance
Cleaning
Regular cleaning is essential for hygiene and optimal performance. Disconnect the power before cleaning.
- Wipe down all surfaces with a damp cloth and mild disinfectant after each incubation cycle.
- Ensure all parts are completely dry before reassembly or storage.
- Do not immerse the main unit or electrical components in water.
Storage
Store the incubator in a cool, dry place, away from direct sunlight and extreme temperatures. It is recommended to store it in its original packaging to protect it from dust and damage.
Troubleshooting
| Problem | Possible Cause | Solution |
|---|---|---|
| Temperature/Humidity readings are inaccurate. | Sensor malfunction or environmental factors. |
|
| Buttons are unresponsive or modes cannot be switched. | Software glitch or button malfunction. |
|
| Egg turning mechanism not working. | Motor issue or obstruction. |
|
| Candling light not illuminating. | LED failure or electrical issue. |
|
Specifications
- Product Dimensions: 13.9 x 8 x 13.9 inches
- Item Weight: 8.13 pounds
- Model Number: *ONLD005370_US_BL
- Capacity: 24 standard chicken eggs (varies by egg size)
- Power Input: (Refer to power adapter label for specific voltage/amperage)
Warranty and Support
For warranty information, technical support, or service inquiries, please refer to the contact details provided in your product packaging or visit the official Sailnovo website. Keep your purchase receipt as proof of purchase.
Sailnovo Customer Service: Please refer to the contact information provided with your product or on the manufacturer's official website.
Related Documents - *ONLD005370_US_BL
 |
VEVOR M12H Poultry Incubator User Manual Comprehensive user manual for the VEVOR M12H Poultry Incubator, providing detailed instructions on setup, operation, maintenance, and troubleshooting for hatching various types of poultry eggs. |
 |
VEVOR CR400 Poultry Incubator User Manual User manual for the VEVOR CR400 Poultry Incubator, providing setup instructions, operating procedures, safety precautions, and incubation tips for various bird species. |
 |
VEVOR NLF64-5280 Incubator User Manual - Hatching Eggs Guide Comprehensive user manual for the VEVOR NLF64-5280 automatic egg incubator. Learn about setup, operation, temperature and humidity control, egg turning, safety precautions, and troubleshooting for hatching poultry eggs. |
 |
Auveach Household Intelligent Incubator Operating Manual (16-Egg Capacity) This operating manual provides detailed instructions for the Auveach 16-egg household intelligent incubator. It covers egg preparation, incubator setup, operation, temperature and humidity control, egg turning, troubleshooting, and specific incubation parameters for chicken, duck, goose, and pigeon eggs. |
 |
Automatic Egg Incubator User Manual - Setup, Operation, and Incubation Guide Comprehensive user manual for the Automatic Egg Incubator, covering installation, operation, temperature and humidity control, incubation steps for various poultry eggs, and technical specifications. |
 |
Buile GRID M12 Automatic Egg Incubator User Manual Comprehensive user manual for the Buile GRID M12 automatic egg incubator. Learn about setup, operation, control features, hatching tips, and maintenance for hatching chicken, duck, goose, and quail eggs. |
Ask a question about this manual
Ask about setup, troubleshooting, compatibility, parts, safety, or missing instructions. Manuals+ will review the question and use this page’s manual context to help answer it.