EONON X3PLUS
Eonon Double Din Car Stereo X3PLUS Instruction Manual
Model: X3PLUS
1. Introduction
This manual provides comprehensive instructions for the installation, setup, operation, and maintenance of your Eonon Double Din Car Stereo X3PLUS. Please read this manual thoroughly before using the product to ensure proper functionality and safety.

Figure 1.1: Eonon Double Din Car Stereo X3PLUS showcasing the Apple CarPlay interface.
2. Safety Information
Always prioritize safety. Improper installation or operation can lead to damage or injury. Observe the following precautions:
- Ensure the vehicle's power is disconnected before installation.
- Consult a professional for installation if you are unsure about any steps.
- Do not operate the device in a manner that distracts you from driving.
- Avoid exposing the unit to extreme temperatures, moisture, or direct sunlight for prolonged periods.
- Use only specified accessories and parts.
3. What's in the Box
Verify that all components are present before beginning installation:
- Eonon Double Din Car Stereo X3PLUS Unit
- Power Cable
- External Microphone
- Parking Brake Signal Wire
- 10A Fuse
- Screws (8 pieces)
- User Manual
- (Optional: Eonon A0125 AHD backup camera, if included with purchase)

Figure 3.1: Included accessories and main unit for the X3PLUS.
4. Installation
The Eonon X3PLUS is designed for double din dashboards. Before installation, measure your dashboard opening. If it is approximately 178mm in width and 100mm in height, and your car has an ISO connector, direct installation is possible. Otherwise, an additional mounting kit or wire harness may be required.
4.1. Dashboard Compatibility

Figure 4.1: Dashboard measurement guide for X3PLUS installation.
If your dashboard dimensions differ from the standard 178mm x 100mm, an extra installation kit (not included) will be necessary. Ensure your car's factory radio uses an ISO connector for direct compatibility with the provided power cable. If not, an adapter cable (not included) will be needed.
4.2. Wiring Diagram
Refer to the following diagram for proper wiring connections. Ensure all connections are secure to prevent malfunctions.

Figure 4.2: Wiring connections for the X3PLUS unit.
Key connections include: ISO Port, GND (Ground), SWC (Steering Wheel Control) wires, Reverse Trigger Wire, USB Ports (for CarPlay and charging), External Microphone, Backup Camera Input, Subwoofer Output, Video Input/Output, Audio Input/Output, and Radio Antenna Input.
4.3. Screen Panel Removal (if needed)
In some installation scenarios or for maintenance, it may be necessary to remove the screen panel. Follow these steps:
Video 4.1: This video demonstrates how to safely remove the screen panel of the Eonon X3PLUS car radio. This process involves releasing clips and disconnecting the screen cable.
To remove the screen panel, pull the two clips on the back of the screen outwards on both sides, then lift the screen upwards. Unscrew the screws on the cable fixing clip and remove the clip. Carefully remove the clip that secures the screen cable and pull the screen cable out of the panel. Reassembly is the reverse of these steps.
5. Initial Setup and Configuration
5.1. Display Settings
The 10.1-inch QLED display offers a vibrant 1280x720 resolution. You can adjust the screen for optimal viewing angles.

Figure 5.1: QLED display features including resolution and viewing angles.
5.2. Audio Settings (DSP)
The unit features a built-in DSP (Digital Signal Processor) for enhanced audio. Customize your sound experience using the 16-band graphic equalizer and 7 EQ modes.

Figure 5.2: Audio customization options with DSP.
5.3. Steering Wheel Control Setup
To enable steering wheel controls, navigate to the settings menu on the head unit. This unit supports analog SWC signals. Follow the on-screen prompts to map your steering wheel buttons to the stereo functions.
Video 5.1: This video provides a step-by-step guide on how to set up steering wheel controls for the Eonon car stereo, including wiring and programming the buttons.
5.4. Wireless Apple CarPlay Setup
Connect your iPhone wirelessly to the X3PLUS for Apple CarPlay functionality. Ensure Wi-Fi and Bluetooth are enabled on your iPhone.
Video 5.2: This video demonstrates the process of setting up wireless Apple CarPlay with the Eonon car stereo, showing the necessary phone and head unit settings.
5.5. Wireless Android Auto Setup
Connect your Android phone wirelessly to the X3PLUS for Android Auto functionality. Ensure your phone supports 5GHz Wi-Fi for wireless connection and that Wi-Fi and Bluetooth are enabled.
Video 5.3: This video guides users through the setup of wireless Android Auto on the Eonon car stereo, detailing the steps for phone pairing and connection.
6. Operating Instructions
6.1. Apple CarPlay & Android Auto
Once connected, you can access navigation, messaging, calls, and music directly from the stereo's QLED display. Both wireless and wired (via USB) options are available.
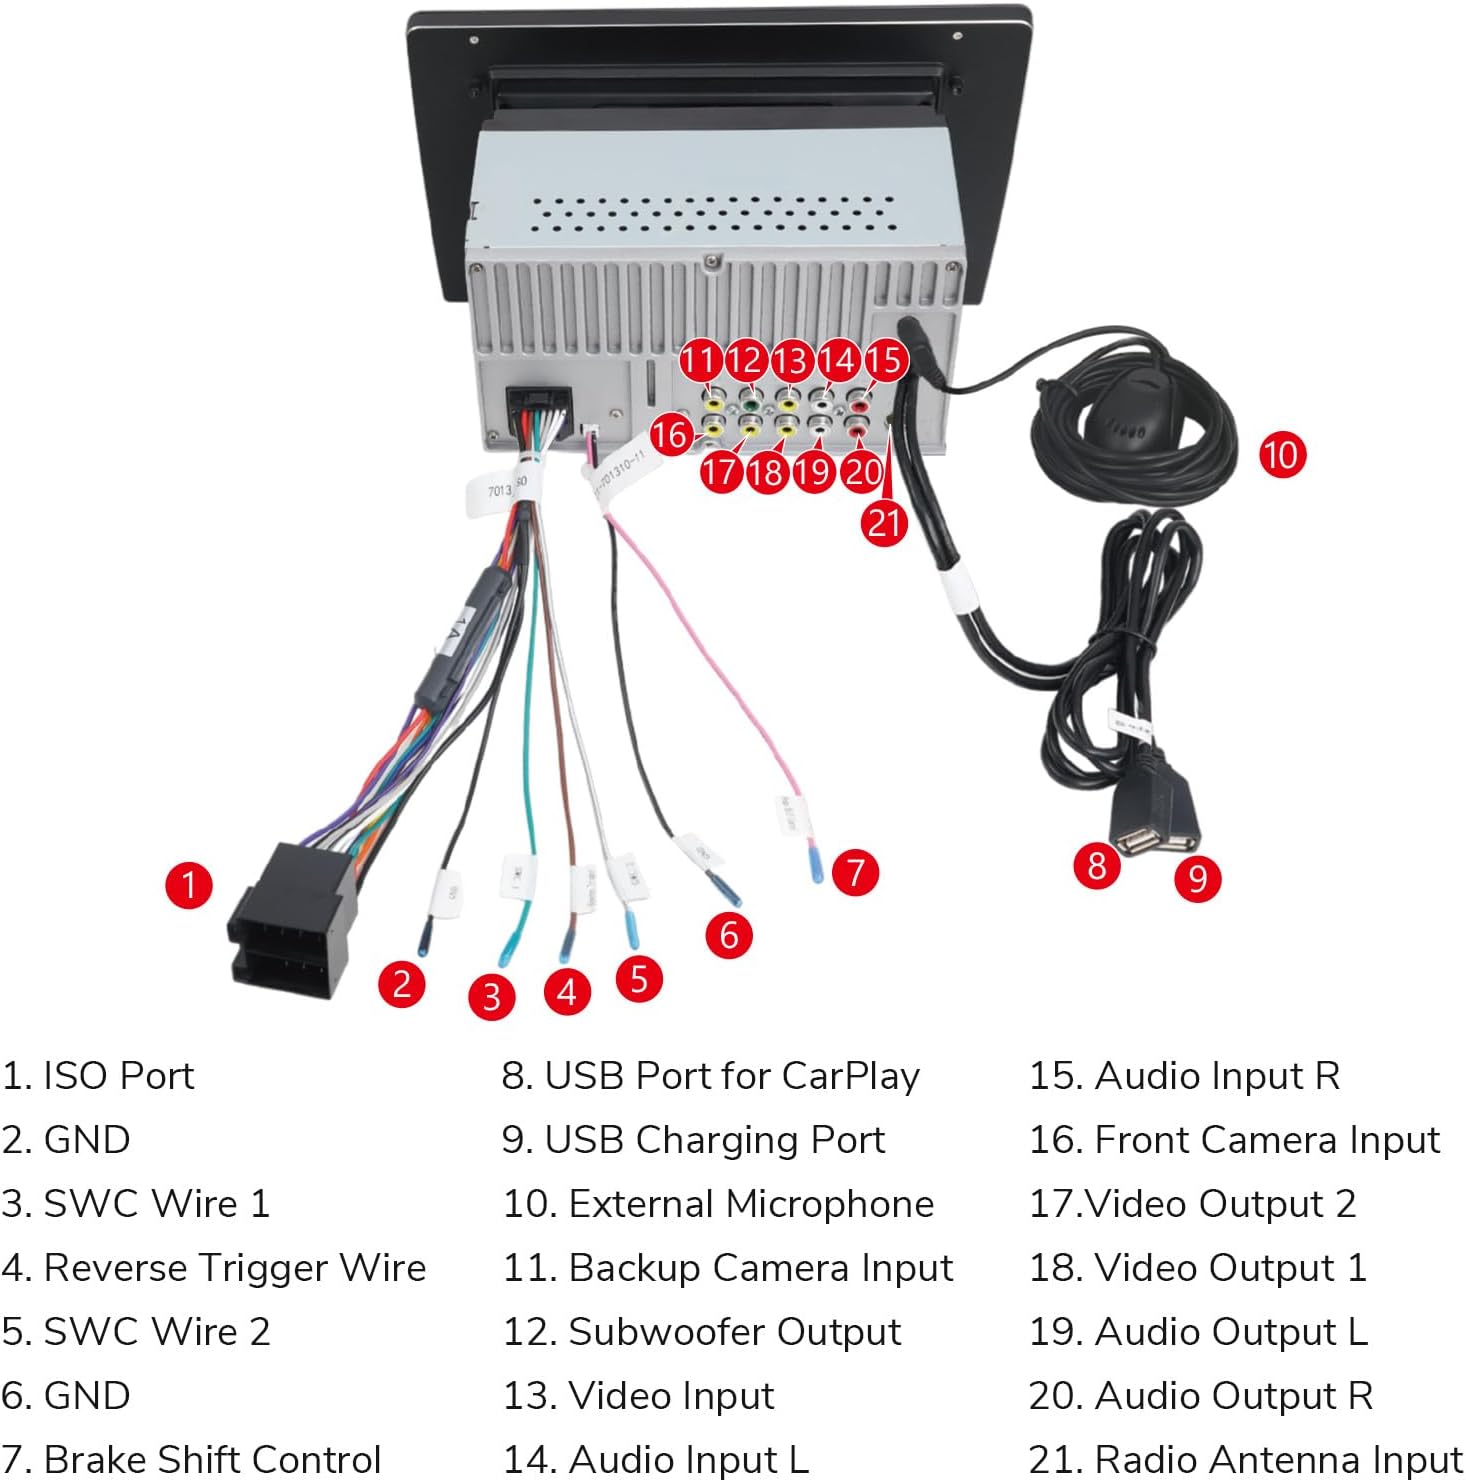
Figure 6.1: Wireless CarPlay and Android Auto functionality.
6.2. Bluetooth Functionality
Pair your smartphone via Bluetooth for hands-free calling and audio streaming. Navigate to the Bluetooth menu on the stereo to pair a new device.

Figure 6.2: Bluetooth and AM/FM radio interface.
6.3. Radio Operation
The unit supports AM/FM radio with 18 FM and 12 AM station memory presets. Use the touch screen to scan for stations and save your favorites.
6.4. USB Quick Charge
Utilize the Type-C USB port for fast and secure phone charging with a maximum current of 1.5A.
6.5. Backup Camera Support
The stereo supports 720P AHD backup cameras, displaying the parking trajectory on the screen when reversing. Ensure the backup camera is properly connected to the dedicated input.
7. Maintenance
To ensure the longevity and optimal performance of your Eonon X3PLUS, follow these maintenance guidelines:
- Cleaning: Use a soft, dry cloth to clean the screen and unit. Avoid abrasive cleaners or solvents.
- Firmware Updates: Periodically check the official Eonon website for firmware updates to improve performance and add new features.
7.1. Firmware Update Procedure
To update the firmware, you will need a USB flash drive (less than 64 GB, formatted to FAT32) and the firmware file from the Eonon website. Ensure a stable power supply during the update process.
Video 7.1: This video provides instructions on how to upgrade the firmware of your Eonon X3/X3PLUS car stereo using a USB flash drive.
8. Troubleshooting
If you encounter issues with your Eonon X3PLUS, refer to the following common problems and solutions:
| Problem | Possible Cause | Solution |
|---|---|---|
| Unit does not power on. | Incorrect wiring, blown fuse, insufficient power. | Check power cable connections, inspect the 10A fuse, ensure stable power supply. |
| No sound or distorted audio. | Speaker wiring issues, incorrect audio settings. | Verify speaker connections, adjust DSP and EQ settings. |
| Wireless CarPlay/Android Auto not connecting. | Incorrect Wi-Fi/Bluetooth settings, phone incompatibility (5GHz Wi-Fi for wireless Android Auto). | Ensure Wi-Fi and Bluetooth are enabled on both devices. Check phone compatibility. Try wired connection. |
| Steering wheel controls not working or saving. | Incorrect wiring, improper programming. | Verify SWC wire connections. Re-program the steering wheel controls via the unit's settings menu. |
| Screen has lines or is unresponsive. | Screen cable issue, software glitch. | Check the screen cable connection (refer to screen panel removal section). Try a factory reset or firmware update. |
If the issue persists after attempting these solutions, please contact Eonon customer support for further assistance.
9. Specifications
| Feature | Detail |
|---|---|
| Model Number | X3PLUS |
| Display | 10.1 Inch QLED Touchscreen |
| Resolution | 1280x720 |
| Connectivity | Wireless Apple CarPlay, Wireless Android Auto, Bluetooth, Wi-Fi |
| Audio Output | 4x45W Max Output, Built-in DSP, 16-band Graphic Equalizer, 7 EQ Modes |
| USB Charging | Type-C USB Quick Charge (1.5A) |
| Camera Support | 720P AHD Backup Camera |
| Steering Wheel Control | Supports Analog SWC Signals |
| Dimensions (Package) | 12.6 x 9.37 x 7.8 inches |
| Item Weight | 5.94 pounds |
10. Warranty and Support
For warranty information and technical support, please refer to the warranty card included with your product or visit the official Eonon website. You can also contact Eonon customer service directly for assistance with product issues or inquiries.
Eonon Customer Support: support@eonon.com
Ask a question about this manual
Ask about setup, troubleshooting, compatibility, parts, safety, or missing instructions. Manuals+ will review the question and use this page’s manual context to help answer it.