
Introduction
Thank you for choosing the EVERYGROW 12 Egg Incubator. This device is designed to provide an optimal environment for hatching various types of poultry eggs, including chickens, ducks, and quails. It features precise temperature and humidity control, automatic egg turning, and a built-in egg candler to support a successful hatching process. Please read this manual thoroughly before operating the incubator to ensure proper use and care.

Figure 1: The EVERYGROW 12 Egg Incubator.
Safety Information
- Always place the incubator on a stable, level surface away from direct sunlight, drafts, or extreme temperature fluctuations.
- Ensure the power supply matches the voltage requirements specified on the product label.
- Do not immerse the incubator or its electrical components in water or other liquids.
- Keep out of reach of children and pets.
- Unplug the incubator from the power outlet before cleaning or performing any maintenance.
- Avoid opening the incubator unnecessarily during the incubation period to maintain stable internal conditions.
Package Contents
Verify that all components are present and in good condition upon unpacking:
- EVERYGROW 12 Egg Incubator Unit (Base, Clear Lid, Control Panel)
- Automatic Egg Turner Tray
- Water Filling Bottle
- Power Adapter
- Incubation Diary
- Instruction Manual (this document)

Figure 2: Exploded view of the incubator components.
Product Features
- 12-Egg Capacity: Accommodates up to 12 standard chicken eggs, or a comparable number of duck or quail eggs.
- Fan-Assisted Airflow: Ensures stable and even temperature distribution throughout the incubator.
- Humidity Control & Display: Integrated sensor and display for monitoring and adjusting humidity levels.
- Automatic Egg Turning: Automatically turns eggs every 120 minutes for 16 seconds to prevent embryo adhesion and promote healthy development. (Note: Remove egg turner 3 days before hatch).
- Built-in Egg Candler: Allows for easy observation of embryo development without disturbing the incubation environment.
- Large Capacity Water Bottle: Simplifies humidity management by reducing the frequency of water refills.
- Adjustable Vents: For precise air exchange control.
- 360° Clear View: Transparent lid provides an unobstructed view of the hatching process.

Figure 3: Unique atomizing technology for humidity control.

Figure 4: Fan-assisted airflow for stable temperature.

Figure 5: Automatic egg turning in action.

Figure 6: Built-in egg candler for embryo observation.

Figure 7: Large capacity water bottle for humidity.
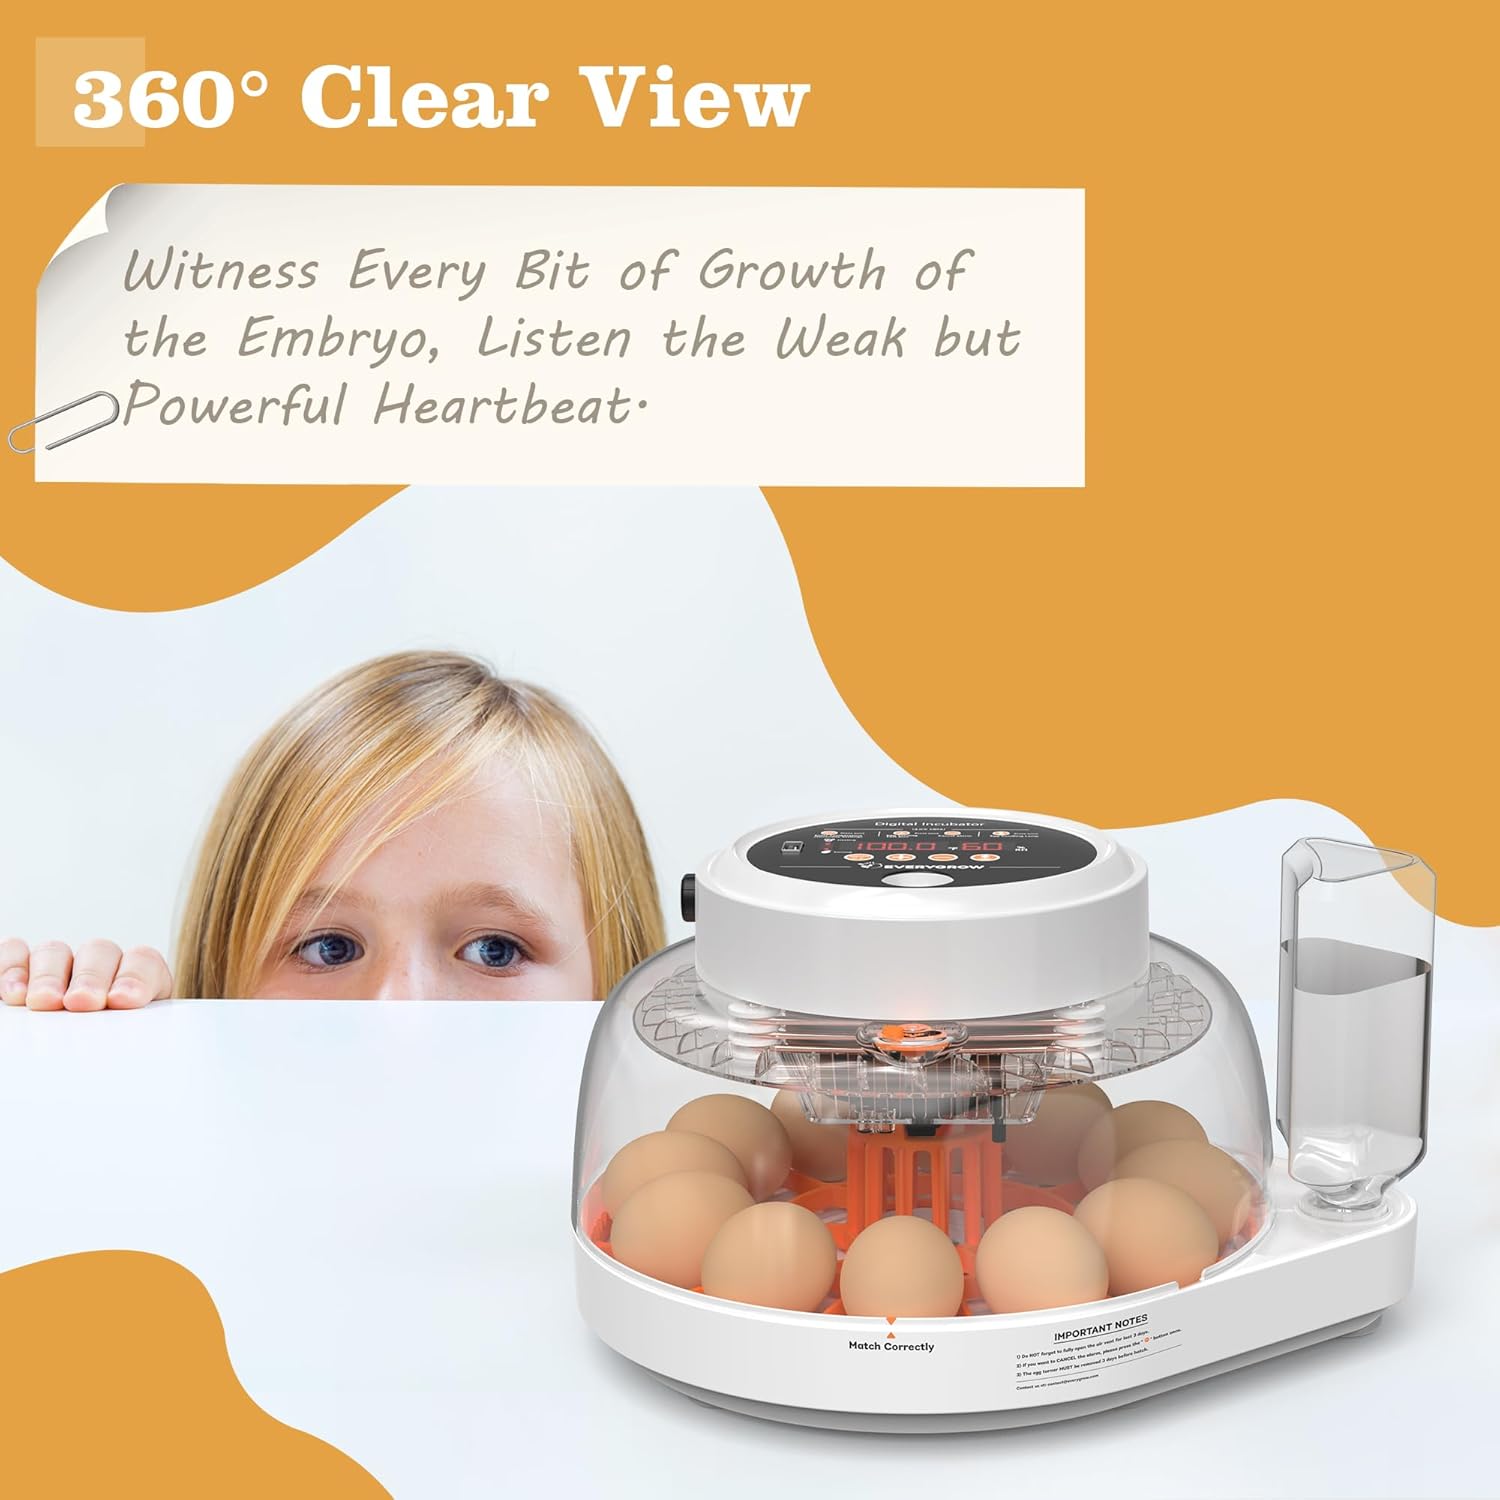
Figure 8: 360° clear view of the incubation process.
Setup Guide
- Place the Humidifier: If your humidifier component is separate, place it into its designated slot on the incubator base.
- Install the Egg Turner: Carefully place the automatic egg turner tray onto the base of the incubator. Ensure it is seated correctly.
- Fill the Water Bottle: Fill the provided water bottle with distilled water. Attach it to the incubator's water inlet. This system automatically maintains humidity.
- Load Eggs: Place your fertilized eggs into the egg slots on the turning tray. Ensure they are positioned correctly for the turning mechanism.
- Secure the Lid: Align the arrows on the lid and the base, then carefully place the clear lid onto the incubator base. Ensure it is securely closed to maintain internal conditions.
- Connect Power: Plug the power adapter into the incubator and then into a suitable electrical outlet. The digital display will illuminate.
- Initial Test Run: Allow the incubator to run for at least 2-3 hours before placing eggs to stabilize temperature and humidity. Adjust settings as needed (refer to Operating Instructions).

Figure 9: Step-by-step assembly and setup.
Operating Instructions
Control Panel Overview
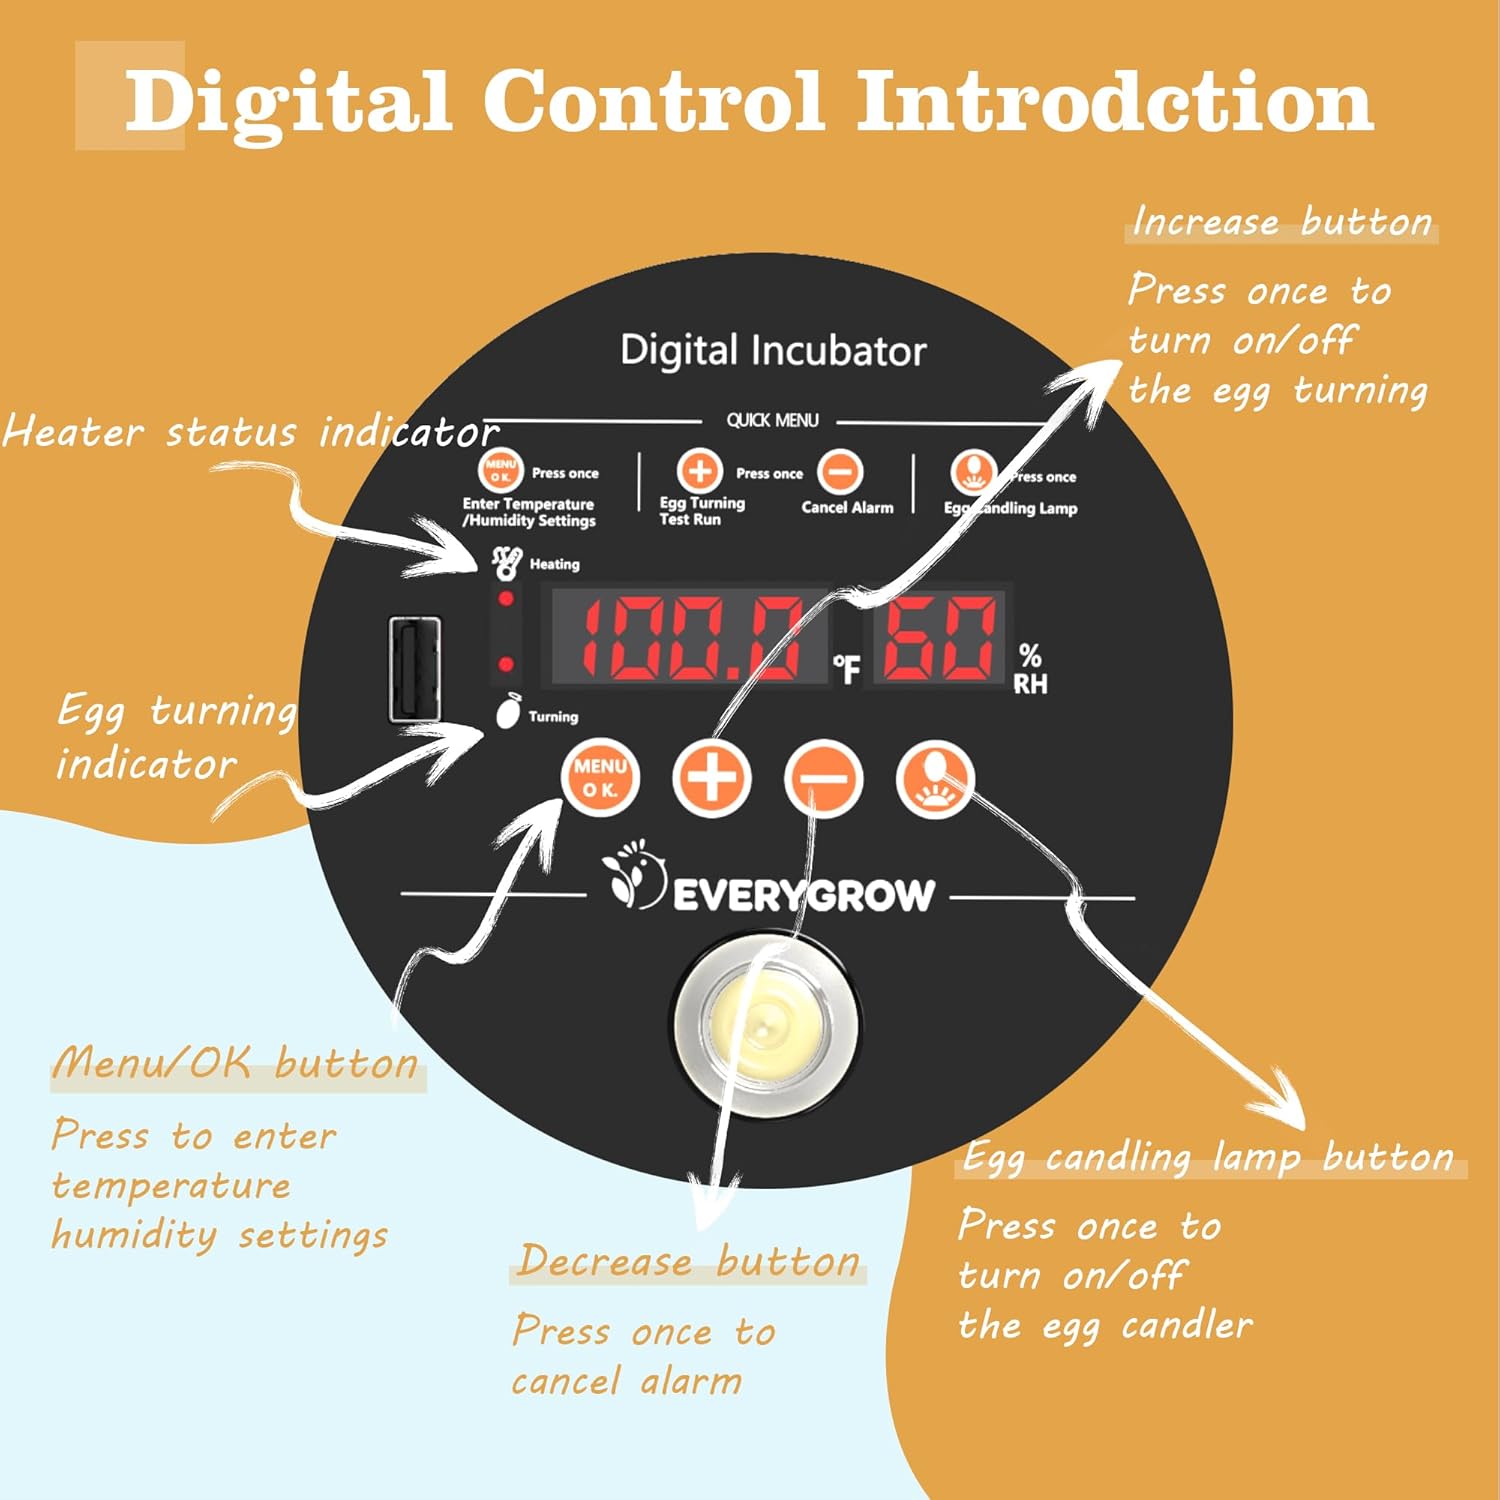
Figure 10: Digital Control Panel.
- Menu/OK Button: Press to enter temperature and humidity settings.
- Increase (+) Button: Press once to turn on/off egg turning. Use to increase values in settings.
- Decrease (-) Button: Press once to cancel alarms. Use to decrease values in settings.
- Egg Candling Lamp Button: Press once to turn on/off the egg candler.
- Heater Status Indicator: Lights up when the heater is active.
- Egg Turning Indicator: Lights up when the egg turning mechanism is active.
Temperature and Humidity Settings
The incubator comes with preset optimal settings. Consult the included incubation diary or species-specific guidelines for recommended temperature and humidity levels. To adjust:
- Press the Menu/OK button to enter setting mode.
- Use the (+) and (-) buttons to adjust the desired temperature.
- Press Menu/OK again to switch to humidity settings, then adjust with (+) and (-).
- Press Menu/OK one more time to save and exit.
Automatic Egg Turning
The incubator automatically turns eggs every 120 minutes for 16 seconds. This feature is crucial for embryo development. To manually toggle the egg turning function, press the (+) button once.
Important: The egg turner MUST be removed three days before the expected hatch date to allow chicks to position themselves for hatching. Refer to your incubation diary for specific timing.
Using the Egg Candler
The built-in egg candler allows you to observe the development of the embryo. To use:
- Press the Egg Candling Lamp Button to turn on the light.
- Gently place an egg over the candler light to view the internal contents.
- Press the Egg Candling Lamp Button again to turn off the light.
Regular candling helps identify infertile eggs or those with arrested development, which should be removed to prevent contamination.
Humidity Management
The large capacity water bottle automatically supplies water to maintain the set humidity level. Monitor the water level in the bottle and refill as needed. Use distilled water to prevent mineral buildup.
Incubation Diary
Utilize the provided incubation diary to record important dates, such as when eggs were set, candling results, and expected hatch dates. This helps track progress and ensures timely adjustments.

Figure 11: Important notes on the incubator base.
- Air Vent: Ensure the air vent is fully open for the last 3 days of incubation (lockdown period).
- Alarm Cancellation: To cancel an alarm, press the (-) button once.
- Egg Turner Removal: The egg turner MUST be removed 3 days before the hatch date.
Maintenance
- Cleaning: After each hatch, unplug the incubator and disassemble the removable parts. Wash the base, egg tray, and water bottle with mild soap and warm water. Wipe the clear lid and control panel with a damp cloth. Ensure all parts are completely dry before reassembly or storage.
- Disinfection: For thorough cleaning, use a poultry-safe disinfectant on all surfaces that came into contact with eggs or chicks. Rinse thoroughly.
- Storage: Store the incubator in a clean, dry place away from direct sunlight and extreme temperatures.
- Ventilation: Regularly check that the adjustable vents are clear of debris to ensure proper airflow.
- Water System: Periodically check the water filling system for any blockages or mineral buildup, especially if using tap water (distilled water is recommended).
Troubleshooting
| Problem | Possible Cause | Solution |
|---|---|---|
| Temperature fluctuations | Incubator placed in a drafty area; lid not sealed properly; external room temperature changes. | Move incubator to a stable environment; ensure lid is securely closed; monitor room temperature. |
| Humidity too low | Water bottle empty; water inlet blocked; insufficient water surface area. | Refill water bottle; check for blockages; ensure proper water flow. |
| Humidity too high | Too much water in the system; high ambient humidity. | Reduce water level if possible; ensure proper ventilation by adjusting vents. |
| Eggs not turning | Egg turner not installed correctly; motor malfunction; power issue. | Re-install egg turner; check power connection; contact support if motor issue suspected. |
| Poor hatch rate | Incorrect temperature/humidity; infertile eggs; improper egg handling; lack of ventilation. | Verify settings with species-specific guidelines; ensure eggs are fertile and handled gently; check vents. |
Specifications
| Feature | Detail |
|---|---|
| Brand | EVERYGROW |
| Model Number | Egg Incubator |
| Capacity | 12 Eggs (Chicken, Duck, Quail) |
| Color | Blue |
| Product Dimensions (L x W x H) | 12.2" x 10.23" x 7.87" |
| Item Weight | 4.6 Pounds |
| Power Source | Electric |
| Automatic Egg Turning | Yes (120 minutes / 16 seconds cycle) |
| Humidity Control | Yes, with digital display |
| Egg Candler | Built-in |

Figure 12: Product dimensions.
Warranty and Support
For warranty information or technical support, please refer to the contact details provided with your purchase documentation or visit the official EVERYGROW website. Keep your purchase receipt as proof of purchase.