1. Introduction and Safety Information
This manual provides detailed instructions for the safe and proper setup, operation, and maintenance of your COBIZI 10x30 Canopy Tent with 8 Sidewalls. Please read all instructions carefully before assembly and use.

Figure 1.1: COBIZI 10x30 Canopy Tent. This image displays the complete canopy tent with its frame, top cover, and netting sidewalls, along with included accessories like the roller bag, sandbags, stakes, and ropes.
Important Safety Warnings:
- This product should not be used in stormy, rainy, or snowy conditions.
- When using the tent, it is important to properly secure it using the included wind ropes, stakes, and sandbags. Failure to do so could result in the tent being damaged or collapsing, posing a hazard to users.
- Ensure all frame connections are securely fastened before and during use.
- Keep children and pets away from the canopy during assembly and disassembly.
2. Packing List
Verify that all components listed below are present before beginning assembly. If any parts are missing or damaged, please contact customer support.
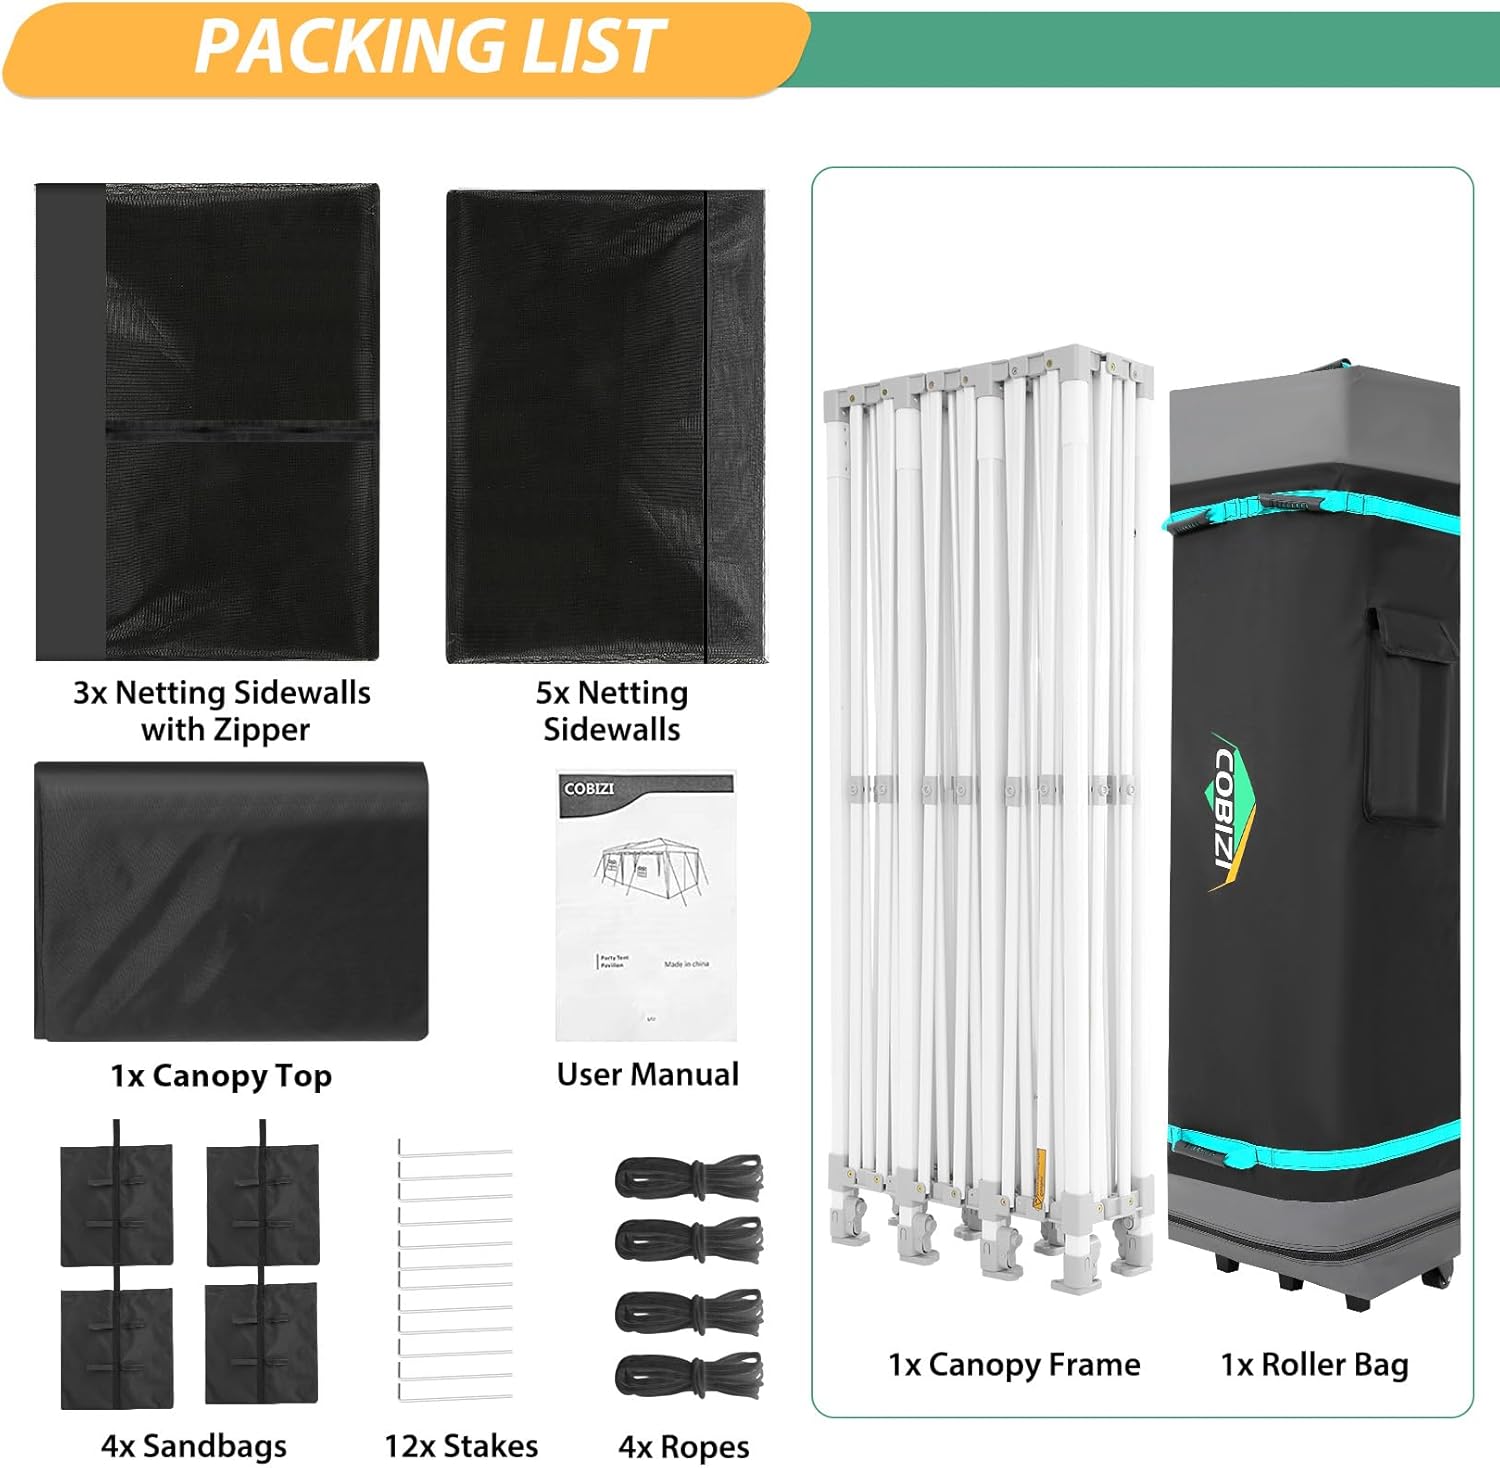
Figure 2.1: Included Components. This image displays the canopy top, frame, roller bag, netting sidewalls, sandbags, stakes, ropes, and user manual.
- 1 x Heavy Duty Frame
- 1 x 420D Oxford Cloth Top Cover
- 8 x Mesh Sidewalls (3 with zippers, 5 without)
- 4 x Sandbags
- 12 x Ground Spikes
- 4 x Ropes
- 1 x Roller Bag
- 1 x Instruction Manual
3. Setup Instructions
The COBIZI canopy tent features a pre-assembled truss structure designed for quick setup. A minimum of 2-4 people is recommended for efficient assembly.

Figure 3.1: EZ Up Canopy Setup Steps. This diagram illustrates unfolding the frame, attaching the canopy top, adjusting height, and installing sidewalls.
- Step 1: Unfold the Frame. Remove the frame from the roller bag. With at least two people, gently pull the legs outwards to begin unfolding the pre-assembled frame.
- Step 2: Attach the Canopy Top. Place the 420D Oxford cloth top cover over the partially expanded frame. Secure the canopy top to the frame using the integrated hook-and-loop fasteners. Ensure a snug fit.
- Step 3: Adjust the Height. Fully extend the frame. Use the thumb latch system on each leg to adjust the canopy to your desired height. There are three adjustable height positions. Ensure all four legs are locked at the same height for stability.
- Step 4: Install Netting Sidewalls and Secure. Attach the mesh sidewalls to the canopy top and frame using the hook-and-loop fasteners. Secure the canopy by attaching the sandbags to the legs, and using the ground spikes and ropes to anchor the tent firmly to the ground.
4. Operating Instructions
4.1 Height Adjustment
The canopy offers three adjustable height settings. To change the height, locate the thumb latch system on each leg. Press the button and slide the leg to the desired position. Ensure all legs are adjusted evenly and locked securely before use.

Figure 4.1: Three Height Positions. This image shows the different height options for the canopy, ranging from 86.6 inches (220cm) to 94.5 inches (240cm) at the eaves, and up to 132 inches (335cm) at the peak.
4.2 Using the Netting Sidewalls
The canopy includes 8 removable mesh sidewalls designed to provide protection from insects while allowing airflow. Three of these sidewalls feature zippers for easy entry and exit.
- Attach sidewalls using the hook-and-loop fasteners along the top and sides of the frame.
- Utilize the double-sided zippers for convenient access.
- When not needed, the sidewalls can be rolled up and secured with the integrated straps.

Figure 4.2: Netting Sidewall Features. This image highlights the fine mesh for insect protection, secure Velcro attachments, convenient double-sided zippers, and straps for tying back the sidewalls.
4.3 Key Features Overview

Figure 4.3: Key Product Features. This image illustrates the waterproof and UPF50+ fabric, adjustable height setting, hook-and-loop fasteners for sidewalls, heavy-duty canopy frame, thumb button for easy adjustment, and breathable material.
5. Maintenance
- Cleaning: Clean the canopy top and sidewalls with mild soap and water. Do not use harsh chemicals or abrasive cleaners. Allow all fabric components to dry completely before storage to prevent mold and mildew.
- Frame Care: Inspect the alloy steel frame periodically for any signs of damage or corrosion. Clean any dirt or debris from the frame.
- Storage: When not in use, disassemble the canopy and store all components in the provided roller bag in a dry, cool place, away from direct sunlight.
- Weather Conditions: Always take down the canopy in anticipation of strong winds, heavy rain, or snow to prevent damage to the product and potential hazards.
6. Troubleshooting
- Canopy instability: Ensure all legs are fully extended and locked at the same height. Verify that sandbags are filled and attached, and ropes and stakes are properly secured to the ground.
- Water pooling on canopy top: Ensure the canopy top is stretched taut and properly attached to the frame. The full truss structure is designed to prevent water accumulation, but extreme weather may still cause pooling if not properly secured or if the tent is pitched incorrectly.
- Difficulty with assembly/disassembly: Refer to the setup instructions (Section 3). Ensure at least two people are assisting, especially for unfolding and folding the frame.
7. Specifications
| Feature | Detail |
|---|---|
| Brand | COBIZI |
| Model | 10x30FT Canopy Tent (main_canopy) |
| Material | Thickened Alloy Steel (Frame), 420D Oxford Polyester Fabric (Top Cover) |
| Color | Black |
| Product Dimensions (L x W x H) | 354"L x 118"W x 132"H (10x30FT) |
| Item Weight | 142 Pounds (64.5 kg) |
| Water Resistance Level | Waterproof (2.1psi) |
| Ultraviolet Light Protection | UPF 50+ (blocks 99% UV rays) |
| Adjustable Heights | 3 positions |
| Sidewalls | 8 removable mesh sidewalls (anti-mosquito) |
| Capacity | 300 sq ft shade for 25-30 people |
8. Warranty and Support
COBIZI stands behind the quality of its products. If you encounter any issues, have questions, or find missing/damaged accessories upon receipt, please contact our customer support team.
We aim to respond to all inquiries within 24 hours to promptly address any concerns you may have.
For support, please visit the official COBIZI store or contact us through your purchase platform.
Return Policy: This product is eligible for a 30-day return policy (refund/replacement).