1. Introduction
The PULME AXU3EGB is an advanced FPGA development board featuring the Xilinx UltraScale+ MPSoC XCZU3EG. This board is designed for high-performance embedded applications, offering powerful processing capabilities and extensive connectivity options. It is suitable for a wide range of projects requiring high-speed data processing, real-time control, and complex algorithm implementation.
2. Key Features
- Greatly improved transfer rate for faster and more convenient operation.
- Powerful on-board storage and processing capabilities, allowing integration with application-specific sensors and devices that require minimum load during runtime.
- Reliable and scalable design for a variety of applications.
- Environmentally friendly production technology and materials, with function, voltage, and current testing performed before packaging.
- Applicable for Smart Home, Intelligent Building, and Industrial Automation systems.
3. Board Layout and Interfaces
Understanding the layout of the AXU3EGB board is crucial for proper setup and operation. The board integrates various interfaces for power, data transfer, and expansion.

This image illustrates the key interfaces and components of the AXU3EGB board, including Gigabit Ethernet, USB 3.0, 40-pin Expansion Ports, Core Board (SoM), Mini DP Interface, and USB UART.
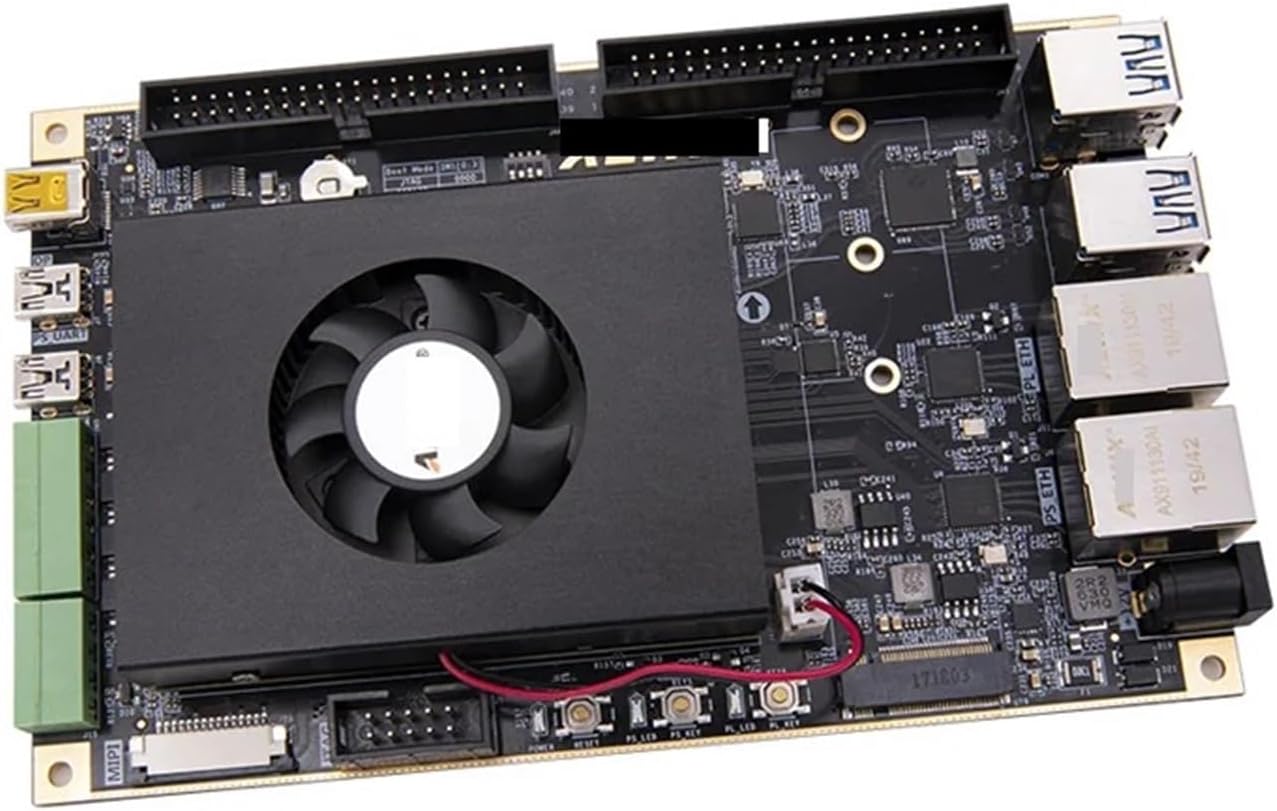
A top-down view of the AXU3EGB board, highlighting the integrated cooling solution for the main processing unit.
4. Setup
4.1. Power Connection
- Ensure the board is placed on a stable, non-conductive surface.
- Connect the appropriate power adapter to the DC input jack on the board. Refer to the specifications for voltage and current requirements.
- Do not apply power until all other necessary connections are made.
4.2. Peripheral Connections
- USB 3.0: Connect USB peripherals such as keyboards, mice, or storage devices to the USB 3.0 ports.
- Gigabit Ethernet: Connect an Ethernet cable to the RJ-45 ports for network access.
- Mini DP Interface: Connect a display using a Mini DisplayPort cable. An ALINX customized DP to HDMI cable may be required (sold separately).
- 40-pin Expansion Ports: These ports allow connection of various ALINX modules, including camera modules, TFT LCD screens, and other expansion boards. Ensure correct pin alignment before connecting.
- USB UART: Connect to a host PC for serial communication and debugging.
4.3. Software Installation
Before operating the board, install the necessary development tools and drivers on your host computer. This typically includes Xilinx Vivado Design Suite, SDKs, and specific board support packages (BSPs). Refer to the official PULME or Xilinx documentation for detailed software installation guides.
5. Operating Instructions
5.1. Power On/Off
- After all connections are secure, apply power to the board. The power indicator LED should illuminate.
- To power off, disconnect the power adapter. Always ensure proper shutdown procedures are followed if an operating system is running on the board.
5.2. Programming the FPGA
The FPGA can be programmed via JTAG or by loading a bitstream from storage (e.g., QSPI Flash, eMMC). Use the Xilinx Vivado software for design compilation and programming. Consult the Xilinx documentation for specific programming steps for UltraScale+ MPSoC devices.
5.3. Using Expansion Ports
The 40-pin expansion ports provide access to various I/O signals. When connecting expansion modules, ensure compatibility and proper voltage levels. Refer to the documentation for specific ALINX modules for detailed usage instructions.
6. Specifications
The following tables detail the technical specifications and interface functions of the PULME AXU3EGB development board.
6.1. General Specifications
| Attribute | Value |
|---|---|
| Package Dimensions | 1.18 x 0.79 x 0.39 inches |
| Item Weight | 1.1 pounds |
| Manufacturer | PULME |
| Assembly Required | No |
| Number of Pieces | 1 |
6.2. Interface and Function Details

This table provides a comprehensive list of interfaces and their functions, including DDR4, QSPI Flash, eMMC Flash, DP Interface, M.2 Interface, MIPI Interface, USB 3.0, USB Uart, Gigabit Ethernet, Crystal Oscillator, RS485 Bus Interface, CAN Bus Interface, JTAG, Temperature Sensor, EEPROM, SD Card Slot, Real Time Clock, LED, Keys, and 40-Pin Expansion Ports.
6.3. Core Specifications (AXU3EG)

This table compares various FPGA board models, including the AXU3EG, detailing their Core Board SoM, FPGA Chip, CPU Core, Main Frequency, GPU, and RAM specifications.
7. Maintenance
7.1. Cleaning
- Keep the board free from dust and debris. Use a soft, dry brush or compressed air to gently clean the surface.
- Avoid using liquid cleaners or solvents, as these can damage components.
7.2. Storage
- Store the board in an anti-static bag when not in use.
- Keep the board in a cool, dry environment, away from direct sunlight and extreme temperatures.
8. Troubleshooting
8.1. Common Issues
- Board not powering on: Check power adapter connection and ensure it meets voltage/current requirements. Verify the power outlet is functional.
- Peripheral not detected: Ensure cables are securely connected. Check device drivers on the host PC.
- Programming errors: Verify JTAG chain integrity. Ensure correct bitstream is selected and software is properly configured.
8.2. Contact Support
If you encounter persistent issues that cannot be resolved using this manual, please contact PULME customer support or refer to the official product website for additional resources and technical assistance.
9. Warranty and Support
This product is covered by a standard manufacturer's warranty. Please refer to the warranty card included with your purchase or visit the PULME official website for detailed warranty terms and conditions. For technical support, driver downloads, and additional documentation, please visit the PULME support portal.