Supdex 788-2
1/24 RC Battle Tank Set Instruction Manual
Model: 788-2
Introduction
This instruction manual provides essential information for the safe and effective operation and maintenance of your Supdex 1/24 RC Battle Tank Set. This set includes two remote-controlled tanks, a Russian T90 and a German Leopard II, designed for interactive battle play with realistic features such as smoke, sound effects, and lights.
Safety Information
Please read and understand all safety warnings before operating the product.
- Do not aim or shoot at animals or people.
- Keep small parts away from children to prevent choking hazards.
- Ensure batteries are inserted with correct polarity.
- Do not mix old and new batteries, or different types of batteries.
- Adult supervision is recommended during operation, especially for younger users.
What's in the Box
Your Supdex 1/24 RC Battle Tank Set package should contain the following items:
- 1x Russian T90 RC Battle Tank
- 1x German Leopard II RC Battle Tank
- 2x Remote Controllers
- 2x Rechargeable Batteries (for tanks)
- 2x USB Charging Cables
- 2x AA Batteries (for remote controllers, included)
- 2x Soldier Figures
- 1x Water Bottle (for smoke effect)
- 1x Screwdriver
- Instruction Manual

Image: The complete 1/24 RC Battle Tank Set, showing both the Russian T90 and German Leopard II tanks, their respective remote controls, rechargeable batteries, USB charging cables, soldier figures, water bottle, and screwdriver.
Setup
1. Battery Installation
For Tanks:
- Locate the battery compartment on the underside of each tank.
- Use the provided screwdriver to open the battery compartment cover.
- Connect the rechargeable battery to the tank's power connector. Ensure the connection is secure.
- Carefully place the battery inside the compartment and close the cover, securing it with the screw.

Image: Detailed view of the tank's battery compartment, illustrating how to connect the rechargeable battery.
For Remote Controllers:
- Open the battery compartment on the back of each remote controller.
- Insert 2 AA batteries (included) into each remote, observing the correct polarity (+/-).
- Close the battery compartment cover.
2. Charging the Tank Batteries
Connect the rechargeable tank battery to the USB charging cable. Plug the USB cable into a standard USB power adapter (not included) or a computer USB port. The charging time is approximately 2-3 hours for a full charge, providing about 30 minutes of play time.
3. Filling Water for Smoke Effect
For the realistic smoke effect, fill the small water bottle with clean water. Locate the water inlet on the tank (usually near the rear exhaust vents). Carefully squeeze water into the inlet until the reservoir is full. Do not overfill.

Image: Instructions for adding water to the tank for the smoke simulation feature.
Operating Instructions
1. Power On and Pairing
Turn on the power switch on both the tank and its corresponding remote controller. The tank will automatically demonstrate all functions with cool lights. The 2.4Ghz technology allows multiple tanks to operate simultaneously without interference, enabling 2v2, 3v1, or free-for-all battles.
2. Basic Controls
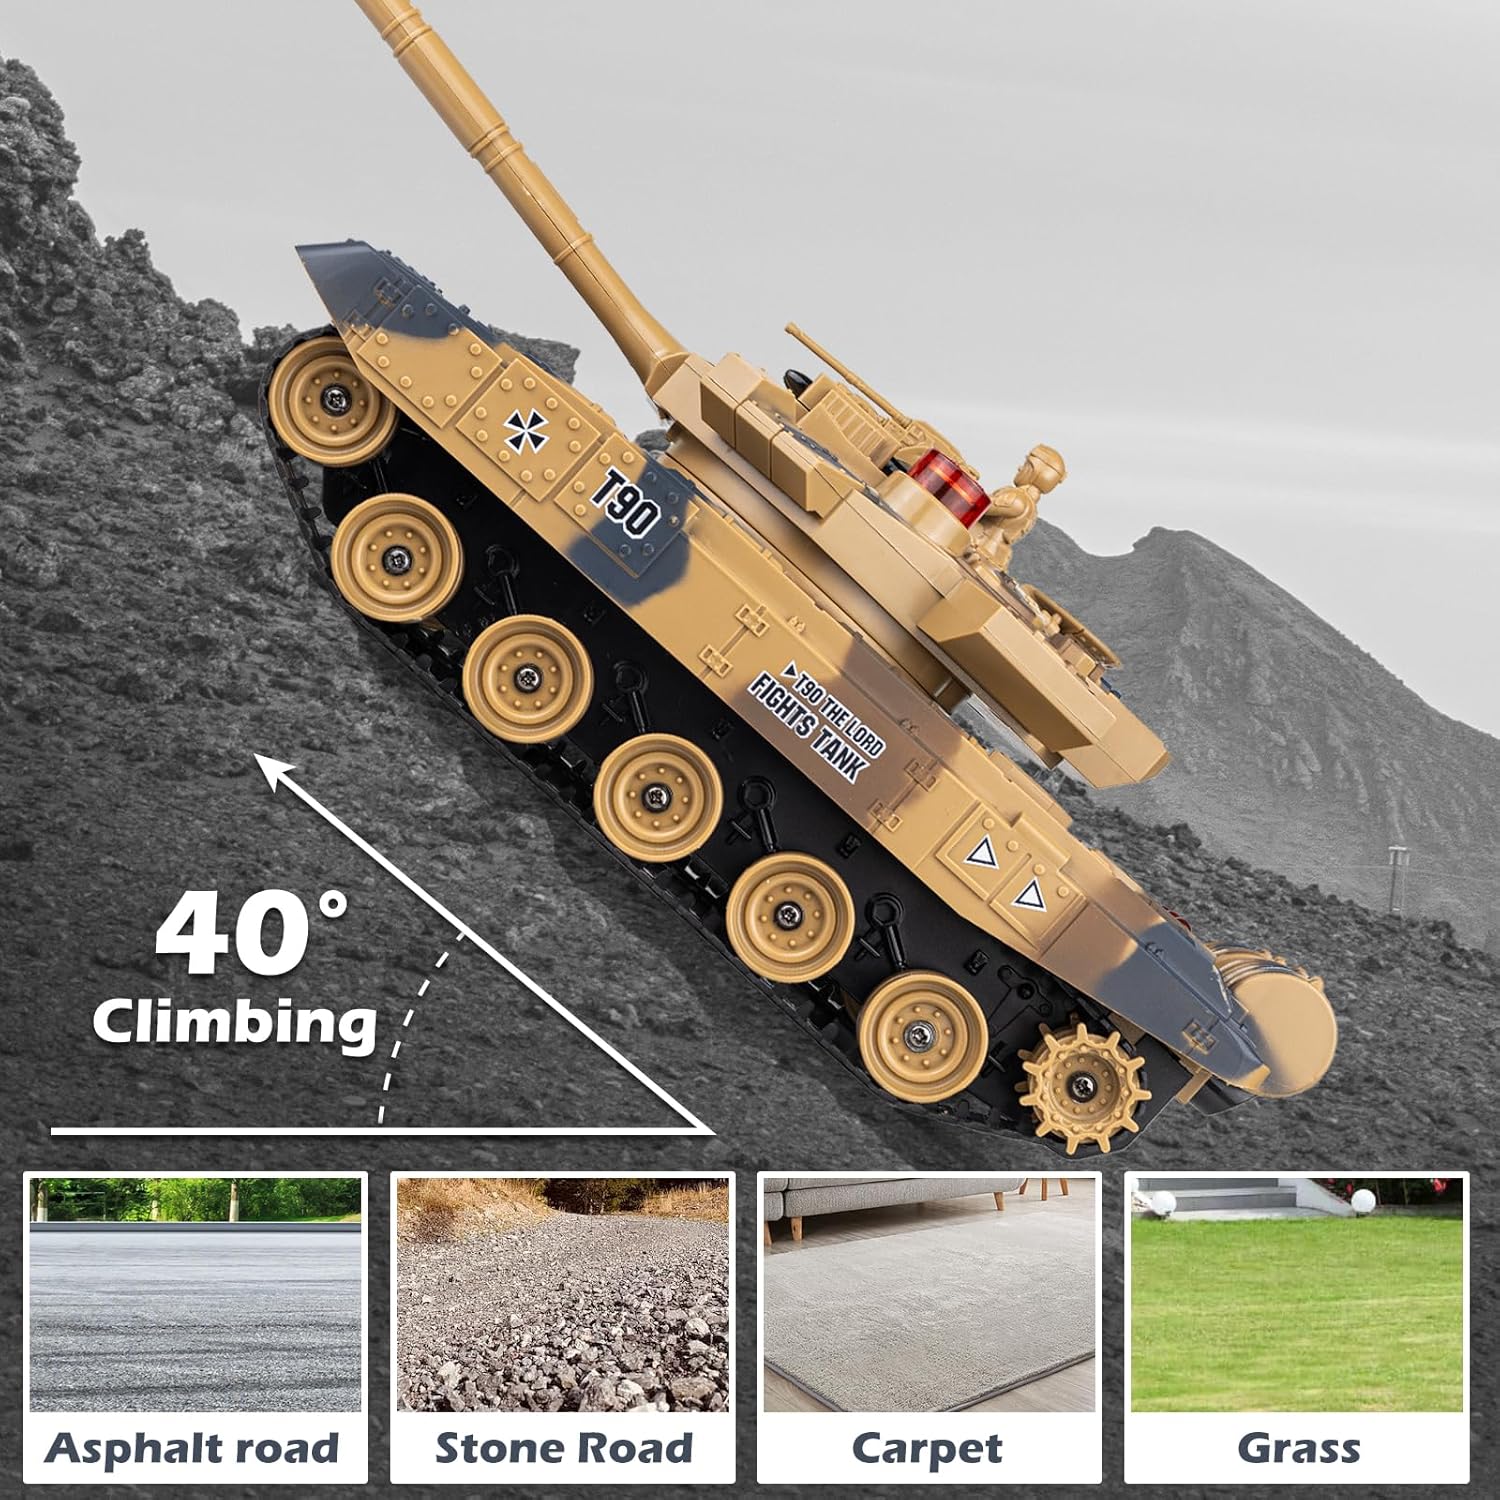
Image: A detailed diagram of the remote control, highlighting the functions of each button, including movement, turret control, and firing.
- Forward/Backward: Use the designated levers/buttons on the remote.
- Left/Right 360-degree Rotation: Control individual treads for precise turning.
- Turret Rotation: The turret can spin 350 degrees using the dedicated buttons on the remote.
- Barrel Adjustment: The barrel can be manually adjusted 30 degrees up and down.
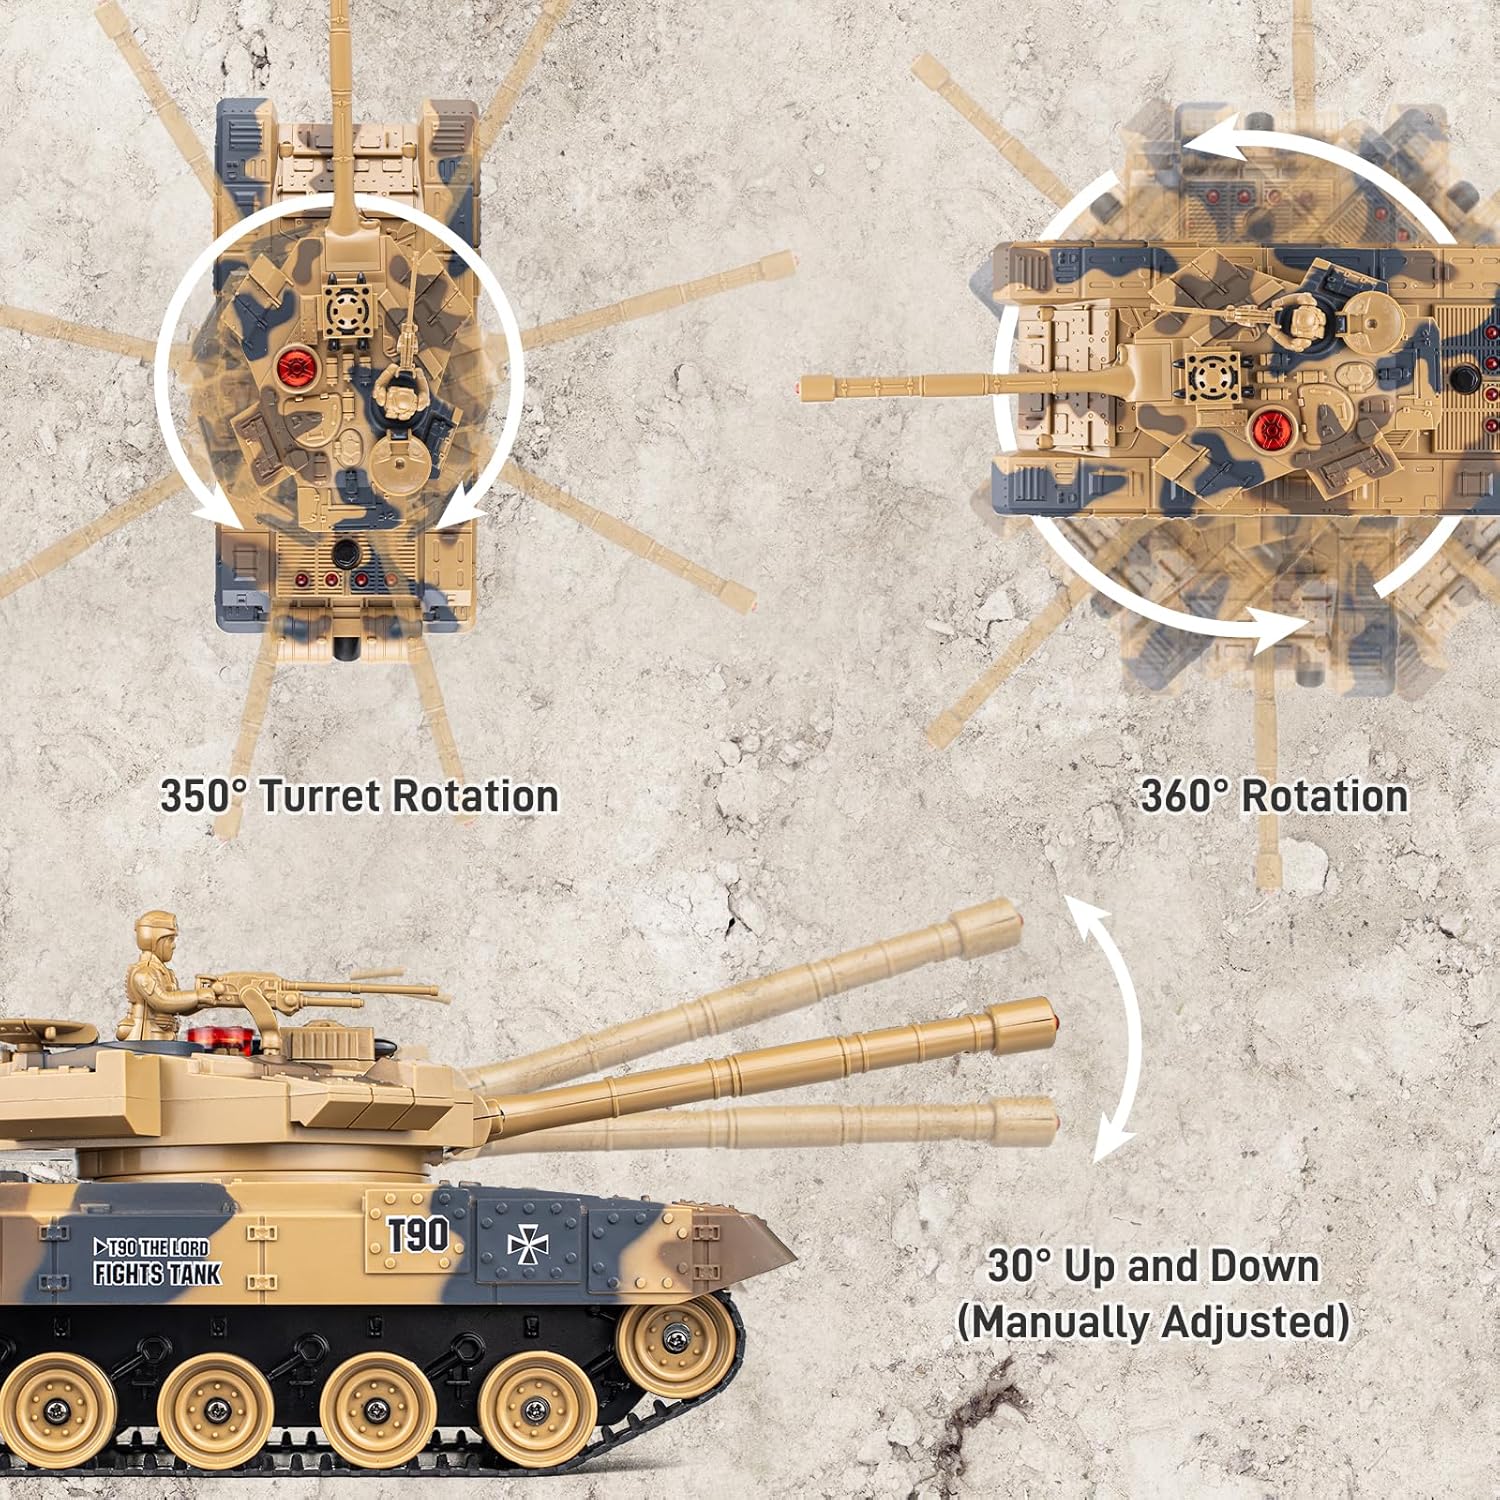
Image: Visual representation of the tank's maneuverability, including turret rotation and barrel elevation.
3. Battle Functions and Effects
- Shooting: Use the shooting button for machine gun fire, cannon button for cannon fire, and missile button for missile launch.
- Recoil and Vibration: When shooting, the tanks will exhibit recoil, and the remote control will vibrate, simulating a realistic battle experience.
- Smoke Effect: Activate the smoke effect via the spray switch on the tank. The tank will emit simulated smoke from its exhaust.
- Sound Effects: Enjoy realistic engine sounds, machine gun fire, cannon blasts, and missile launches. Sound can be turned off with one click on the remote.
- Lights: Tanks feature cool lights for enhanced play, especially in darker environments.
- Life Indicator: Each tank has four life indicator lights. When a tank is hit, a light will turn off. When all four lights are off, the tank is defeated and will make a defeated sound. Press the start button on the remote to reset and begin a new round.

Image: Explanation of the infrared battle system and how the life indicator lights function during combat.
Image: Demonstration of the tank's smoke simulation feature, with details on the spray switch and water inlet.
Image: Visual of the tank's recoil action and the remote's vibration feedback during firing.
4. Terrain Capability
The battle tanks can climb a maximum slope of 40 degrees and can roll over small obstacles. They perform best on hard, flat surfaces like asphalt, stone roads, or carpet. Avoid thick grass or very uneven terrain to prevent damage to the tracks.

Image: Illustration of the tank's climbing capability and recommended operating surfaces.
Maintenance
- Cleaning: Wipe the tanks and remote controllers with a soft, dry cloth. Do not use water or chemical cleaners.
- Battery Care: Always remove batteries from the tanks and remote controllers when not in use for extended periods. Store rechargeable batteries in a cool, dry place.
- Storage: Store the product in a cool, dry environment away from direct sunlight and extreme temperatures.
Troubleshooting
| Problem | Possible Cause | Solution |
|---|---|---|
| Tank not moving or unresponsive. | Low battery in tank or remote; tank/remote not powered on; not paired correctly; interference. | Charge tank battery; replace remote batteries; ensure both are switched ON; re-pair by turning both off and on; move away from other 2.4Ghz devices. |
| Smoke effect not working. | Water reservoir empty; spray switch off. | Refill water reservoir; ensure spray switch is ON. |
| Sound effects not playing. | Sound switch off. | Ensure sound switch on remote is ON. |
| Tank not climbing slopes effectively. | Surface too slippery or too steep; low battery. | Operate on suitable surfaces (asphalt, stone road, carpet); ensure battery is fully charged. |
Specifications
| Feature | Detail |
|---|---|
| Product Dimensions | 16 x 6 x 12 inches |
| Item Weight | 3.89 pounds |
| Model Number | 788-2 |
| Manufacturer Recommended Age | 14 years and up |
| Batteries Required | 2 AA batteries (included for remote), Rechargeable battery (included for tank) |
| Remote Control Frequency | 2.4Ghz |
| Max Remote Distance | Approx. 20m (65ft) |
| Play Time | Approx. 30 minutes (after 2-3 hours charge) |
| Max Climbing Angle | 40 degrees |
| Turret Rotation | 350 degrees |
| Barrel Adjustment | 30 degrees (manual) |
Warranty and Support
For warranty information or technical support, please contact the manufacturer, Supdex, directly through their official channels. Retain your proof of purchase for any warranty claims.
Manufacturer: Supdex
Ask a question about this manual
Ask about setup, troubleshooting, compatibility, parts, safety, or missing instructions. Manuals+ will review the question and use this page’s manual context to help answer it.