
Introduction
This manual provides instructions for the installation, function, maintenance, and troubleshooting of the M93DVN Moisture Sensor Replacement. This part is designed to replace the original moisture sensor in various Kenmore and Frigidaire dryer models, ensuring proper drying cycles and energy efficiency. Please refer to the compatibility list to confirm this part is suitable for your specific dryer model.
Safety Information
WARNING: Before attempting any repair or replacement, always disconnect the dryer from its power source by unplugging it or turning off the circuit breaker. Failure to do so can result in electric shock, injury, or death.
- Wear appropriate personal protective equipment, such as gloves, to prevent injury.
- Ensure the work area is well-lit and clear of obstructions.
- If you are unsure about any step, consult a qualified appliance technician.
- Keep small parts away from children.
Installation
The moisture sensor is typically located inside the dryer drum, often near the lint filter housing. Its function is to detect the moisture level of clothes during a drying cycle.
Tools Required:
- Screwdriver (Phillips and/or flathead, depending on dryer model)
- Nut driver or socket set (if applicable)
- Pliers (if needed for wire connections)
Installation Steps:
- Disconnect Power: Unplug the dryer from the wall outlet or turn off the circuit breaker.
- Access the Sensor: Depending on your dryer model, you may need to remove the top panel, front panel, or access the sensor from the rear. Refer to your specific dryer's service manual for precise access instructions.
- Locate the Old Sensor: Identify the existing moisture sensor. It typically consists of two metal strips or bars.
- Disconnect Wiring: Carefully disconnect any wires attached to the old moisture sensor. Note their positions for correct reattachment.
- Remove Old Sensor: Unscrew or unclip the old moisture sensor from its mounting.
- Install New Sensor: Position the new M93DVN moisture sensor in the same location and secure it with screws or clips.
- Reconnect Wiring: Reattach the wires to the new sensor, ensuring they are connected correctly and securely.
- Reassemble Dryer: Reattach any panels removed during the process.
- Restore Power: Plug the dryer back into the outlet or turn on the circuit breaker.
- Test Functionality: Run a test cycle to ensure the dryer operates correctly and the moisture sensor is functioning.
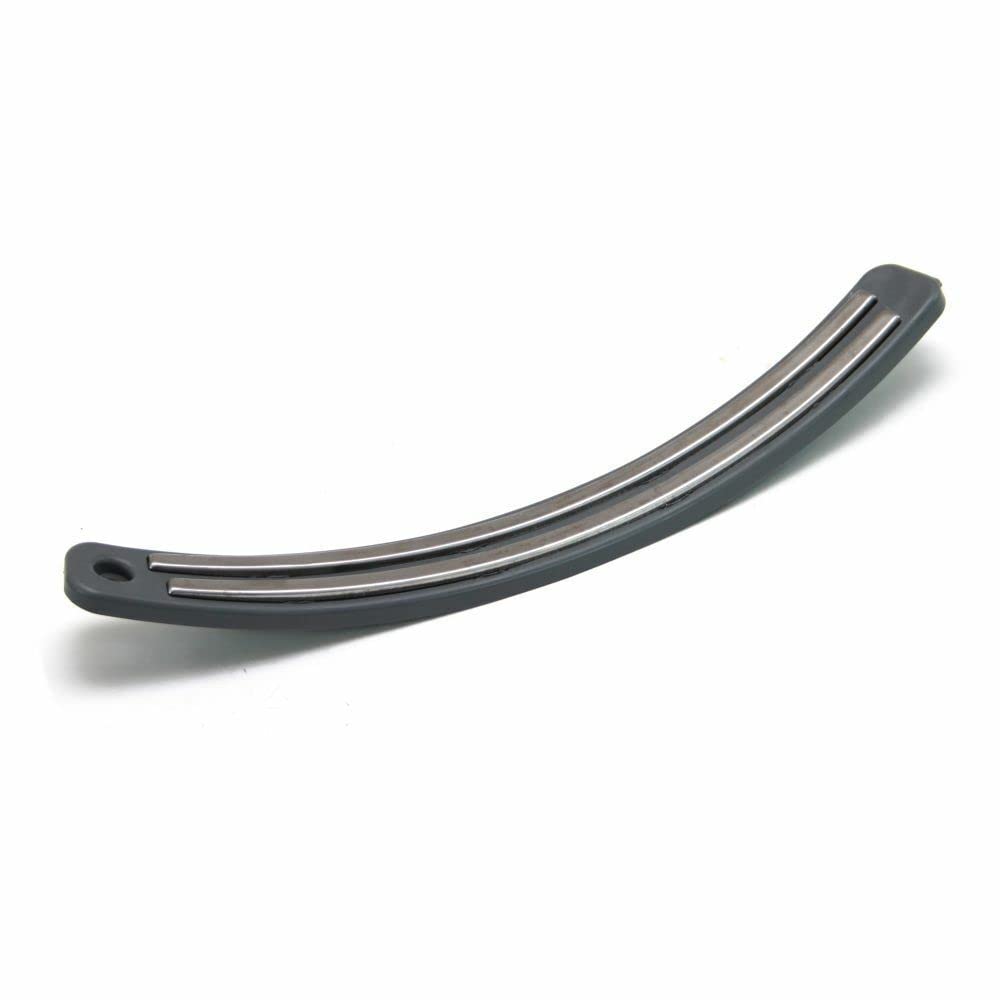
Image: The M93DVN Moisture Sensor Replacement part, showing its typical design with two conductive strips.
Operating Principle
The moisture sensor works by detecting the electrical conductivity of the clothes tumbling in the dryer drum. When clothes are wet, they conduct electricity more readily. As they dry, their conductivity decreases. The sensor sends this information to the dryer's control board, which then determines when the clothes are dry and signals the dryer to shut off or proceed to the cool-down phase. A properly functioning moisture sensor helps prevent over-drying, which can damage fabrics and waste energy.
Maintenance
To ensure optimal performance of your moisture sensor and dryer:
- Clean Sensor Bars: Periodically inspect the metal sensor bars inside the dryer drum. Lint, fabric softener residue, or mineral deposits can accumulate on them, reducing their ability to detect moisture accurately. Clean them gently with a soft cloth dampened with rubbing alcohol or a mild detergent solution. Ensure they are completely dry before using the dryer.
- Clean Lint Filter: Always clean the lint filter before each load to maintain proper airflow and prevent lint buildup that could affect sensor readings.
- Avoid Overloading: Overloading the dryer can prevent clothes from tumbling freely and making consistent contact with the sensor, leading to inaccurate readings.
Troubleshooting
If your dryer is exhibiting issues related to moisture sensing after replacing the sensor, consider the following:
Dryer Not Shutting Off / Over-drying:
- Check Sensor Cleanliness: Ensure the sensor bars are clean and free of residue.
- Verify Wiring: Double-check that the sensor wires are securely connected and not damaged.
- Small Loads: Very small loads may not make consistent contact with the sensor, causing the dryer to run longer. Try adding a few damp towels to increase the load size.
- Vent Blockage: A clogged dryer vent can cause clothes to take longer to dry, potentially confusing the sensor. Clean the dryer vent system.
Dryer Shutting Off Too Soon / Clothes Still Damp:
- Sensor Cleanliness: Residue on the sensor can sometimes cause it to falsely detect dryness. Clean the sensor bars.
- Overloading: An overloaded dryer might prevent proper tumbling and sensor contact.
- Incorrect Cycle Selection: Ensure you are using the appropriate drying cycle for the load type.
- Heating Element Issue: If the dryer is not heating properly, clothes will remain damp regardless of sensor function. This indicates a different component failure.
Specifications
| Attribute | Detail |
|---|---|
| Part Number | 41781100000 |
| Brand | M93DVN |
| Compatibility | Replaces Kenmore models: 41781100000, 41781101000, 41781102000, 41781102002, 417.81102002, 417 81102002, 41784130000, 41784131000, 41784132000, 41791100000, 41791101000, 41791102000, 41794130000, 41794131000, 41794132000, 41794132002. Replaces Frigidaire models: BAQE7077KB0, BAQE7077KW0, BAQG7077KB0, BAQG7077KW0, CAQE7072LA0, CAQE7072LR0, CAQE7072LW0, CAQE7077KA0, CAQE7077KB0, CAQE7077KN0, CAQE7077KR0, CAQE7077KW0, CARE4044MW0, CARE4044MW1, CASE7073LA0, CASE7073LR0, CASE7073LW0, CASE7074NA0, CASE7074NA2, CASE7074NA3, CASE7074NR0, CASE7074NR2, CASE7074NR3, CASE7074NW0, CASE7074NW2, CASE7074NW3, CDE7700LW1, CFSE5115PA0, CFSE5115PA1, CFSE5115PW0, CFSE5115PW1, DAQE7077KW0, DAQG7077KW0, EIMED55IIW2, EIMED5CQT0, EIMGD60JIW3, EIMGD60LSS3, EWMED70JSS3, EWMED7CJIW2, EWMED7CJIW3, EWMED7CJSS3, EWMGD70JSS3, FAQE7072LA0, FAQE7072LN0, FAQE7072LR0, FAQE7072LW0, FAQE7077KA0, FAQE7077KB0, FAQE7077KN0, FAQE7077KR0, FAQE7077KW0, FAQG7072LA0, FAQG7072LN0, FAQG7072LR0, FAQG7072LW0, FAQG7077KA0, FAQG7077KB0, FAQG7077KN0, FAQG7077KR0, FAQG7077KW0, FARE4044MW0, FARG4044MW0, FARG4044MW1, FASE7021NW0, FASE7073LA0, FASE7073LN0, FASE7073LR0, FASE7073LW0, FASE7073NA0, FASE7073NA2, FASE7073NA3, FASE7073NR0, FASE7073NR2, FASE7073NR3, FASE7073NW0, FASE7073NW2, FASE7073NW3, FASE7074LA0, FASE7074LN0, FASE7074LR0, FASE7074LW0, FASE7074NA0, FASE7074NA2, FASE7074NA3, FASE7074NR0, FASE7074NR2, FASE7074NR3, FASE7074NW0, FASE7074NW2, FASE7074NW3, FASG7021NW0 GAS, FASG7073LA0, FASG7073LN0, FASG7073LR0, FASG7073LW0, FASG7073NA0, FASG7073NA2, FASG7073NA3, FASG7073NR0, FASG7073NR2, FASG7073NR3, FASG7073NW0, FASG7073NW2, FASG7073NW3, FASG7074LA0, FASG7074LN0, FASG7074LR0, FASG7074LW0, FASG7074NA0, FASG7074NA2, FASG7074NA4, FASG7074NA5, FASG7074NR0, FASG7074NR2, FASG7074NR3, FASG7074NW0, FASG7074NW2, FASG7074NW3, FFSE5115PA0, FFSE5115PA1, FFSE5115PW0, FFSE5115PW1, FFSE5115PW2, FFSE5115PW3, FFSG5115PA0, FFSG5115PA1, FFSG5115PW0, FFSG5115PW1, LAQE7000LW0, LAQE7077KR0, LAQE7077KW0, LAQE8000LW0, LAQG7000LW0, LAQG7077KR0, LAQG7077KW0, LAQG8000LW0 Dryers. |
Warranty and Support
This M93DVN moisture sensor replacement comes with a 90-day warranty. We are committed to the quality of our products. If you encounter any issues or are not satisfied with your purchase within this period, please contact your retailer for a replacement or refund.
For further assistance or technical support, please refer to the contact information provided by your product retailer or the M93DVN brand website.