
Aicevoos S7G-70-US
Aicevoos Laser Measure User Manual
Model: S7G-70-US
1. Introduction
This user manual provides comprehensive instructions for the safe and effective operation of your Aicevoos Laser Measure, Model S7G-70-US. This digital laser measurement tool is designed for precise distance, area, and volume measurements, featuring a large backlit screen and electronic angle measurement capabilities. Please read this manual thoroughly before using the device to ensure proper function and to prevent damage or injury.

Figure 1: Aicevoos Laser Measure, Model S7G-70-US. This image shows the front view of the device with its large screen and control buttons.
2. Safety Information
The Aicevoos Laser Measure is a Class 2 laser product. Adherence to the following safety guidelines is crucial for safe operation:
- Laser Radiation: Do not stare into the laser beam or view directly with optical instruments. Direct exposure to the laser beam can cause eye injury.
- Maximum Laser Output: The maximum laser output is less than 1mW.
- Operating Environment: Use the device in a stable environment. Avoid extreme temperatures, humidity, or dusty conditions.
- Battery Safety: Ensure correct battery polarity when inserting. Do not mix old and new batteries or different types of batteries. Remove batteries if the device will not be used for an extended period.
- Maintenance: Do not attempt to disassemble or modify the device. Repairs should only be performed by qualified personnel.
- Children: Keep the device out of reach of children.
3. Package Contents
Verify that all items are present in the package:
- Aicevoos Laser Measurement Tool (229Ft / 70m)
- User Manual
- Hand Strap
- Package Case / Cloth Bag
- 3 x 1.5V AAA Batteries (Note: Some packages may not include batteries. Please check the product description at the time of purchase.)

Figure 2: Illustration of typical package contents, including the laser measure, manual, hand strap, and batteries.
4. Product Overview
Familiarize yourself with the components and controls of your laser measure.

Figure 3: Front view of the Aicevoos Laser Measure, highlighting the 2.4-inch backlit display and key buttons.
4.1. Display Features
- Large 2.4-inch Backlit Screen: Provides clear visibility of measurements in various lighting conditions.
- Electronic Angle Display: Shows the current angle, assisting in horizontal alignment.
- Data Storage: Indicates the memory group number and allows access to up to 99 stored data sets.
- Measurement Reference: Displays the current measurement reference point (front or rear of the device).
- Battery Level Indicator: Shows remaining battery life.
4.2. Button Functions
- START / Measurement Key: Powers on the device and initiates measurements.
- FUNC (Function Key): Cycles through different measurement modes (distance, area, volume, Pythagorean).
- MAX/MIN (Continuous/Maximum/Minimum Measurement Key): Activates continuous measurement mode and displays maximum/minimum values.
- Switch Key for Datum/Unit: Changes the measurement reference point (front/rear) and switches between measurement units (Meters/Inches/Feet).
- Record View/Record Switch: Accesses stored measurements and saves current data.
- OFF/CLEAR: Powers off the device or clears the current measurement.
- +/- (On Broadcast for Plus-Minus): Used for addition and subtraction of measurements.
5. Setup
5.1. Battery Installation
- Locate the battery compartment cover on the rear of the device.
- Slide the cover open.
- Insert three (3) 1.5V AAA batteries, ensuring correct polarity (+/-) as indicated inside the compartment.
- Close the battery compartment cover securely.
5.2. Powering On/Off
- To Power On: Press the START button. The device will power on and display the last measurement mode.
- To Power Off: Press and hold the OFF/CLEAR button for a few seconds. The device will automatically shut down after 150 seconds of inactivity to conserve power.
6. Operating Instructions
6.1. Setting Measurement Reference Point
The device can measure from its front or rear edge. This is crucial for accurate measurements. Press the Switch Key for Datum/Unit to toggle between the front and rear reference points. An icon on the display will indicate the active reference point.

Figure 4: Illustration of the two measurement reference points: considering the device's length (from rear) or not (from front).
6.2. Switching Measurement Units
Long press the Switch Key for Datum/Unit to cycle through measurement units: Meters (m), Inches (in), and Feet (ft).
6.3. Basic Distance Measurement
- Ensure the device is powered on.
- Point the laser beam at the target surface.
- Press the START button once. The laser will activate.
- Press the START button again to take the measurement. The distance will be displayed on the screen.
6.4. Continuous Measurement (Tracking)
- Press the MAX/MIN button. The device will enter continuous measurement mode.
- Move the device slowly towards or away from the target. The display will continuously update the current distance, along with the maximum and minimum measured distances.
- Press the MAX/MIN button again or the START button to exit continuous measurement.
6.5. Area Measurement
- Press the FUNC button until the area measurement icon (rectangle) appears on the display.
- Measure the first side (e.g., length) by pressing START.
- Measure the second side (e.g., width) by pressing START again.
- The calculated area will be displayed on the main line of the screen.
6.6. Volume Measurement
- Press the FUNC button until the volume measurement icon (cube) appears on the display.
- Measure the length by pressing START.
- Measure the width by pressing START.
- Measure the height by pressing START.
- The calculated volume will be displayed on the main line of the screen.
6.7. Pythagorean Measurement (Indirect Measurement)
This mode allows you to calculate inaccessible heights or distances using the Pythagorean theorem.
- Press the FUNC button until the desired Pythagorean mode icon appears (e.g., for 2-point or 3-point measurement).
- Follow the on-screen prompts to take the required measurements (e.g., hypotenuse, base). Ensure the device is held steady and level for accurate results.
- The calculated indirect measurement will be displayed.

Figure 5: Visual representation of multiple measurement modes supported by the device.
6.8. Electronic Angle Measurement
The integrated electronic angle sensor helps determine horizontal alignment. The angle is displayed on the screen in real-time as you tilt the device.
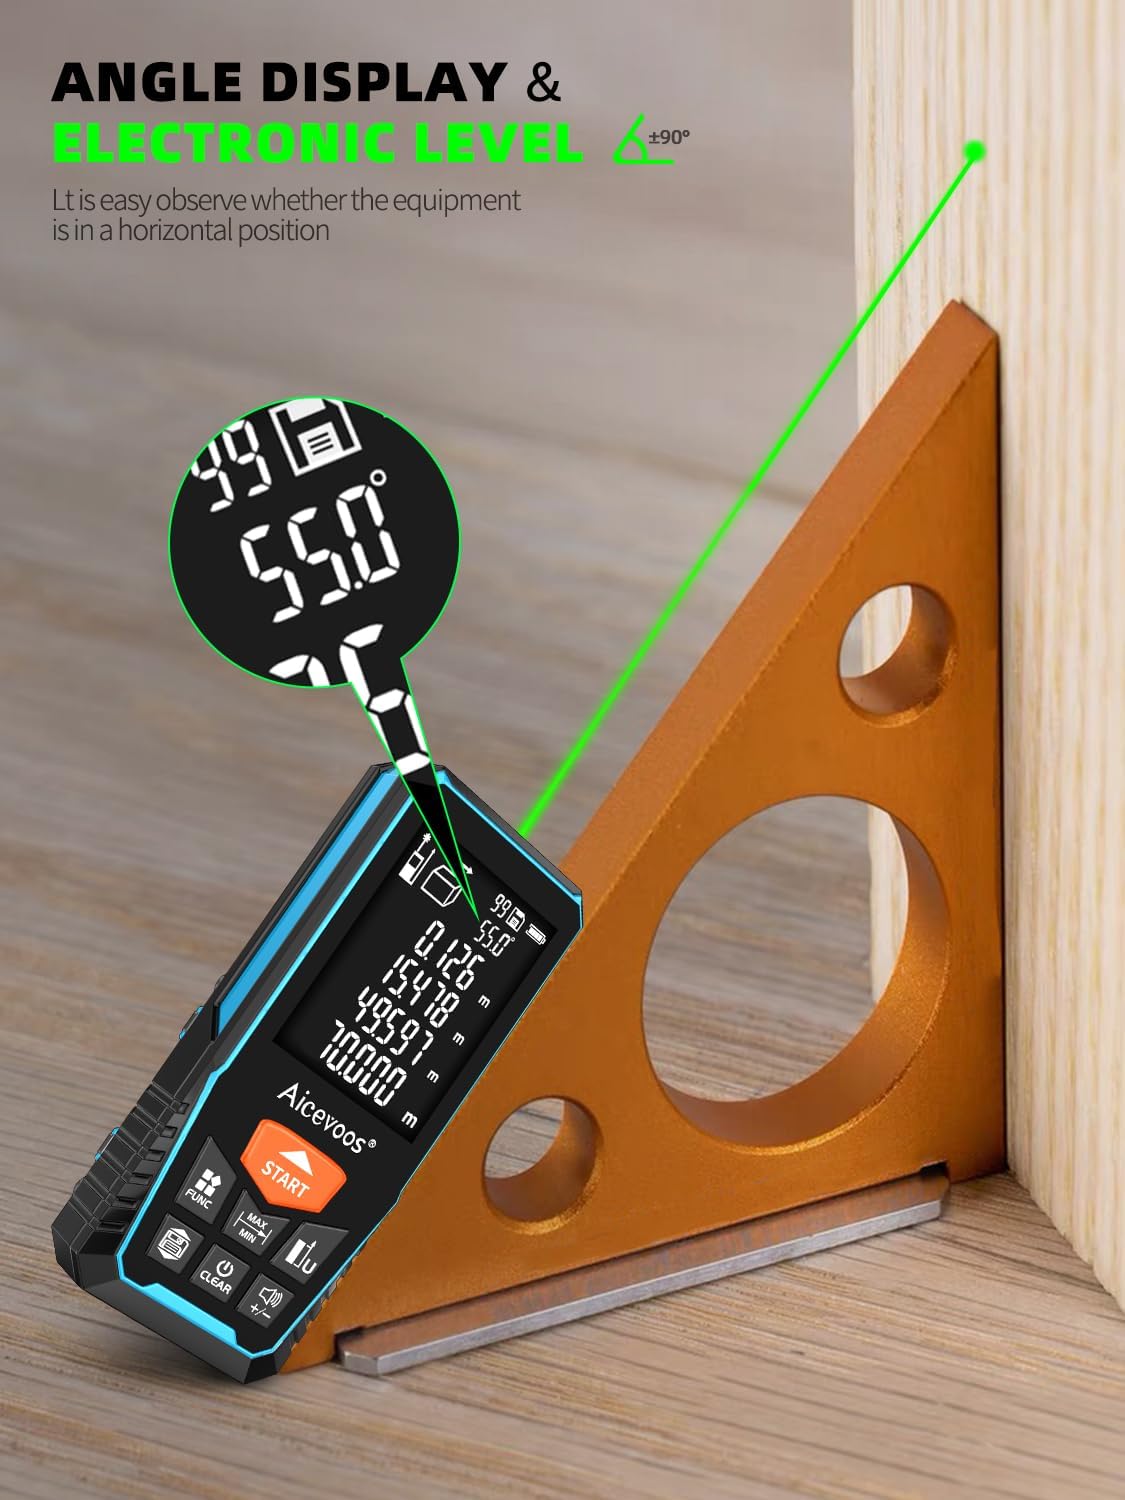
Figure 6: The device displaying an angle, indicating its electronic level capability.
6.9. Data Storage and Recall
The device can store up to 99 groups of measurement data.
- To Store Data: Measurements are automatically stored.
- To Recall Data: Press the Record View/Record Switch button to browse through stored measurements.
- To Delete Data: Press and hold the OFF/CLEAR button while in data recall mode to delete the current displayed data.
7. Maintenance
- Cleaning: Use a soft, damp cloth to clean the device. Do not use abrasive cleaners, solvents, or immerse the device in water.
- Lens Care: The laser lens is a sensitive component. Clean it gently with a soft cloth, similar to cleaning camera lenses.
- Storage: Store the device in its protective case in a cool, dry place when not in use. Remove batteries if storing for extended periods to prevent leakage.
- Temperature: Avoid exposing the device to extreme temperatures or direct sunlight for prolonged periods.
8. Troubleshooting
| Problem | Possible Cause | Solution |
|---|---|---|
| Device does not power on. | Batteries are dead or incorrectly inserted. | Replace batteries or check polarity. |
| Inaccurate measurements. | Incorrect measurement reference point selected; target surface is too reflective/absorbent; device is not stable; environmental interference. | Verify reference point; use a target plate for difficult surfaces; ensure device stability; avoid strong light sources. |
| Laser beam is not visible. | Bright ambient light; laser is off. | Use in lower light conditions or closer to target; press START button to activate laser. |
| Display shows "Error". | Measurement out of range; internal error. | Ensure target is within 0.16ft to 229ft range; power cycle the device. If error persists, contact support. |
9. Specifications
| Model Name | S7G-70-US |
| Measuring Range | 0.05m - 70m (0.16ft - 229ft) |
| Accuracy | ±2mm (±1/16 inch) |
| Laser Class | Class 2, <1mW |
| Laser Type | 510-520nm (Green Beam) |
| Display | 2.4-inch Backlit LCD |
| Unit Options | m / in / ft |
| Data Storage | 99 groups |
| Automatic Shut Down | 150 seconds (laser off after 20s) |
| Power Supply | 3 x 1.5V AAA Batteries |
| Item Weight | 200 Grams |
| Item Dimensions (LxWxH) | 4.65 x 2.05 x 1.06 inches (118 x 52 x 27 mm) |
| IP Rating | IP54 (Dust and splash water protected) |

Figure 7: Detailed specifications of the Aicevoos Laser Measure.
10. Warranty and Support
Aicevoos products are designed for reliability and performance. For warranty information and technical support, please refer to the contact details provided below or on the official Aicevoos website.
- Warranty: Please retain your purchase receipt for warranty claims. Specific warranty terms and duration may vary by region.
- Customer Support: For assistance with product operation, troubleshooting, or warranty inquiries, please contact Aicevoos customer service.
- Manufacturer: Aicevoos
- Contact Information: Refer to the contact details provided in the product packaging or visit the official Aicevoos store on Amazon: Aicevoos Store

Figure 8: For support, refer to the manufacturer's contact details.
Related Documents - S7G-70-US
 |
MILESEEY D5 Professional Laser Distance Meter User Manual User manual for the MILESEEY D5 Professional Laser Distance Meter, detailing its functions, operation, and troubleshooting. |
Ask a question about this manual
Ask about setup, troubleshooting, compatibility, parts, safety, or missing instructions. Manuals+ will review the question and use this page’s manual context to help answer it.