1. Introduction
This manual provides essential information for the safe and efficient operation, assembly, and maintenance of your IRONMAX 10 Amp Electric Tiller. Please read this manual thoroughly before using the product to ensure proper handling and to prevent injury or damage.

Figure 1.1: Overview of the IRONMAX 10 Amp Electric Tiller. This image displays the complete tiller unit, highlighting its compact design and the arrangement of its handle, motor housing, and tines.
The IRONMAX electric tiller cultivator is designed to reduce the effort of tilling fields. It features 4 durable steel tines that efficiently prepare soil for gardening. Its lightweight and compact design, along with a foldable handle and adjustable wheels, allows for easy storage and portability. This tiller is an ideal tool for gardens, flower beds, and greenhouses.
2. Safety Information
Your safety and the safety of others are extremely important. Always observe the following safety precautions when operating this electric tiller.
2.1 General Safety Precautions
- Read and understand all instructions before operating the tiller.
- Wear appropriate personal protective equipment (PPE), including safety glasses, gloves, and sturdy footwear.
- Keep children, bystanders, and pets away from the operating area.
- Do not operate the tiller in wet conditions or rain.
- Ensure the work area is well-lit.
- Always disconnect the power supply before performing any maintenance, cleaning, or when the tiller is not in use.
2.2 Specific Product Safety
- Dual Safety Switch System: The tiller is equipped with a safety button that must be pressed before the ON/OFF switch can be activated. Releasing the ON/OFF switch will immediately stop the equipment.
- Soil Conditions: Do not use the tiller directly in rocky soil to avoid damaging the blades.
- Vegetation Clearance: Remove tall grass or vines from the tilling area before operation to prevent entanglement of the blades and potential stopping of the machine.
- Protective Shield: The sturdy and wide shield is designed to prevent sand splashes from injuring the operator or damaging the motor.
- Over-temperature Protection: The unit includes over-temperature protection to ensure the safety of both the user and the machine.
3. Product Features
The IRONMAX 10 Amp Electric Tiller offers several features designed for efficient and convenient gardening:
- Powerful 10 Amp Motor: Equipped with a 120V/60HZ 10AMP copper motor, providing a no-load speed of 365 RPM for strong tilling power with low loss and high conversion efficiency.
- Large Tilling Size: Features 4 steel tines with a 14-inch working width and a maximum 8.7-inch working depth, enhancing efficiency and coverage.
- Safety Button & ON/OFF Switch: A dual safety switch system provides protection against accidental activation.
- Easy Assembly & Foldable Design: Simple structure with clear installation steps for quick setup. The lightweight design, foldable handle, and 2-position auxiliary adjustment wheels allow for compact storage and easy transport.
- Convenient Operation: Operates with an extension cord and power source, offering an environmentally friendly alternative to gas-powered equipment. Ergonomic grips reduce arm fatigue during use.
4. Components Overview
Familiarize yourself with the main components of your electric tiller:

Figure 4.1: Labeled diagram of the IRONMAX Electric Tiller showing key components. This diagram illustrates the placement of the ON/OFF trigger, safety button, cable clamps, lever clamps for folding, power cord, powerful motor, 4 efficient tiller tines, protective shield, and flexible wheels.
4.1 Key Components
| Component | Description |
|---|---|
| Powerful Motor | 10 Amp motor providing the power for tilling. |
| 4 Efficient Tiller Tines | Durable steel blades for digging and cultivating soil. |
| Switch ON/OFF Trigger & Press Safety Button | Controls power to the motor, requiring simultaneous activation for safety. |
| Protective Shield | Guards against debris and soil splashes during operation. |
| Flexible Wheels | Adjustable wheels for easy transport and storage. |
| Foldable Handle (Lever Clamps) | Allows the handle to be folded for compact storage and transport. |
| Cable Clamps | Secures the power cord along the handle. |
5. Assembly Instructions
The IRONMAX Electric Tiller is designed for straightforward assembly. Follow these steps to prepare your tiller for use:
- Unpack Components: Carefully remove all parts from the packaging. Verify that all components listed in the packing list (refer to your included user manual for the complete list) are present and undamaged.
- Attach Lower Handle: Connect the lower handle sections to the main motor unit. Ensure all bolts and fasteners are securely tightened.
- Assemble Upper Handle: Attach the upper handle, which includes the control switches, to the lower handle sections. Use the provided lever clamps to secure the handle in place.
- Secure Power Cord: Use the cable clamps to neatly secure the power cord along the handle, preventing it from interfering with operation or becoming damaged.
- Adjust Wheels: The tiller features adjustable wheels. For tilling, ensure the wheels are in the appropriate position (often raised or adjusted for depth). For transport, they can be lowered.
- Inspect Tines: Before first use, ensure the 4 steel tines are securely attached and free from any obstructions.
The foldable handle design allows for easy setup and breakdown. When assembling, ensure the lever clamps are properly engaged to provide a stable handle for operation.
6. Operation
Proper operation ensures effective tilling and prolongs the life of your IRONMAX Electric Tiller.
6.1 Before Operation
- Area Preparation: Clear the tilling area of any large rocks, debris, tall grass, or vines that could entangle the blades.
- Power Connection: Connect the tiller to a suitable 120V/60HZ power source using a heavy-duty outdoor extension cord appropriate for the tiller's 10 Amp power input.
- Personal Protective Equipment: Always wear safety glasses, hearing protection, sturdy gloves, and closed-toe footwear.
6.2 Starting and Stopping the Tiller
- To Start: Press and hold the safety button located on the handle, then simultaneously squeeze the ON/OFF trigger. The tines will begin to rotate.
- To Stop: Release the ON/OFF trigger. The tines will stop rotating.
6.3 Tilling Techniques

Figure 6.1: The IRONMAX Electric Tiller actively cultivating soil in a garden bed. This image demonstrates the tiller's effectiveness in breaking up and aerating the ground.
- Working Depth and Width: The tiller has a 14-inch working width and can reach a maximum depth of 8.7 inches. Adjust your tilling passes to achieve desired results.
- Consistent Movement: Move the tiller slowly and steadily across the area to be tilled. Do not force the machine.
- Multiple Passes: For compacted soil or deeper tilling, make multiple passes, gradually increasing the depth with each pass.
- Ergonomic Design: The ergonomically designed handle helps reduce hand or arm strain, especially when working in difficult soils.

Figure 6.2: Visual representation of the tiller's working depth (8.7 inches) and working width (14 inches). This graphic highlights the operational dimensions of the tiller's blades.

Figure 6.3: Examples of various applications for the electric tiller, including greenhouses, crops, backyard gardens, and orchards. This image demonstrates the versatility of the tiller across different gardening environments.
7. Maintenance
Regular maintenance ensures the longevity and optimal performance of your IRONMAX Electric Tiller.
- Cleaning: After each use, disconnect the power and clean the tines and protective shield. Remove any soil, grass, or debris that may have accumulated. Use a damp cloth for the main unit, avoiding direct water spray on electrical components.
- Blade Inspection: Periodically inspect the tines for wear, damage, or dullness. Replace worn or damaged tines to maintain tilling efficiency.
- Cord Inspection: Check the power cord and extension cord for any cuts, fraying, or damage before each use. Do not use if damaged.
- Storage: Store the tiller in a dry, secure location, away from moisture and extreme temperatures. The foldable handle allows for compact storage.
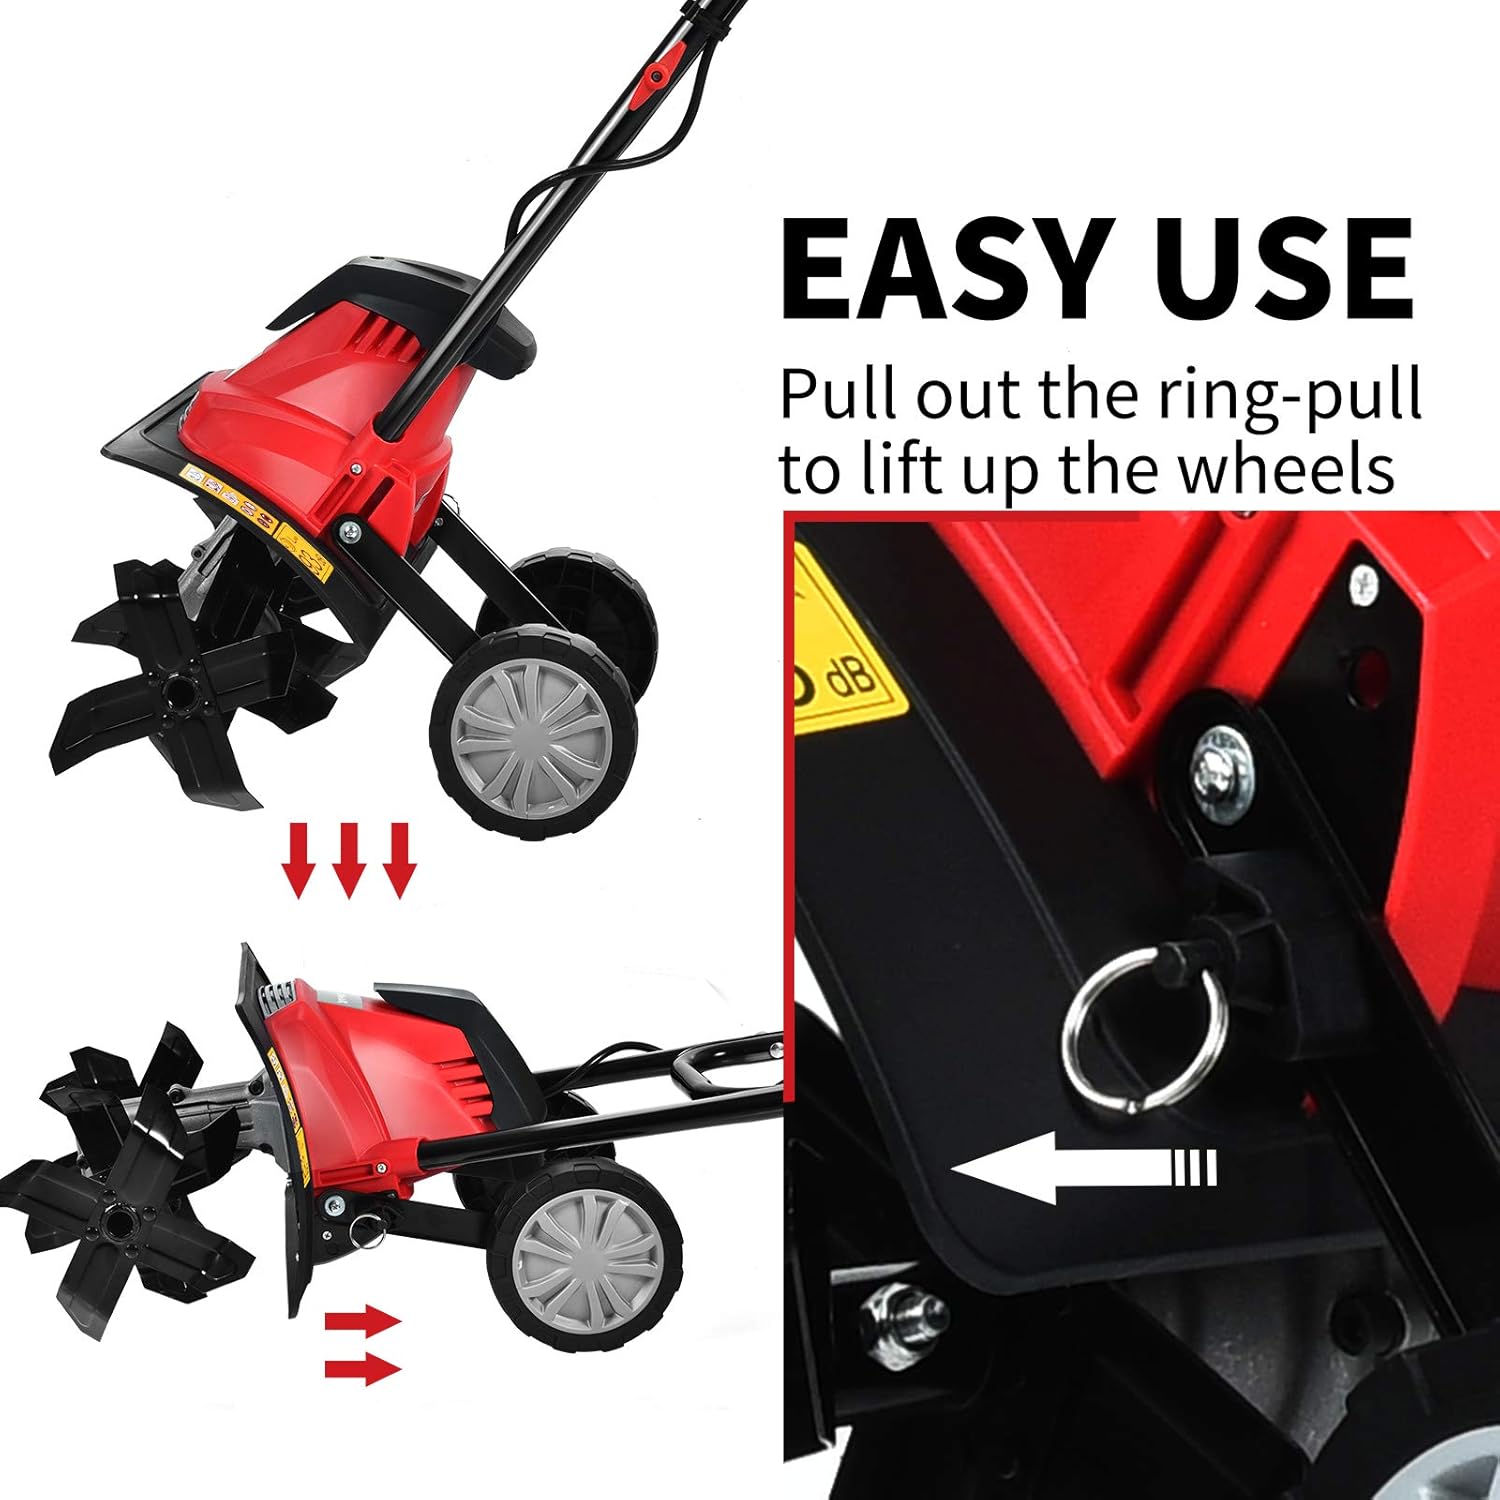
Figure 7.1: Illustration of the "Easy Use" feature, demonstrating how to pull out the ring-pull to lift up the wheels. This mechanism facilitates easy transport and compact storage of the tiller.
8. Troubleshooting
Refer to the table below for common issues and their potential solutions:
| Problem | Possible Cause | Solution |
|---|---|---|
| Tiller does not start. | No power supply; Safety button not pressed; ON/OFF trigger not engaged. | Check power connection and extension cord. Ensure both safety button and trigger are pressed simultaneously. |
| Blades stop rotating during operation. | Blades entangled with tall grass/vines; Overload protection activated. | Disconnect power, clear any entanglement. Allow motor to cool if overload protection was triggered. |
| Tiller not tilling effectively. | Soil too hard/rocky; Blades dull or damaged. | Pre-moisten hard soil. Avoid rocky areas. Inspect and replace dull/damaged blades. Make multiple passes. |
| Excessive vibration or noise. | Loose components; Damaged blades. | Disconnect power, check all fasteners for tightness. Inspect blades for damage. |
9. Specifications
Detailed technical specifications for the IRONMAX 10 Amp Electric Tiller:
| Specification | Value |
|---|---|
| Model Number | IR358TG |
| Power Input | 10 Amp |
| Main Voltage | 120V/60HZ |
| No-Load Speed | 365 RPM |
| Number of Blades | 4 Steel Angled Tines |
| Working Width | 360mm (14 inches) |
| Working Depth | Max. 220mm (8.7 inches) |
| Net Weight | 18.5 lbs (8.4 kg) |
| Overall Dimensions (L x W x H) | 14.5'' x 40'' x 41'' (36.8cm x 101.6cm x 104.1cm) |
| Sound Power Level | 91.64 dB(A) |
| Material | Alloy Steel |
| Color | Black + Red |

Figure 9.1: A visual representation emphasizing the 220mm (8.7 inch) working depth achievable with the 10 Amp motor. This image provides a contextual understanding of the tiller's operational depth.
10. Warranty and Support
For warranty information, technical support, or to inquire about replacement parts, please contact IRONMAX customer service. Refer to the product packaging or the official IRONMAX website for the most current contact details.
Note: Protection plans are available for purchase separately and are not included with the standard product warranty.