1. Introduction
Thank you for choosing the EROMMY 11x13 Louvered Pergola. This outdoor structure is designed to enhance your garden, patio, or deck with its adjustable louvered roof, integrated drainage system, and durable aluminum frame with a wood-grain finish. This manual provides essential information for safe assembly, operation, and maintenance to ensure long-lasting enjoyment of your pergola.

Image 1.1: EROMMY 11x13 Louvered Pergola with curtains and netting, set up on a patio.
2. Safety Information
Please read and understand all safety warnings and instructions before assembly and use. Failure to follow these instructions may result in injury or damage to the product.
- Secure Installation: Always ensure the pergola is securely anchored to a stable surface to prevent tipping or movement, especially in windy conditions. Use the provided expansion screws for hard ground installation.
- Wind Conditions: In strong winds, it is recommended to close the louvered roof and secure any curtains or netting to prevent damage.
- Assembly: Assembly requires 3-4 people. Exercise caution during assembly to avoid pinching or crushing injuries. Wear appropriate safety gear, such as gloves.
- Weight Distribution: Do not hang heavy objects from the pergola frame or louvers.
- Regular Inspection: Periodically inspect all bolts, screws, and connections to ensure they remain tight and secure.
- Snow Load: In areas with heavy snowfall, it is advisable to clear snow from the louvered roof to prevent structural damage.
3. Package Contents
The EROMMY 11x13 Louvered Pergola is shipped in multiple boxes. Verify all components are present and undamaged before beginning assembly. Refer to the parts list in your separate assembly guide for detailed component identification.

Image 3.1: The pergola components are typically distributed across 6 shipping boxes.
Expected Components:
- Aluminum Frame Components (Posts, Beams)
- Louvered Roof Panels
- Operating Mechanism for Louvers
- Waterproof Curtains
- Insect Netting
- Hardware Kit (screws, bolts, anchors)
- Assembly Tools (basic wrenches, hex keys may be included)
4. Specifications
| Feature | Detail |
|---|---|
| Brand | EROMMY |
| Model | 11x13 Louvered Pergola |
| Product Dimensions (L x W x H) | 153.6" x 133" x 88.98" |
| Item Weight | 315 Pounds |
| Frame Material | Aluminum (Wood Grain Finish) |
| Roof Material | Aluminum Louvers |
| Curtain/Netting Material | Polyester |
| Water Resistance Level | Water Resistant (Rainproof Louvers) |
| UV Protection | 99% |
| Assembly Required | Yes |

Image 4.1: Detailed product dimensions for the 11x13 Louvered Pergola.
5. Setup (Assembly)
The assembly process for the EROMMY 11x13 Louvered Pergola is designed to be straightforward. It is recommended that 3-4 people participate in the assembly, which typically takes approximately 2-3 hours. Always refer to the separate, detailed assembly instructions provided in your package for step-by-step guidance and diagrams.
- Preparation: Clear the assembly area. Ensure you have enough space and all tools listed in the assembly guide. Unpack all boxes and identify components using the parts list.
- Frame Assembly: Begin by assembling the main aluminum frame, including the posts and horizontal beams. Pay close attention to the orientation of each part as indicated in the diagrams.
- Louver Installation: Install the louvered roof panels. The mechanism for the slats is largely pre-assembled for ease of installation.
- Gutter System: Ensure the integrated gutter system components are correctly aligned to facilitate proper rainwater drainage through the support pillars.
- Anchoring: Secure the pergola to your chosen surface using the provided expansion screws for stable installation.
- Curtains and Netting: Attach the waterproof curtains and insect netting to the tracks. Ensure they can move freely.

Image 5.1: The stable base stand features pre-drilled holes for secure anchoring.
6. Operating Instructions
6.1 Adjustable Louvered Roof
The pergola features an adjustable louvered roof, allowing you to control sunlight and shade. The top is composed of multiple louver sections that can be individually adjusted using a hand crank mechanism.
- Opening Louvers: Turn the handle to open the louvers, allowing sunlight and airflow. This is ideal for sunbathing or enjoying an open sky view.
- Closing Louvers: Turn the handle to close the louvers, providing shade and rain protection. When fully closed, the herringbone design and integrated gutter system efficiently direct rainwater away.

Image 6.1: Adjust the louver angle by turning the handle.

Image 6.2: Multiple louver positions: closed, half-open, and fully open.
6.2 Integrated Gutter System
The pergola features an innovative herringbone-shaped design for the louvered roof, which, combined with horizontal crossbeams, forms an efficient built-in eaves gutter system. This system directs rainwater from each panel into the support pillars, preventing water accumulation on the roof.
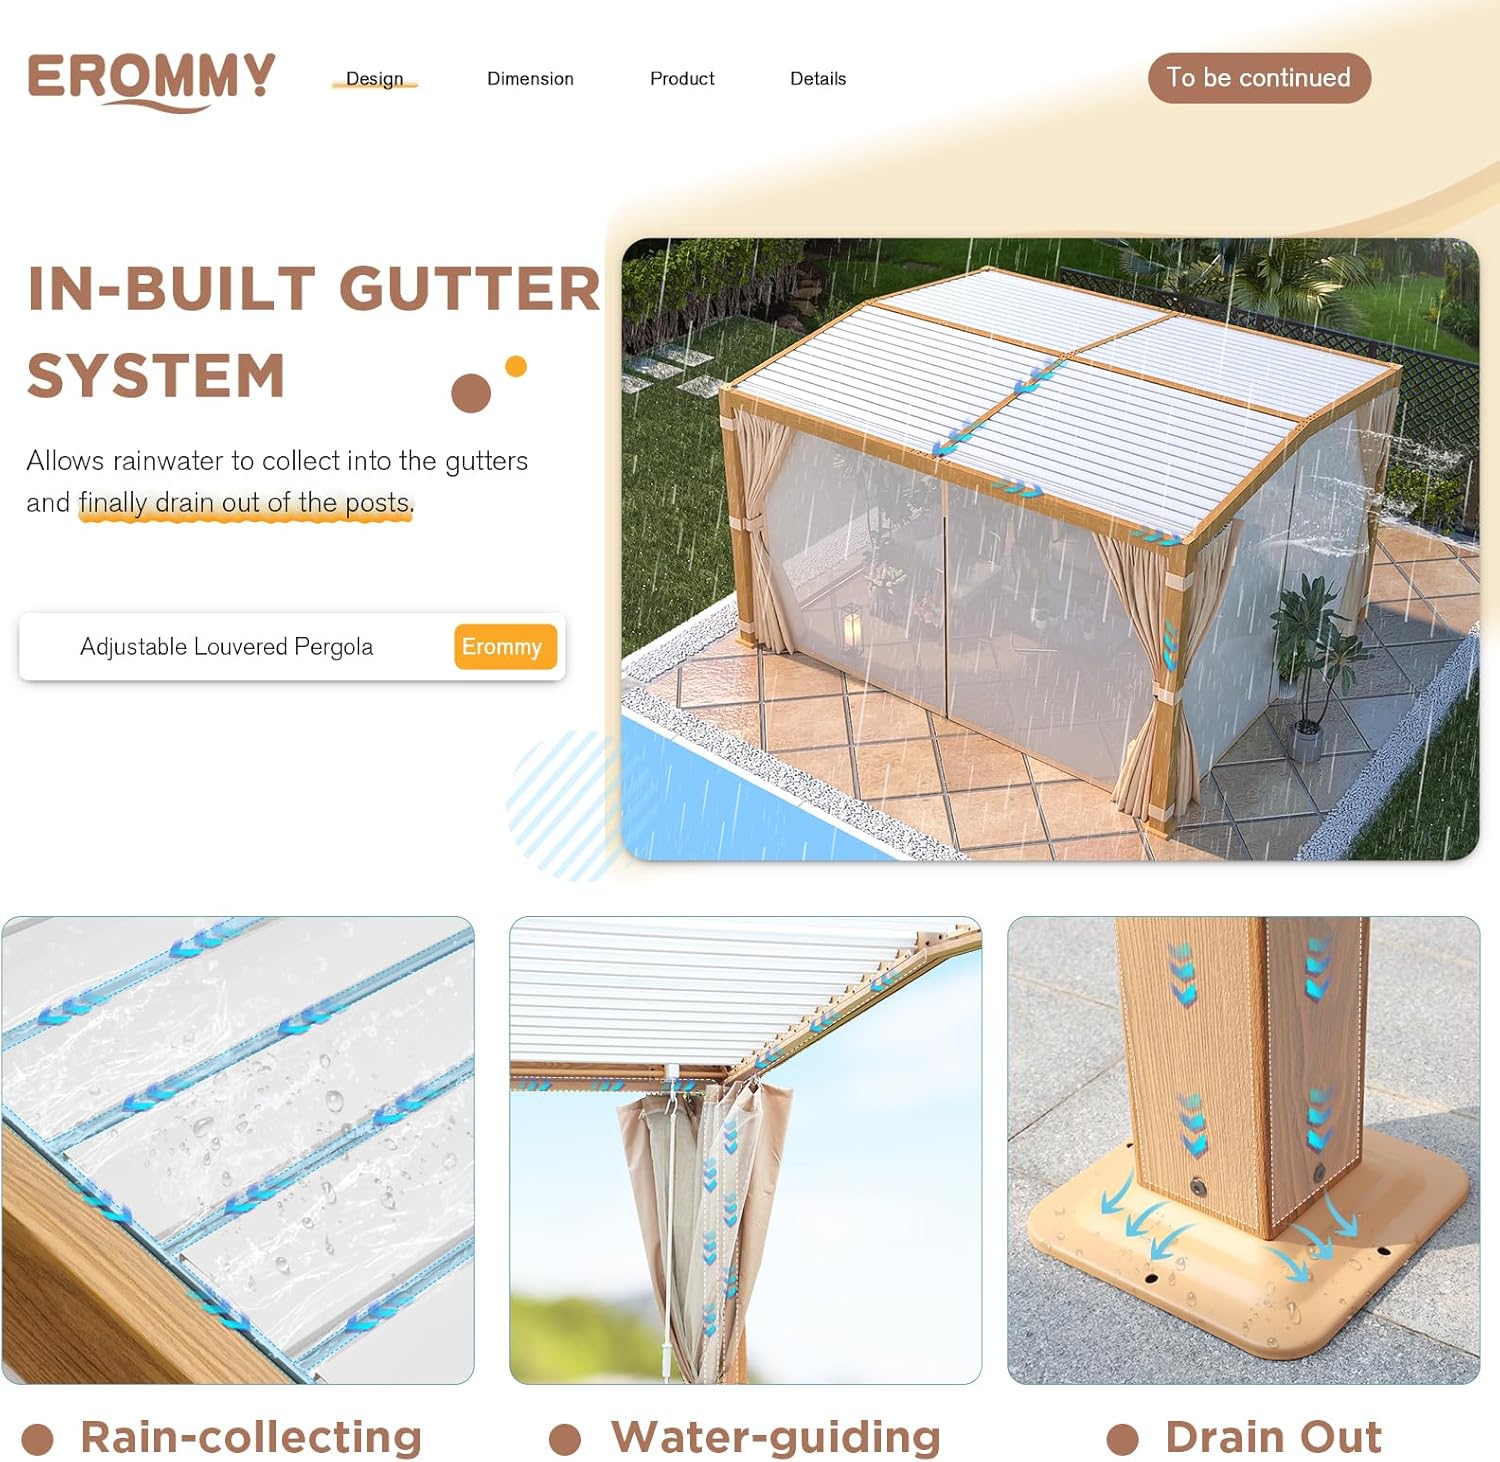
Image 6.3: The integrated gutter system efficiently drains rainwater through the posts.
6.3 Curtains and Netting
The pergola includes both waterproof curtains and insect netting, which can be operated independently on a double-track system.
- Privacy and Sun Protection: Use the curtains for increased privacy or additional shade from direct sunlight.
- Insect Protection: Deploy the netting to create an enclosed space, protecting against insects while maintaining airflow.
- Securing Curtains/Netting: Utilize the humanized straps located on the upper, middle, and lower sections to tie back or secure the curtains and netting, preventing them from flapping in windy conditions.

Image 6.4: Humanized straps help secure curtains and netting.
7. Maintenance
Regular maintenance will extend the lifespan and preserve the appearance of your EROMMY Louvered Pergola.
- Cleaning the Frame: Clean the aluminum frame with a mild soap and water solution. Rinse thoroughly with clean water and dry with a soft cloth. Avoid abrasive cleaners or harsh chemicals.
- Louver Cleaning: Periodically clean the louvered panels to remove leaves, debris, or dirt that may accumulate. This ensures smooth operation and efficient drainage.
- Curtain and Netting Care: The polyester curtains and netting can be spot cleaned with mild soap and water. For deeper cleaning, follow care instructions on the fabric tags. Ensure they are dry before storing or closing for extended periods to prevent mildew.
- Hardware Check: Annually, or more frequently if exposed to harsh weather, check all bolts, screws, and connections. Tighten any loose hardware.
- Drainage System: Ensure the built-in eaves gutter system and support pillar drainage channels are free from blockages (e.g., leaves, dirt) to prevent water accumulation.
8. Troubleshooting
This section addresses common issues you might encounter.
| Problem | Possible Cause | Solution |
|---|---|---|
| Louvers not opening/closing smoothly | Debris in mechanism; bent louver; loose connection. | Clear debris. Inspect louvers for damage. Check and tighten operating mechanism connections. |
| Water accumulation on roof | Louvers not fully closed; drainage channels blocked. | Ensure louvers are fully closed. Clear any blockages from gutters and drainage pillars. |
| Pergola feels unstable | Anchoring not secure; loose frame connections. | Re-check all anchor points and ensure they are firmly secured. Tighten all frame bolts and screws. |
| Curtains/Netting not moving freely | Track obstruction; damaged hooks/glides. | Inspect tracks for debris or damage. Replace any broken hooks or glides. |
9. Warranty and Support
For any missing parts, damaged components, or questions regarding assembly, operation, or maintenance, please contact EROMMY customer service.
Refer to your purchase documentation or the EROMMY official website for specific warranty details and contact information. Please have your model number (11x13 Louvered Pergola) and purchase date available when contacting support.
Contact Information:
Please visit the EROMMY Store on Amazon or refer to the contact details provided in your product packaging.