1. Introduction
This manual provides essential instructions for the safe and efficient operation, assembly, and maintenance of your Yuejiqi G3530 Foldable Treadmill. Please read this manual thoroughly before initial use to ensure proper setup and to maximize the lifespan of your equipment. Retain this manual for future reference.

Image 1.1: The Yuejiqi G3530 Treadmill shown in both operational and folded states, highlighting its compact design.
2. Safety Information
To prevent injury and ensure safe operation, adhere to the following safety guidelines:
- Always attach the safety key to your clothing before starting the treadmill. In case of an emergency, pulling the safety key will immediately stop the machine.
- Ensure the treadmill is placed on a flat, stable surface with adequate clearance around it (at least 2 feet on sides and rear).
- Do not exceed the maximum user weight capacity of 240 LBS (108 kg).
- Keep children and pets away from the treadmill during operation.
- Consult a physician before starting any new exercise program.
- Wear appropriate athletic footwear during use.
- Do not operate the treadmill if it is damaged or malfunctioning.
- Unplug the treadmill from the power outlet when not in use or before cleaning and maintenance.
3. Package Contents
Verify that all components are present in the package before beginning assembly:
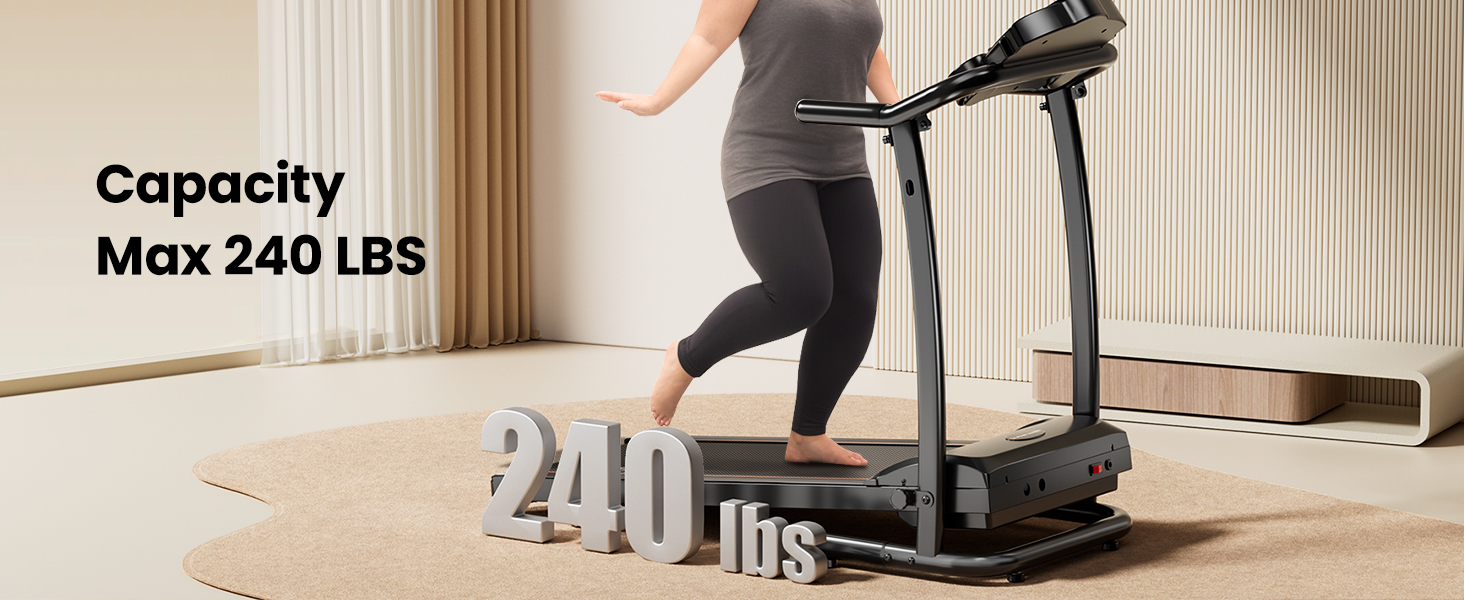
Image 3.1: Visual representation of all items included in the product package.
- User Manual x 1
- Safety Key x 1
- Plum Knob x 1
- Screw M8*25 x 2
- Lubricating Oil x 1
- Inner Hexagon Spanner 5mm x 1
- Inner Hexagon Spanner 6mm x 1
4. Assembly Instructions
The Yuejiqi G3530 treadmill is designed for quick and straightforward assembly. Most of the unit comes pre-assembled. Follow these steps to complete the setup:
- Carefully remove all components from the packaging.
- Lift the console frame into the upright position.
- Secure the console frame to the base using the provided screws and inner hexagon spanners.
- Attach the plum knob to secure the folding mechanism.
- Ensure all connections are tight and secure before plugging in the power cord.
Once assembled, place the treadmill in your desired location, ensuring it is on a level surface and has sufficient clear space around it.
5. Operating Instructions
5.1. LED Display Console

Image 5.1: The LED display console showing controls, data readouts, and integrated features like cup holders and a device holder.
The LED display provides real-time feedback on your workout:
- Time: Duration of your workout.
- Speed: Current running belt speed (0.5 - 6.0 MPH).
- Distance: Total distance covered during the session.
- Calories: Estimated calories burned.
The console also features integrated cup holders and a phone/tablet holder for convenience during your exercise.
5.2. Starting and Stopping
- Plug the treadmill into a grounded electrical outlet.
- Attach the safety key to the designated slot on the console and clip the other end to your clothing. The treadmill will not operate without the safety key in place.
- Press the 'START' button to begin. The belt will start moving at a low speed.
- Use the speed adjustment buttons (+/-) to increase or decrease the belt speed. Quick speed buttons (2/4/6 MPH) are also available.
- To stop, press the 'STOP' button. In an emergency, pull the safety key to immediately halt the treadmill.
5.3. Adjusting Incline

Image 5.2: Illustration of the three manual incline settings available on the treadmill.
The Yuejiqi G3530 features 3 levels of manual incline, up to 6%. To adjust the incline:
- Ensure the treadmill is stopped and unplugged for safety.
- Locate the incline adjustment pins at the rear of the treadmill base.
- Lift the rear of the treadmill deck and adjust the pins to the desired incline level (0%, 3%, or 6%).
- Ensure both sides are set to the same level before resuming use.
5.4. Preset Programs
The treadmill includes 12 preset programs (P1-P12) designed to offer varied workout intensities. To select a program:
- From the standby mode, press the 'PROG' button to cycle through the available programs.
- Once your desired program is displayed, press 'START' to begin the workout. The program will automatically adjust speed and duration according to its profile.
5.5. Music Playback
The built-in speaker allows you to enjoy music during your workout. Connect your device to the treadmill's audio input (if available) or via Bluetooth (if supported by your specific model) to play audio through the integrated speakers.
6. Maintenance
Regular maintenance ensures the longevity and optimal performance of your treadmill.
6.1. Lubrication
The running belt requires periodic lubrication to reduce friction and wear. Use the provided lubricating oil or a treadmill-specific silicone lubricant.
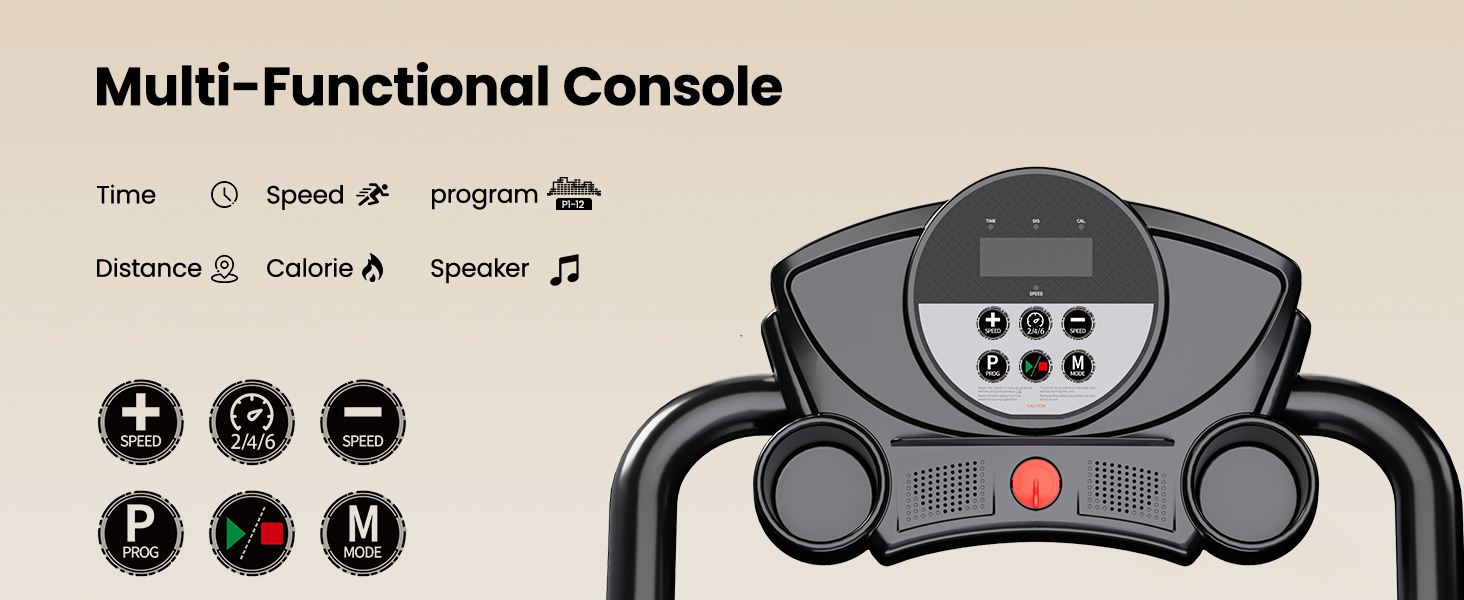
Image 6.1: Guide for applying lubricant to the running belt and a table detailing lubrication frequency based on usage.
Lubrication Schedule:
| Usage Frequency | Maintenance Frequency |
|---|---|
| <3 Hours/Week | Every 2 Months |
| 4-7 Hours/Week | Every 1 Month |
| >8 Hours/Week | Every 2 Weeks |
Application Steps:
- Turn off and unplug the treadmill.
- Loosen the running belt by turning the rear roller bolts counter-clockwise (usually 2-3 turns).
- Lift the edge of the running belt and apply a thin line of lubricant evenly across the center of the deck, underneath the belt.
- Tighten the running belt by turning the rear roller bolts clockwise until the belt is snug but not overly tight.
- Plug in the treadmill and run it at a slow speed (e.g., 1 MPH) for 5 minutes to distribute the lubricant.
6.2. Cleaning
- Wipe down the console and exterior surfaces with a damp cloth after each use. Avoid abrasive cleaners.
- Periodically vacuum underneath the treadmill to remove dust and debris that can accumulate.
7. Troubleshooting
Refer to this section for common issues and their solutions:
| Problem | Possible Cause | Solution |
|---|---|---|
| Treadmill does not start | Safety key not in place; Power cord unplugged; Power switch off | Ensure safety key is fully inserted; Check power cord connection; Turn on the main power switch (usually located near the power cord inlet). |
| Running belt slips or hesitates | Belt too loose; Insufficient lubrication | Adjust belt tension (refer to manual for specific instructions); Apply lubricant as per maintenance schedule. |
| Unusual noise during operation | Loose components; Debris under belt; Motor issue | Check and tighten all visible bolts and screws; Clean under the running belt; If noise persists, contact customer support. |
| Display not working | Loose cable connection; Power issue | Check all cable connections to the console; Verify power supply. |
8. Specifications
Detailed technical specifications for the Yuejiqi G3530 Treadmill:

Image 8.1: Illustration detailing the 3.0 HP low-noise motor and its performance characteristics.
| Feature | Specification |
|---|---|
| Brand | Yuejiqi |
| Model Name | G3530 |
| Motor Horsepower | 3.0 HP |
| Speed Range | 0.5 - 6.0 MPH |
| Maximum Incline | 6% (3 manual levels) |
| Maximum Weight Recommendation | 240 LBS |
| Running Surface (Deck Length x Width) | 39.4" x 15" |
| Product Dimensions (L x W x H) | 51.2" x 23" x 44.3" |
| Folded Size (L x W x H) | 51.2" x 23" x 44.3" (Note: Folded dimensions are typically height-oriented, the provided data seems to indicate the same footprint but folded upright) |
| Item Weight | 46.3 Pounds |
| Material | Alloy Steel |
| Display Type | LED |
| Special Features | Compact Design, Foldable, Lightweight, Manual Incline, Music Player |
| Included Components | Lubricant, Safety Key, Tool Kit, User Manual |
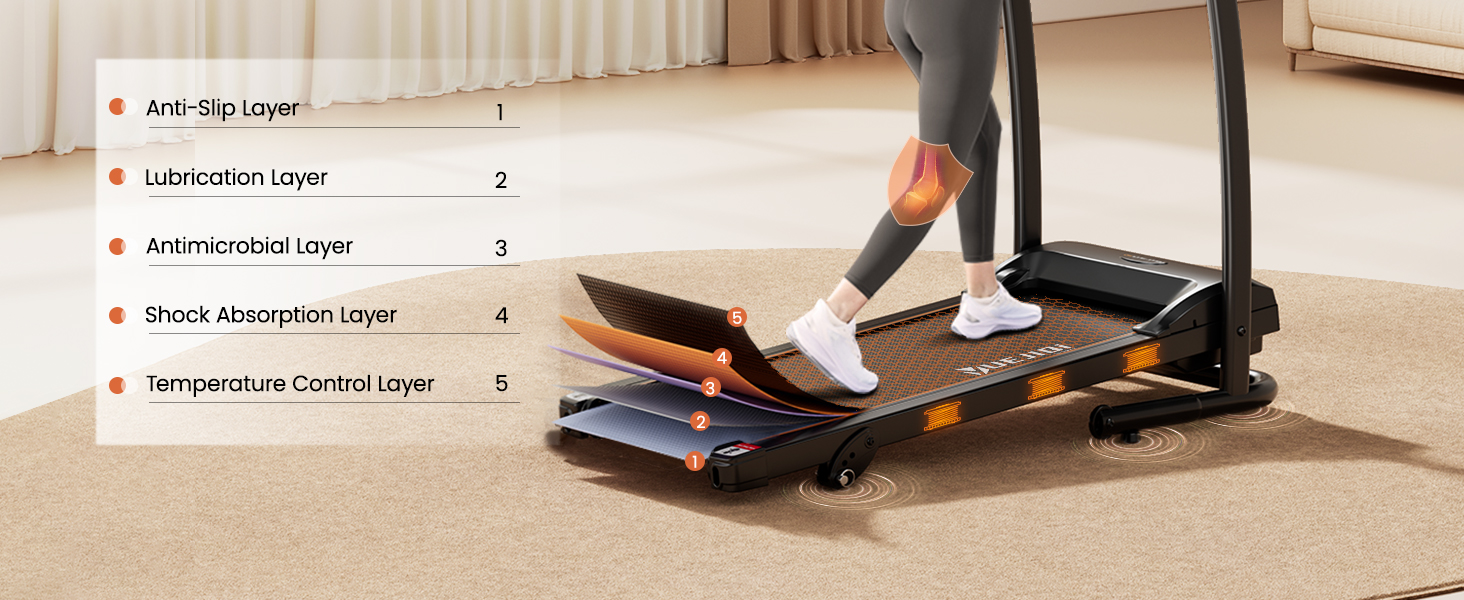
Image 8.2: Cross-section view illustrating the multi-layer construction of the running belt for comfort and durability.
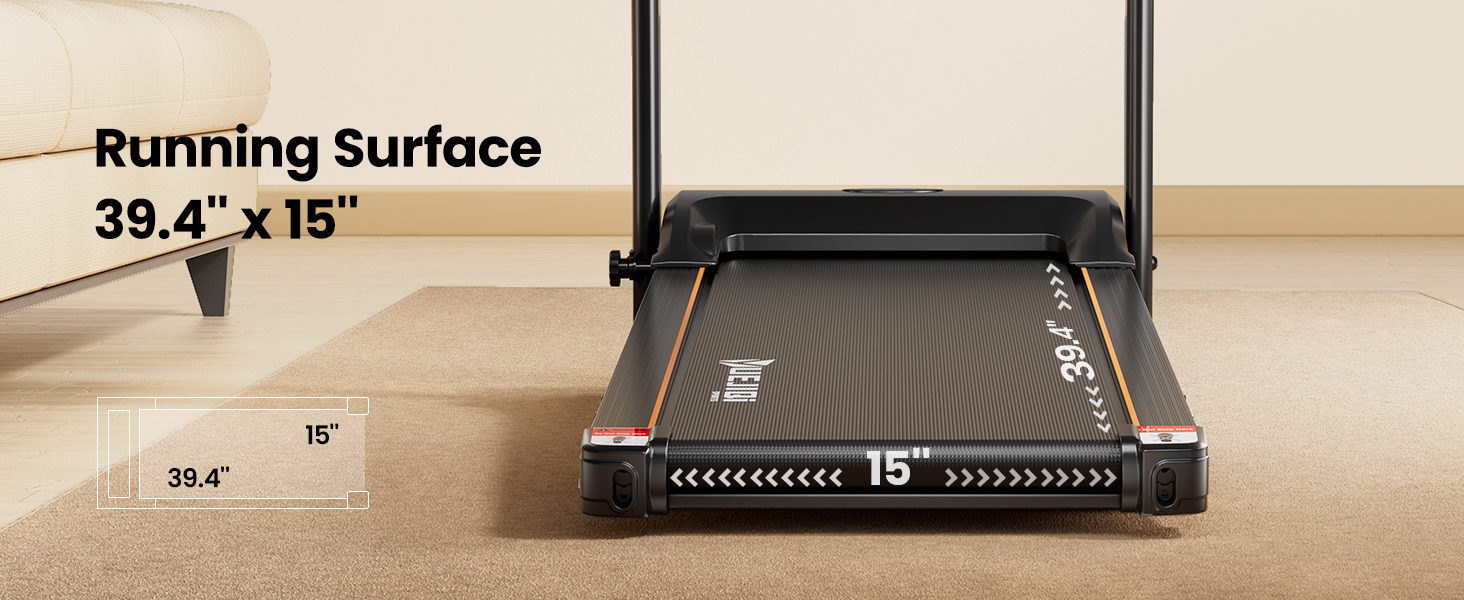
Image 8.3: Visual representation of the treadmill's compact folding design and dimensions for storage and portability.
9. Warranty and Support
The Yuejiqi G3530 Treadmill comes with a 1-year manufacturer's warranty covering defects in materials and workmanship from the date of purchase.
For warranty claims, technical assistance, or any questions regarding your treadmill, please contact Yuejiqi customer support through the retailer where the product was purchased or refer to the contact information provided in your product packaging.
Please have your model number (G3530) and proof of purchase ready when contacting support.