1. Introduction
Thank you for choosing the DMASUN Home Exercise Spin Bike. This manual provides essential information for the safe assembly, operation, maintenance, and troubleshooting of your new fitness equipment. Please read this manual thoroughly before use and retain it for future reference.

Image 1.1: DMASUN Home Exercise Spin Bike
2. Safety Information
Before using the exercise bike, please observe the following safety precautions:
- Consult a physician before starting any new exercise program.
- Ensure all parts are securely tightened before each use.
- Place the bike on a flat, stable surface.
- Keep children and pets away from the equipment during use.
- Wear appropriate athletic footwear and clothing.
- The maximum user weight capacity is 150 kg (300 lbs).
- Use the emergency brake to stop the flywheel quickly if needed.
3. Package Contents
Verify that all components are present before assembly. If any parts are missing or damaged, please contact customer support.
- Main Frame
- Front Stabilizer
- Rear Stabilizer
- Seat Post and Saddle
- Handlebar Post and Handlebar
- Left and Right Pedals
- Digital Monitor
- Water Bottle Cage
- Assembly Tools (wrenches, hex keys)
- Instruction Manual
4. Setup and Assembly
Follow these steps to assemble your DMASUN Home Exercise Spin Bike. Assembly tools are included.
4.1. Attaching Stabilizers
- Attach the front and rear stabilizers to the main frame using the provided bolts and washers. Ensure they are securely tightened with the wrench.
Video 4.1: Aerobic Bike Setup Video (Part 1 - Stabilizers)
4.2. Attaching Seat and Handlebar Posts
- Insert the seat post into the main frame and secure it with the adjustment knob.
- Attach the saddle to the seat post using the provided wrench.
- Insert the handlebar post into the main frame and secure it with its adjustment knob.
- Attach the handlebar to the handlebar post using the provided bolts and hex keys.
Video 4.2: Aerobic Bike Installation Video (Seat and Handlebar)
4.3. Attaching Pedals
- Identify the Left (L) and Right (R) pedals. The left pedal tightens counter-clockwise, and the right pedal tightens clockwise.
- Thread the pedals into the crank arms and tighten them securely with the wrench.
4.4. Installing Digital Monitor
- Connect the sensor cable from the bike to the digital monitor.
- Attach the digital monitor to the handlebar post using the provided screws.
- Insert 2 AAA batteries (not included) into the monitor's battery compartment.
5. Product Features
- Sturdy, Stable, and Safe: The exercise bike has a maximum load capacity of 150kg (300 lbs). The main frame is constructed from thick alloy steel, ensuring stability and preventing movement or wobbling even during intense use.
- Magnetic Resistance for Quiet and Smooth Operation: Features a magnetic resistance system that ensures a quiet and smooth cycling experience. There is no need to worry about disturbing others. Compared to wool felt brake pads, our magnetic resistance exercise bike offers superior durability.
- Easy Assembly, 30-Minute Setup: Assembly and disassembly tools are included, allowing for quick setup in approximately 30 minutes, even for individuals assembling alone. Equipped with transport wheels for convenient movement and storage.
- Thoughtful Design Details: The DMASUN fitness bike includes a water bottle cage, transport wheels, non-slip cage pedals, and horizontal adjusters. The newly upgraded handlebar provides a more comfortable cycling experience, a large, easy-to-read digital display, and a wide grip.
- Real-time Sports Data Monitoring: The DMASUN spin bike is equipped with a display that provides real-time sports data, including exercise time, distance, calories burned, odometer, and pulse. Use this data to plan and track your fitness progress.

Image 5.1: Digital Monitor for Real-time Data

Image 5.2: Transport Wheels
6. Operating Instructions
Familiarize yourself with the bike's adjustments and monitor functions for an optimal workout.
6.1. Adjusting Seat Height and Position
Adjust the seat height so that your knee is slightly bent when the pedal is at its lowest point. The seat can also be adjusted horizontally for comfort.

Image 6.1: Seat Adjustment
6.2. Adjusting Handlebar Height
Adjust the handlebar height to a comfortable position that allows for a natural posture without straining your back or shoulders.

Image 6.2: Handlebar Adjustment
6.3. Adjusting Resistance
Turn the resistance knob clockwise to increase resistance and counter-clockwise to decrease it. Push the knob down to engage the emergency brake.
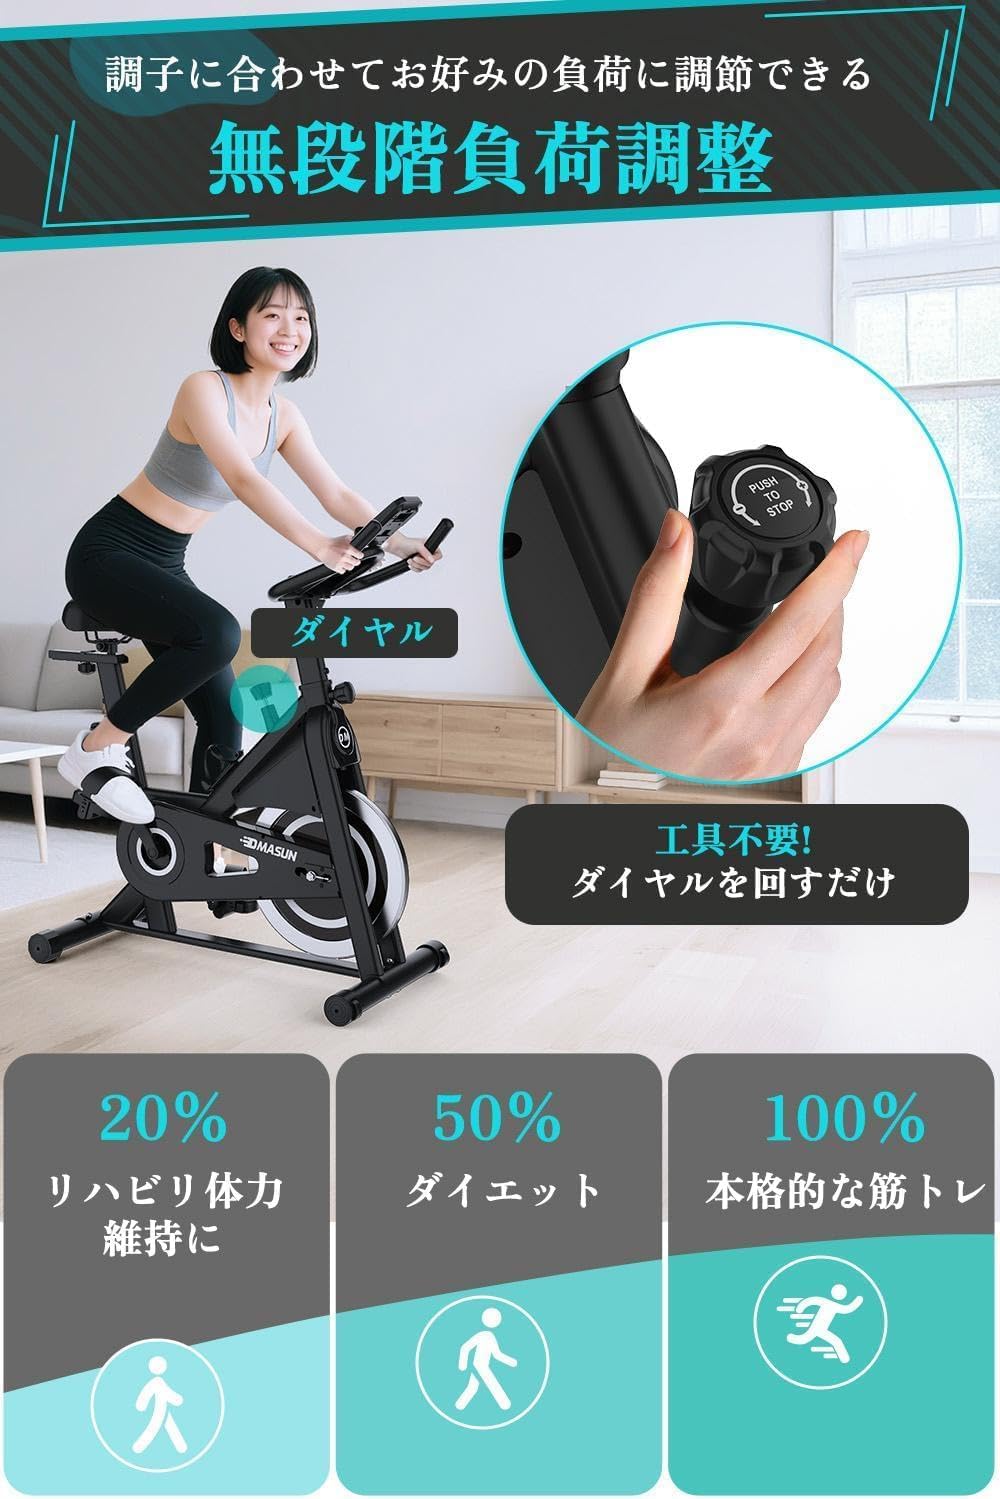
Image 6.3: Resistance Adjustment Knob
6.4. Digital Monitor Functions
The digital monitor tracks your workout data. Press the MODE button to cycle through different display modes (Time, Speed, Distance, Calories, Odometer, Pulse). Hold the MODE button for 3 seconds to reset all values (except Odometer).
Video 6.4: DMASUN Exercise Bike Overview (includes monitor usage)
7. Maintenance
Regular maintenance ensures the longevity and safe operation of your exercise bike.
- Cleaning: Wipe down the bike with a damp cloth after each use to remove sweat and dust. Avoid abrasive cleaners.
- Inspections: Periodically check all bolts, nuts, and moving parts for tightness. Tighten any loose components.
- Lubrication: No specific lubrication is required for the magnetic resistance system.
- Storage: Store the bike in a dry, cool place away from direct sunlight and extreme temperatures. Use the transport wheels to move it easily.
8. Troubleshooting
Here are solutions to common issues you might encounter:
| Problem | Possible Cause | Solution |
|---|---|---|
| Bike is unstable/wobbles | Loose bolts; uneven floor. | Tighten all assembly bolts. Adjust the horizontal adjusters on the stabilizers to level the bike. |
| Squeaking/Grinding noise | Loose parts; friction from resistance. | Check and tighten all bolts. Ensure the resistance knob is not overtightened causing constant contact. |
| Digital monitor not working | Dead batteries; loose sensor cable. | Replace batteries. Check if the sensor cable is securely connected to the monitor and the bike frame. |
| Resistance not changing | Resistance mechanism issue. | Ensure the resistance knob is properly engaged. If the issue persists, contact customer support. |
9. Specifications
| Feature | Detail |
|---|---|
| Brand | DMASUN |
| Model | Home Exercise Spin Bike |
| Color | Black |
| Material | Aluminum |
| Load Capacity | 150 kg (300 lbs) |
| Product Dimensions | 97 x 19 x 76 cm |
| Product Weight | 26.5 kg |
| Power Source | Battery (for monitor) |
| Resistance Type | Magnetic, Adjustable |
| Recommended Use | Indoor |
10. Warranty and Support
Your DMASUN Home Exercise Spin Bike comes with a 5-year manufacturer's warranty. This warranty covers free repair or replacement services in the unlikely event of a malfunction. Please note that while some older manuals may state a 1-year warranty, all customers who purchased on or after December 1, 2023, are eligible for the 5-year warranty.
For any questions, concerns, or warranty claims, please contact DMASUN customer support through your purchase platform or the official DMASUN website.